The Summer Edition. Beach House Baking. Peach and Ricotta Breakfast Muffins.

Peach and Ricotta Muffin Tray

We’ve all been there. Booked a long weekend or holiday getaway at an idyllic, secluded beach house. Far from the maddening crowds. And the nearest convenience store. The car is loaded up with enough provisions to tide the family over for the duration of the stay. Nothing too fancy. Kitchen equipment at holiday rentals, more often than not is notoriously basic, encouraging a welcome paring back of meals.  The emphasis is on anything tasty and delicious that is quick and easy to prepare. Invariably involving alfresco dining and the firing up of a barbecue.

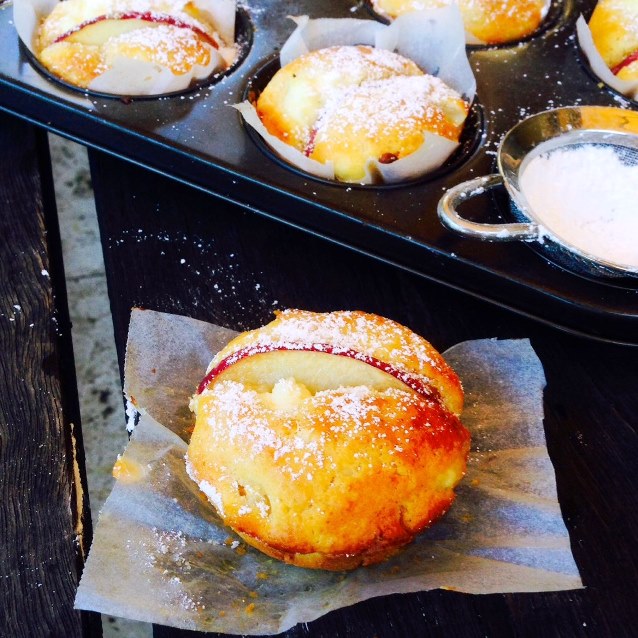
After an early morning swim, nothing is more inviting than a tray of freshly baked muffins and a pot of coffee. The beauty of this recipe is that it requires no fancy equipment; just a bowl, a cup, a jug, a wooden spoon and a muffin tin. The perfect no-fuss recipe for the holidays. Here in Australia we like to use cup measurements. For baking a standard cup equals 250ml. I must confess I usually remember to pack a muffin tray and measuring cup, but if not the proportions for this recipe work using an ordinary breakfast cup from the kitchen cupboard. Ordinary baking paper cut into squares replaces paper muffin cases. Thankfully I have never come across a kitchen without a bowl and wooden spoon.

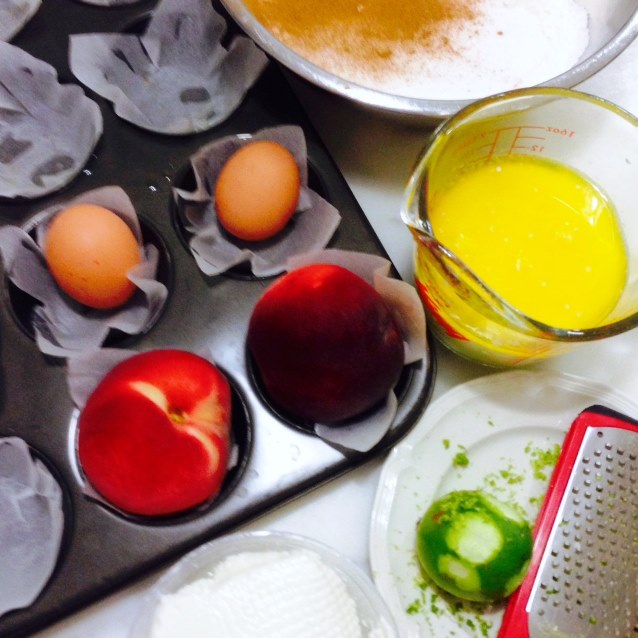
The secret to perfect muffins every time? It’s easy when you know how.  Stir the dry ingredients together in a bowl. Combine the wet ingredients together in a jug. Pour the wet on top of the dry and fold together very gently. Scoop the batter into well greased (or paper-lined) muffin tins, making sure they are no more than 3/4 full.  Bake in a preheated oven until golden.

Peach and Ricotta Muffins

At this time of year trays of perfectly ripe peaches are readily available for a song at country roadside produce stalls. I love the combination of peaches and ricotta in my muffins. It reminds me of the classic combination of peaches and cream. Often I will remember to pack a tub of ricotta in my esky, but occasionally have resorted to making my own.  From just three ingredients; milk, lemon juice and salt as described in an earlier post, Simple Cheese Making at Home. Warm Breakfast Bruschetta With Fresh Ricotta and Honey. Or any even easier option? Leave out the ricotta entirely. The end result is a little less luscious but still incredibly delicious. Fortunately, this recipe is extremely adaptable and works with any combination of fresh fruit and berries. The perfect breakfast muffin recipe for a holiday getaway.

Peach and Ricotta Breakfast Muffins

Peach and Ricotta Breakfast Muffins
Makes 12 large Texas style muffins or 18 regular sized muffins
Use a standard 250ml capacity cup for this recipe

2 1/2 cups  self-raising flour
2/3 cup caster sugar
2 eggs
3 tablespoons unsalted butter, melted
1 cup  milk
1 cup full-fat ricotta
2 medium peaches, ripe but firm, stones removed and thinly sliced
finely grated zest and freshly squeezed juice of 1 lime
icing sugar, for dusting (optional)

PREHEAT oven to 180 C.
LINE a muffin pan with squares of baking paper.
PREPARE the peaches. Cut unpeeled fruit in half and remove the stones. Slice one peach half finely into 12 slices for large muffins or 18 for regular sized muffins. The slices will be used for the topping. Dice the remaining peach halves for the filling.
ADD lime zest and juice to the peaches. Set aside.
SIFT the flour  into a large bowl. Add the caster sugar and stir to combine.
PLACE the eggs, butter and milk in a jug and whisk to combine.
ADD the liquid ingredients to the dry ingredients and stir until just combined.
STIR three-quarters of the ricotta and all of the diced peaches into the batter.
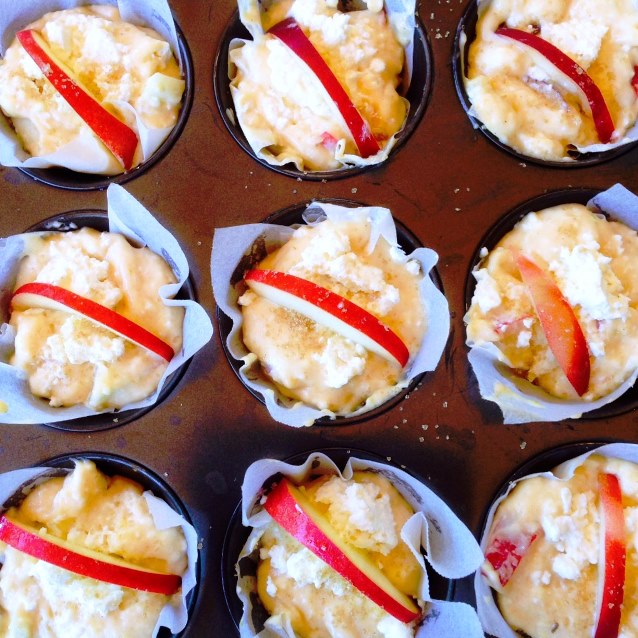
PLACE heaped tablespoons  of the batter in each muffin case.
TOP each muffin with thin slices of peach and a little of the remaining ricotta.
BAKE in hot oven, middle shelf position for 20-25 minutes until golden.
DUST with a little sifted icing sugar (optional).

Posted in Baked, Breakfast, What I Love to Cook | Tagged , , , , , | 17 Comments

Eat, Fast and Live Longer.A 5-2 Fast Day Meal Idea Under 300 Calories. A Mediterranean Grilled Haloumi and Summer Vegetable Salad.

 Mediterranean Grilled Haloumi and Summer Vegetable Salad

When the temperatures soar the last thing I want to do is spend hours in a hot kitchen preparing an evening meal. On hot, balmy evenings the barbecue is  my best friend. Relaxed, alfresco cooking and dining. Pared back and laid back. No wonder this is my favourite time of year.

Another fast day, another  summer salad. This time it’s all about the taste of the Mediterranean. Making good use of fresh seasonal produce; pendulous  eggplant, sweet capsicum,  plump tomatoes, crisp lettuce and fresh herbs. Perfectly ripe and bursting with flavour, all that is really required is a quick sear on a hot grill. Combine with  salty haloumi and a tangy dressing. Voila  dinner is served. A perfect 5-2 fast day meal for just 260 calories per serve.

A Mediterranean Grilled Haloumi and Summer Vegetable Salad
Makes approximately 6 cups (260 calories per cup serve)

2 medium sized eggplant (180 calories)
2 capsicums (62 calories)
1 punnet (250g) cherry or grape tomatoes (54 calories)
180g haloumi cheese (612 calories)
2 tablespoons olive oil, for brushing (240 calories)
sea salt and freshly ground pepper
100g mixed salad leaves, radicchio, endive and rocket (17 calories)
1/2 cup picked herb; basil, mint  and oregano, to garnish  (2 calories)

Dressing
1 clove garlic, finely chopped (4 calories)
finely grated zest and juice of one lemon (12 calories)
1 tablespoon balsamic vinegar (12 calories)
3 tablespoons extra virgin olive oil (360 calories)

To Prepare The Vegetables

SLICE eggplant into 1 cm  thick pieces and sprinkle each side with salt. Allow to sit in a colander for about 30 minutes to release some of its bitterness. Rinse the salted eggplant. Drain and pat dry. Set aside.
SLICE  the block of haloumi  into 12 thick slices, set aside.
PREHEAT the barbecue or a large griddle pan to medium-high
PLACE whole capsicums directly onto the barbecue  and grill for 15 -20 minutes, turning occasionally to ensure the skin is evenly blistered and nicely charred.
TRANSFER the charred capsicum to a plastic bag and twist top to seal. Stand for 10 minutes. When cool enough to handle peel and discard seeds. Cut flesh into long, thick strips. Set aside.
PLACE the cherry tomatoes onto the barbecue plate and grill for a few minutes until skin is just beginning to blister. Remove to a plate and set aside to cool.
BRUSH the haloumi cheese and eggplant slices lightly with olive oil.
GRILL the eggplant slices in batches until nicely charred with golden brown grill marks about 3 minutes. Turn the eggplant slices  and grill until tender with golden brown stripes on the second side. Eggplant will be cooked  when the flesh becomes slightly translucent. Remove to a plate and cover tightly with foil. The eggplant will continue to cook and soften.
GRILL the haloumi  cheese on both sides until golden brown. Set haloumi slices aside to cool slightly as you start to assemble the salad.

To Assemble The Salad
WHISK together the dressing ingredients in a small jar.
PLACE  mixed salad leaves into a medium bowl. Drizzle half the dressing over the salad leaves, and toss gently to combine. Season to taste with sea salt flakes and freshly ground pepper.
ARRANGE the dressed leaves on a platter. Scatter cooled, grilled eggplant slices, capsicum strips and blistered cherry tomatoes evenly over the leaves.
TOP with grilled haloumi slices. Drizzle the remaining dressing over the salad and garnish with picked herb leaves. Serve immediately at room temperature.

Posted in Cheese, Salads, What I Love to Cook | Tagged , , , , , , , , , | 2 Comments

The Summer Edition. The Nostalgia Of The Soda Syphon. Home-made Strawberry Cordial With Lemon and Lime.

Our family enjoyed a very fizzy Christmas this year courtesy of a fire engine red SodaStream. Ostensibly purchased as a Secret Santa gift for my husband, it has well and truly captured the imagination of my delighted teenagers. A very modern reinterpretation of the retro vintage soda syphon of my childhood. I well remember the ready supply of boxes of single use Sparklet  steel gas bulbs in our kitchen pantry waiting to be screwed into our soda syphon. These have been sensibly replaced in the current reincarnation by a multi use rechargeable gas canister. So…what’s old is new again with a new generation mesmerised by the satisfying hiss of freshly carbonated water.

Whilst I love the aesthetic of this shiny, new appliance on my kitchen bench, I prefer my soda water unflavoured.  The old fashioned way. Back in the day the soda syphon was considered tres chic and the height of sophistication, used  by our parents when entertaining to prepare spritzers and aperitifs.  On rare and very special occasions we  were lucky to be allowed a glass of soda sweetened with just a little cordial.

Our brand new  SodaStream has been cleverly marketed with  a mind boggling array of flavours and colours.  Suffice to say, my teenagers are now merrily working their way through  a bumper syrup sampler pack which accompanied the purchase.  Many of the flavours are nostalgically reminiscent of another long lost summer ritual of yore.  The weekly delivery, by flat bed truck, of a  crate of  a mixed dozen of brightly coloured soft drinks  to our door.  A service popularly provided by any number of small, independent  local  bottlers;  Loys, Crystal, Shelleys or  Tarax spring to mind. How eagerly we awaited the  arrival of those clinking glass bottles filled with exotic flavours; creaming soda, traditional orange, lemon squash, cherry cheer, lime, portobello and sarsparilla to name but a few.

This week fragrant punnets of sweet strawberries were in plentiful supply at the markets. Beautifully ripe and at their seasonal best. To me they represent the true taste of high summer, and the  perfect opportunity to introduce my family to the simple delights of an old-fashioned but incredibly refreshing home-made strawberry cordial.

The recipe couldn’t be easier, involving no cooking at all.  A crystal clear, cloudless cordial syrup requires just a little patience. The steeping of peak season berries in a simple sugar syrup over a minimum 24 hour period before straining and decanting into a glass bottle. I like to add a little zing to my cordial with the inclusion of  both lemon and lime. Black pepper helps to  intensify the flavour of strawberries, bringing  out their natural sweetness.

Traditionally all cordials are made with the addition of a little citric acid to act as a preservative and enhance  flavour and improve longevity. Citric acid is readily available in Australia in the baking section of supermarket shelves, but may be a little more difficult to come by in other countries. Omitting citric acid from the recipe simply means the cordial should be stored in the refrigerator and used within the week.

Those commercially available syrups might be convenient and easy to use, but nothing quite compares to the refreshing deliciousness of a home-made fruit cordial. My taste testers definitely agree.

Home-made Strawberry Cordial With Lemon and Lime
Makes two 350 ml bottles

500 g (2 punnets) strawberries, hulled & cut in half
1 small unwaxed lemon, thinly sliced
1 small unwaxed lime, thinly sliced
2 1/2 cups white sugar
2 teaspoons citric acid
1 1/2 cups water
a generous grinding of black pepper

PLACE the strawberries and lemon in a large ceramic or glass bowl with  sugar, citric acid and black pepper.
BRING water to the boil and pour over strawberries, stir ring until all the sugar has dissolved.  Use a clean spoon to check sweetness, add a little more sugar if required.
COVER with plastic wrap and place in the refrigerator for 24 hours  to allow the syrup to steep and flavours to infuse.
USE  a clean spoon to taste the concentrate.  If you prefer a more intense strawberry flavour allow to steep in the  refrigerator for up to a further 24 hours before straining.
STRAIN through a cloth lined sieve and decant into sterilised bottles.
SERVE diluted to taste  with still or sparkling water. For a delicious cocktail dilute with  champagne or prosecco.

Posted in What I Love to Cook, What I Love to Drink | Tagged , , , , , , , , , , | 12 Comments

The Summer Edition. Folding With Filo. Spinach, Herb and Cheese Triangles.

Summer is all about simple meals that make good use of seasonal produce. Bursting with flavour the ingredients often don’t need very much preparation at all. On hot, sweltering days we love a casual mezze style of eating.  Char grilled vegetables, hummus, tzatziki, baba ganoush, olives and loads of flat bread.  Perhaps a little skewered and barbecued meat.

Arriving home from holidays with armloads of silverbeet and chard from my father’s garden, my family asked if I would make little spinach and cheese triangles for them.  Perfect accompaniments for any mezze feast. I must admit my heart sank a little. As much as I adore these little flaky filo treats, I’ve always thought them to be a little too time-consuming and fiddly to make. Why go to all that effort when a simple spanakopita; spinach and cheese pie, tastes just as delicious and is so much quicker and easier to prepare?

Pester power finally gave way to compromise. I’d prepare the filling and provide a quick tutorial on how to fold the filo.  Anyone who preferred spinach and cheese triangles over a pie would be quite welcome to assemble them.  And so it transpired; the least culinary minded of my daughters found she had quite a knack for folding pastries and managed to produce 16 small triangles and 24 larger ones at lightning speed. But only after  persuading her sister to tidy up the kitchen after her.  Unsurprisingly their  brother emerged, only  after all the hard work was over. No doubt lured by the delicious aroma of those pastries  baking in the oven. Somehow I think once his sisters are a little older and wiser, circumstances may be a little different.

We had a very casual and very early dinner that evening. Alfresco dining on the back deck. There was much discussion about what other delicious fillings could be wrapped in filo pastry. Lamb with pine nuts, caramelised onions and goats cheese, pumpkin and ricotta, or  nuts and chocolate for something sweet. With a very nimble fingered sous filo pastry chef in the house  to assist, I’m sure I’ll now be more than willing to give these a try.

This slideshow requires JavaScript.

Spinach, Herb and Cheese Triangles
Makes 48 small or 36 large triangles, or any combination of both

For the Pastry

1 box (24 sheets) pre-packaged filo pastry
75g butter melted

For the Filling

1 large bunch silverbeet or chard (or 3 bunches English spinach) leaves stripped from stems and ribs, washed, dried and finely shredded.
4 tablespoons olive oil
50g butter
5 long green spring onions (shallots) chopped
½ small bunch mint, chopped
½ small bunch parsley, chopped
1 small bunch rocket, chopped
zest of one lemon, finely grated
300g (1 ½ cups) ricotta, crumbled
100g (1 cup) feta, crumbled
40g (1/2 cup) parmesan, grated
2 large free range eggs
2 tablespoons sour cream
generous pinch of grated nutmeg
sea salt and pepper to taste

To Prepare The Filling

ADD oil to a heavy based saucepan and gently sauté the spring onions for 5 minutes on low heat. Add butter keeping saucepan on low heat until butter has melted. Remove from heat and add mint, parsley and lemon zest. Allow flavours to infuse.
MEANWHILE sauté the shredded spinach, chard or silver beet in a fry pan with a little olive oil until just wilted. Take off the heat to cool.
TRANSFER the cooked spinach /silver beet to a colander to drain, making sure you squeeze any excess moisture from the leaves. You can do this by hand or wringing the cooked mixture through a clean, dry towel or chux super wipe cloth.
IN a large bowl, combine cooked and thoroughly drained silver beet, rocket, egg, sour cream, ricotta, feta and parmesan with the herb butter mixture.
SEASON to taste with nutmeg, sea salt and a good grinding of pepper.

To Prepare The Pastries

PREHEAT oven to 200 degrees C.
UNROLL the filo pastry sheets on a flat surface. Keep a damp tea towel over the sheets while you work.
LAY out a sheet of filo pastry on a clean work surface, brush with melted butter and cover with a second sheet. Butter the top sheet and cut the filo lengthwise into three (for larger pastries)  or four  (for smaller pastries) strips.
SPOON  two  rounded teaspoons of filling on  one short end of each strip for the smaller pastries (use a tablespoon of mixture for larger pastries).
FOLD the end of each strip over the filling so it forms a triangle. Continue folding the strip as you would a flag to create a neat triangle. Ensure the filling is totally enclosed by flipping the triangle along the pastry strip diagonally from corner to corner as shown in the accompanying slideshow. Use a little melted butter to secure the ends.
TRANSFER the folded pastries, seam side down, to a  baking paper lined oven tray and cover with a clean tea towel as you repeat the process with the remaining filo sheets and filling.
BRUSH the tops of the pastries with a little butter and a light sprinkling of sea salt. Bake for  15 -20 minutes or until crisp, puffed  and golden brown. Serve warm.

Posted in Small Bites, To Serve with Drinks, Vegetables, What I Love to Cook | Tagged , , , , , , , , , , | 4 Comments

Eat, Fast and Live Longer. Eating Clean. A 5-2 Fast Day Recipe Idea Under 300 Calories. Roasted Beetroot and Carrot Salad With Puy Lentils, Rocket And Feta.

Roasted Beetroot And Carrot Salad

My first post for 2014. Proof that I have well and truly been in laid-back holiday mode. Yesterday I even fielded a couple of phone calls and text messages asking if everything was alright as I hadn’t posted for a while. No rest for the wicked or gluttonous it seems.

Back in Sydney after an extended New Year  break, it’s time to redress all those excesses of a very sociable and pleasurable festive season. It’s true, as planned,  I reverted to a 6-1 fast day format for Christmas week, but will confess I  blithely and conveniently carried that schedule over to the following week. Was one day of restricting my eating to just 500 calories enough to undo the damage of the feast?  Probably not.  I vaguely remember hearing that the average Australian consumes an additional 500 calories a day over the Christmas – New Year break. Enough said. That’s  well and truly too much food for thought, no other impetus required to get back on the programme. Happy and satiated, thankfully without having to loosen my belt buckle. The key to a successful eating plan? As Oscar Wilde would say, “everything in moderation, including moderation”.

So this week we are kick starting 2014  by eating clean. With an emphasis on seasonal, whole food.  So very easy to achieve considering we returned home with the boot of our car  laden with the bounty of my father’s summer garden. I’m adapting recipes to use what is seasonally available. It’s all about whole food, no preservatives, no artificial colouring and flavourings.

Yesterday we transformed armload’s of spinach, chard, rocket,  mint and parsley into  Spinach, Cheese and Herb Phylo Pastry Triangles. Today I’m roasting trays of garden fresh beets and carrots for a deliciously healthy salad. Finely diced they will be tossed with puy lentils, shredded peppery rocket, tangy crumbled feta and a  lemon and mustard vinaigrette. An incredibly  colourful and flavourful plate of food that’s surprisingly filling and very, very good for you for just 286 calories a serve. For the ravenously hungry, this salad goes down a treat with a roast leg of lamb. It’s well worth noting for the record though, that each medium sized slice of roast lamb accounts for an additional 75 calories.

Roasted Beetroot and Carrot Salad With Puy Lentils, Rocket and Feta.

Roasted Beetroot and Carrot Salad With Puy Lentils, Rocket and Feta
Makes about 6 cups (286 calories per cup)

Ingredients

For The Lentils
1 cup French puy lentils or Australian blue lentils (678 calories)
1 garlic clove (4 calories)
1 small sprig rosemary (2 calories)
1 teaspoon bicarbonate of soda (0 calories)

For The Roasted Beetroot
4 medium-sized beetroot (140 calories)
1/2 tablespoon olive oil (60 calories)
1 tablespoon  balsamic vinegar (12 calories)
4 cloves garlic, whole and unpeeled (16 calories)
2 small sprigs rosemary (4 calories)
sea salt and freshly ground pepper

For The Roasted Carrots
12 baby carrots (48 calories)
1/2 tablespoon olive oil (60 calories)
sea salt and freshly ground pepper

For The Dressing
4 cloves roasted garlic, removed from the roasted beetroot, garlic squeezed out of skins and mashed with a fork (16 calories – already counted from roasted beetroot)
1 tablespoon whole grain mustard (24 calories)
2 small golden shallots, about 2 tablespoons finely diced (14 calories)
finely grated zest and juice of one lemon (12 calories)
1 tablespoon balsamic vinegar (12 calories)
3 tablespoons extra virgin olive oil (360 calories)
sea salt and freshly ground pepper, to taste

1 cup rocket, shredded (6 calories)
100g feta cheese, crumbled (264 calories)

Method

To Roast Beetroot
PREHEAT oven to 200 C.
WIPE or scrub beetroot clean. Place on a large piece of foil; drizzle with olive oil and balsamic vinegar.
SCATTER over garlic cloves, rosemary and salt and pepper.
WRAP foil around beetroot to form a neat packet. Roast in middle of oven until tender, about an 1 hour depending on the size of the beetroot. Test by piercing the largest beetroot with a knife. If it enters easily, it’s ready.
UNWRAP  and let sit until cool enough to handle. Save roasted garlic cloves for dressing. Use your hands or a paring knife to peel skin, then finely dice beetroot. iSet aside.

To Roast Carrots
MEANWHILE prepare the carrots for roasting. They will require less time in the oven than the beetroot.
WIPE or scrub carrots  clean. Place on a large piece of foil; drizzle with olive oil and season with salt and pepper.
WRAP foil around carrots to form a neat packet. Roast in middle of oven until tender, about 1/2 an hour.
UNWRAP  and let sit until cool enough to handle.  Use a paring knife to peel skin, then finely dice. Set aside.

To Prepare The Lentils
PLACE  the lentils in a medium saucepan with 2 1/2 cups water, bicarbonate of soda, rosemary and garlic. Bring to the boil and simmer for 20 minutes or until just tender and retaining some bite. Remove garlic and rosemary. Drain. Set aside.

To Prepare The Dressing
PLACE the lemon zest, shallots and roasted, mashed garlic cloves into a screw top jar.
ADD the lemon juice, mustard , balsamic vinegar and olive oil.
SECURE the lid and shake the jar vigorously to emulsify.
SEASON to taste with sea salt and freshly ground pepper. Set aside.

To Assemble The Salad
PLACE cooked lentils into a large mixing bowl. Add diced beetroot and carrots and prepared dressing.
TOSS well to combine. Season to taste.
COVER and allow to sit for 30 minutes before serving to allow flavours to meld.
JUST before serving, toss through the shredded rocket and generously scatter crumbled feta cheese over the salad.

Posted in Salads, What I Love to Cook | Tagged , , , , , , , , , , , , | 9 Comments

The Summer Edition. Sunshine And Happiness On A Stick. Sweet And Spicy Mango, Lime And Chilli Paletas.

Mango season is well and truly in full swing over our Christmas and New Year period. Lusciously ripe and abundant we have been buying mangoes by the tray, and storing them on the bottom shelf of the fridge, ready to eat at a moment’s notice. Sweet and juicy, they’re incredibly refreshing on a hot summer’s day but so very messy to eat. Just try eating one without juice dribbling all over your hands and down your arms. Perhaps that’s why some people swear the best place to eat a mango is in the pool or by the water.

I sometimes think its such a pity that mango and cherry season coincides with our Christmas celebrations when there is so much competing deliciousness on offer. Each year it’s the same story. Every last centimetre of fridge space is crammed full with all manner of appetising titbits,  catering  to even the fussiest palates. When the whirlwind of festivities stops, there are rather a lot of leftovers to contend with, in a short space of time, before we slide into summer holiday mode.

What to do with that very last tray of mangoes languishing on the bottom shelf before   departing for your holidays? My latest obsession is to transform them into Sweet and Spicy Mango, Lime and Chili Paletas. I’ve written about these frozen Mexican ices before in one of my earliest posts Hola. Mad About Paletas. The secret is out. These treats  are a wonderfully delicious way to use up all manner of seasonal fruit. Indeed the riper the fruit, the sweeter and more addictive the paleta. The process is so very easy to master.. So  much so we’ve tried all manner of flavour combinations; strawberry and balsamic, roasted banana, raspberry and hibiscus tea, and a 5-2 fast day version watermelon and mint.  Mango, chilli  and lime may sound like a rather strange combination, vaguely reminiscent of a salsa, but it works. All sunshine and happiness on a stick.

Sweet and Spicy Mango, Lime and Chili Paletas
Makes 8 – 10 ices

If you don’t have conventional paleta moulds  improvise and use small disposable cups or shot glasses.

1/2 cup sugar
1 cup water
1 long red chilli, split in half and de seeded
4 (about 3 cups) mangoes, diced
juice and finely grated zest of 1 lime
1 teaspoon salt
1 teaspoon crushed red chillies

MAKE a simple syrup by combining the sugar and water in a small saucepan. Cook over medium heat, stirring  until the sugar dissolves.
ADD the long red chilli and simmer over low heat for five minutes. Take the saucepan off the heat and pour the syrup into a glass jar.
REFRIGERATE  until cool. Remove the chilli. Strain mixture through a fine sieve  before using.
FINELY dice one cup of mango and set aside.
PUREE the remaining mango with the  chilli infused simple syrup, salt, lime zest and juice in a blender until smooth.
STIR through the crushed red chillies and finely diced mango.
DIVIDE the mixture among the paleta moulds, remembering to leave up to a one centimetre buffer from the top of the moulds for expansion.
SNAP on the lids and freeze until mixture begins to set around edges, about 45–60 minutes. Insert sticks and freeze until solid, about 4 – 5 hours.
JUST before serving dip the moulds briefly in hot water to release the paletas.

Posted in Frozen, Fruit, What I Love to Cook | Tagged , , , , , , , , , | 15 Comments

The Summer Edition. Rediscovering Nostalgic Rituals. Fresh Prawn Baguettes With Shredded Lettuce And Aioli.

As much as I love Christmas and the celebration of  all the associated time-honoured traditions, it’s always such a busy, busy time of year. Coinciding  with the end of the school year and the start of our long summer holidays; it also happens to be an incredibly social time of year. A whirlwind of catching up with family, old friends and new. Feasting, reminiscing and catching up on a year in review. Sometimes it seems there’s barely time to draw breath. Until December 26 when the cacophony of chaos suddenly subsides. Time to kick back, take a deep breath and finally relax.

This year we are rediscovering the nostalgic summer rituals of my childhood. Sun, sea and surf. Long lazy days spent on the beach, swimming, reading and relaxing. A huge departure from our long standing Boxing Day trek to Niseko’s winter wonderland of snow and ice. As much as my family adores their skiing, we haven’t had a proper summer holiday in years. It’s time to sit back and unwind. Enjoy a slower pace of life and hopefully plough through that ever growing stack of holiday reading sitting patiently on my bedside table.

Summer ritual number one. Crusty baguettes filled with freshly cooked prawns, crisp iceberg lettuce and lashings of home made mayonnaise. When I was young my family would decamp to the  picturesque seaside town of Burrill Lake in January. Perched on the edge of a salt water estuary. There were oyster beds on the rocks and we spent the summer fishing for flathead and bream. Occasionally we tried our luck catching lobsters with lobster pots. With very mixed results.  One of our favourite holiday activities, however, was to try to catch ourselves a feed of prawns.

The nets came out for prawns at night. But only under the cover of darkness of  a new moon, and only when the tides ebbed out to the ocean,  in summer months containing an “r”. According to the sage locals these were ideal conditions for the running of the prawns. Daylight was the enemy for the prawn. Laying low buried from predators, in the  safe haven of the sandy flats of the lake, schools of prawns took advantage of the darkness of moonless nights to swim en masse through the channel out to the deeper waters of the sea.

And so it was on prawning  nights the entire lake was illuminated with dancing firefly lights as whole families brandished nets and kerosene lanterns and tried their luck wading knee-deep for crustaceans on the sand flats and the channels.

Those were the carefree days before recreational fishing licenses were required from the NSW Department of Primary Industries. No special equipment needed. Most families made do with just three items. A lantern, a plastic bucket and a long handled net to scoop those running schools of prawns. For the squeamish amongst us a pair of old sand shoes may have been optional, but in my mind, mandatory to avoid treading on any lurking nasties with my bare feet while wading around that lake. I well remember the envy inspired in us all, the year my father invested in a pair of rubber waders. The bees knees in prawning paraphernalia.

Nothing tasted sweeter for breakfast in the morning than freshly cooked prawns served up in crusty bread rolls delivered to our door by the travelling bakery van. In memory of those languid summer holidays, here is a modern take on that humble and delicious prawn roll. In the spirit of slowing  down this January and taking time out to relax and smell the roses, I’m introducing the concept of a Summer Edition for my blog. Posting a little less often and definitely more sporadically, refusing to be ruled by the vagaries of potentially unreliable holiday spot internet connections. Taking the road less travelled to find some new inspiration.

Fresh Prawn Baguettes with Shredded Lettuce and Aioli
Serves 6

2 crusty baguettes or French sticks
1/2 – 2/3 cup aioli (recipe follows)
1kg freshly cooked prawns, peeled (recipe follows)
1/2 iceberg lettuce, shredded
lemon and freshly ground pepper, to serve

CUT each baguette into 6 even portions. Split open and spread the inside of each portion generously with aioli.
DIVIDE the shredded lettuce and peeled prawns among the baguettes.
SEASON with freshly squeezed lemon and cracked pepper.

For the Freshly Cooked Green Prawns

1kg green prawns
plenty of water
2 tablespoons sea salt

BRING 2 1/2 litres of water to a rolling boil in a large saucepan with  2 tablespoons of sea salt.
ADD whole, unpeeled green prawns to the pot.
ALLOW water to return to the boil, then continue cooking for a minute or so for small to medium prawns or 3 minutes  for larger  prawns. When ready the prawns will float to the surface, and be opaque and slightly pink in colour.  Their flesh should shrink slightly from the shell.
REMOVE prawns from boiling water when cooked and place immediately in iced water to prevent overcooking.
DRAIN. Refrigerate in a covered container. Peel just before serving.

For the Aioli
Makes just over 1 cup.

1 egg
1 tablespoon lemon juice
2 cloves garlic, grated
sea salt and ground white pepper
1 cup (250ml) olive  oil

PROCESS or blend the egg, lemon juice, garlic, salt and pepper in a food processor or blender until well combined.
WITH the motor running, pour the oil in very slowly in a thin stream and process until the mixture is thick and creamy.

Posted in Marinades, Pastes and Dressings, Seafood, Small Bites, What I Love to Cook | Tagged , , , , , , , | 8 Comments

Fuss Free For A Very Cool Yule. Christmas Pudding Ice Cream With Chocolate Ice Magic Topping and Cherries.

With the Christmas party season in full swing and preparations for the big day well under way, there seems to be very little time to sit back, relax and smell the roses.  Throw in a little heat and, dare I say it, I’m exhausted.  Today temperatures reached 42C in Sydney, signalling that summer has well and truly arrived. It’s time to slow down and take the easy road. In keeping with that  here is a very clever cheat. Christmas Pudding Ice Cream With Chocolate Ice Magic Topping and Cherries.  Fuss free for a very cool yule. Simple, elegant and understated. So incredibly easy to assemble, it really doesn’t qualify as a recipe.

The beauty of this dessert idea is that it can be as simple or elaborate as you like. It uses just a handful of ingredients, store bought of home-made, its up to you; Christmas fruitcake or pudding, the very best quality vanilla ice-cream, a little liqueur, ice magic (chocolate shell) topping and fresh cherries. My favourite seasonal Christmas flavours, all on one very simple plate.

For a little bit of theatre I like to make this up as one large two litre or eight cup pudding, although this recipe is infinitely adaptable to any combination of smaller sized moulds. Who needs flaming brandy when the simple act of pouring ice magic onto the ice-cream pudding at the table evokes a chorus of  wide-eyed oohs and aahs as the liquid topping makes contact with the cold ice-cream and hardens into a crisp chocolate shell. Yes this definitely is  a dessert for the young at heart. For maximum impact, serve extra ice magic on the side for guests to pour over cut slices of ice-cream pudding.

I’ve included a hyperlink  in the recipe to my earlier ice magic post. Making your own takes just moments, and the result is all natural and much better for you than the commercial hydrogenated variety. And, for completeness, I have included hyperlinks back to our family’s favourite Christmas fruitcake and pudding recipes. Perhaps this idea is the perfect dessert  solution for all that leftover pudding.

I’m not sure when I will find the time to publish another post, so am taking this opportunity, from my family table to yours, to wish you a very merry Christmas and all the very best for good health, happiness and prosperity in 2014.

Christmas Pudding Ice Cream With Chocolate Ice Magic Topping and Cherries
Serves 8

For The Ice-Cream Pudding
500g Christmas fruitcake or pudding, store bought or home-made
1.5 litre tub of very best quality vanilla ice-cream
50ml Kahlua or your favourite liqueur (for a non-alcoholic version use fruit juice)

To Serve
1/4 cup ice magic (chocolate shell) topping
250g fresh cherries

LINE a 2 litre (8 cup) pudding basin or tall glass bowl with plastic wrap, allowing a 10cm overhang.  Place in the freezer or refrigerator to chill as you prepare the ice-cream pudding mixture.
REMOVE ice-cream from the freezer and allow to soften slightly.
CRUMBLE the fruitcake or pudding into a large bowl. Sprinkle over the Kahlua. Stir to combine, allowing flavours to meld for 5-10 minutes before adding ice-cream.
ADD softened ice cream. Stir well; ensuring the pudding  is evenly distributed throughout.
SPOON the mixture into the chilled pudding basin. Smooth the surface, tap the basin lightly on the kitchen bench to remove any air pockets  and fold over excess plastic wrap before freezing until firm, about 6 hours or overnight.
WHEN READY TO SERVE, unmould the ice-cream pudding onto a serving platter. Pour over  the chocolate ice magic topping, it will harden into a chocolate shell as it comes into contact with the cold ice-cream. Garnish with cherries. Serve extra ice magic on the side.

Posted in Frozen, Sweet Treats, What I Love to Cook | Tagged , , , , , , , | 5 Comments

A Gift That Keeps On Giving. From The Eveleigh Farmer’s Market. My Hessian Herb Garden.

Last Saturday, free of my children’s sporting commitments, I spent all morning, (and a good part of the early afternoon) browsing the fabulous Eveleigh Farmer’s Market and surrounding cafes and antique stores. An all time favourite  activity that sadly has been usurped by the hustle and bustle of family life. There was a nostalgic time, long, long ago, when my Saturday morning routine  comprised of little more than collecting the weekend newspaper, adjourning to a favourite cafe for a long leisurely breakfast, and visiting the local markets for farm fresh fruit, vegetables and flowers.

When my children were very young, I doggedly followed that routine, albeit not in as a relaxed fashion. Bribing them with baby cappuccinos and an assortment of tasty titbits from the always obliging, always engaging and smiling stallholders. There came a time, however, when their busy schedules took over and my leisurely Saturday mornings were sacrificed to the time consuming madness of criss-crossing Sydney in the deference to the holy grail of Saturday sport. How I love school holidays and the opportunity to relax and rediscover a more leisurely pace of life. Me time has evolved into a jealously guarded commodity, and so it was that my friend Ros and I conspired to reclaim our Saturday morning.

This gorgeous hessian herb garden comes from a whimsically named stall Julie’s Garden Path at Sydney’s inner city  Eveleigh Farmer’s Market. The exotic and not so readily available Japanese shiso  caught my eye. Beautifully planted in a hessian sack. On closer inspection I was delighted to find the planting included  an interesting and vibrant array of other herbs; green and purple Thai basil, rocket, oregano, thyme, chives and two varieties of chilli. Perfect for my back deck.  A Christmas present to myself, and subtle reminder to make more time for me.

I have always loved herbs and the romantic notion of nipping out to the garden and snipping a little bit of this and that to complement  my cooking. It’s what my mother and grandmother did. No wilting or decaying market purchased herbs in the refrigerator. The problem is  I’m no green thumb. Far from it.  I have an appalling track record of killing  plants.  Not  so much through neglect I suspect but with too much kindness. My father is still shaking his head over the latest casualty, a very robust chilli plant that managed to survive the frosts of a Canberra winter, before being transported to Sydney in the Spring.

A quick conversation with the stall holder, Julie, about my lack of gardening prowess ensued. It seems all I need to do to keep my hessian herb garden healthy is ensure the herbs do not get too much sun (easily achieved by rotating the position of the sack in my very sunny, north-facing courtyard), water sparingly (every other day, checking the soil retains a little moisture  at all times ) and snip often. These simple steps should ensure my little herb garden rewards me with a constant supply of fresh herbs over the next four months. A gift that should keep on giving. I’m determined to keep it alive and thriving. So far, so good.

Posted in Musings & Inspiration | Tagged , , , , , , , , , , , | 2 Comments

Eat, Fast and Live Longer. A Recipe Idea Under 200 Calories. Prosciutto Wrapped Chicken Thigh Fillets with Rosemary and Garlic.

Prosciutto Wrapped Chicken Thigh Fillets With Rosemary and Garlic

With Christmas just around the corner, there are endless opportunities for  my 5-2  resolve to fall by the wayside. Every Sunday I sit down and peruse my diary. Mondays are always unapologetically fast days. My goddess days. A good way to recover from my weekend indulgences. It’s scheduling in that second weekly fast day that is often problematic; particularly around mounting festive season social invitations.

Lately, I’ve modified my 5-2 diet approach to fast all day and save the majority of my calories for my evening meal.  Quite easy to do,  here in the Southern hemisphere in the midst of our summer, as long as I remember to stay well hydrated and busy. With careful and clever planning, this gives me leeway to share in the socialising and enjoy  a glass of wine or aperitif at night, even on a fast day.

One of my favourite summer meals is Prosciutto Wrapped Chicken With Rosemary and Garlic, incredibly delicious with it’s gutsy, robust Mediterranean flavours.  With just a little tweaking this dish is also perfectly suited to fast day feasting. Chicken thigh fillets are juicier and more flavoursome than breast meat, energy wise, however, they also carry a  slightly higher calorie count than breast. For comparative purposes 100g of skinless, boneless thigh fillet has an average  130 calories versus just 105 calories for breast.

The secret to successful 5-2 fasting lies in  keeping a close eye on portion size. The average serving size of one medium free range chicken breast fillet  is 300g, whilst the average thigh fillet is just 100g. The perfect, portion controlled size. Just one prosciutto wrapped thigh fillet seasoned with rosemary and garlic has a calorie count of just 187 calories. I like to serve this dish with roasted sweet potatoes (54 calories per small sweet potato) and a side salad of mixed greens (9 calories per cup shredded salad). Depending on my day I may or may not include a vinaigrette dressing (43 calories per tablespoon),

As an aside, I always buy free-range chicken. It’s non negotiable. It tastes better and is better for you According to The Sustainable Table  free-range chickens have 21% less total fat, 30% less saturated fat and 28% fewer calories than their factory-farmed counterparts. Now that’s food for thought.

Prosciutto Wrapped Chicken  Thigh Fillets with Rosemary and Garlic
Makes 6  portions (187 calories per portion)

6  free range boneless, free-range skinless chicken thighs, trimmed of fat  (600g)(780 calories)
6 very thin slices prosciutto (60g) (114 calories)
1 tablespoon olive oil (120 calories)
1 large clove garlic, finely chopped (4 calories)
1 sprig fresh rosemary, leaves stripped and finely chopped (2 calories)
freshly squeezed juice of 1 lemon (12 calories)
1 tablespoon balsamic vinegar (88 calories)
sea salt and freshly ground black pepper

kitchen twine, cut into six 15cm lengths

PREHEAT oven to 180 C.
COMBINE finely chopped garlic and rosemary in a small bowl.
LAY chicken thighs on work bench boned side up. Season with salt and pepper. Sprinkle generously with the garlic and rosemary mixture.
FOLD each thigh over to cover the seasoning and wrap in prosciutto.
SECURE with kitchen twine, as you would tie a parcel with string.
HEAT oil in a large frying pan over medium-high heat.
WORKING in batches add the prosciutto wrapped chicken parcels and sear, turning occasionally, for 5 minutes until prosciutto is brown and crisp.
TRANSFER to a medium-sized baking dish. Drizzle chicken parcels with lemon juice and balsamic vinegar.
BAKE in 180 C oven for 20 minutes or until chicken is cooked through. Using kitchen scissors remove the twine and discard.
TRANSFER chicken to a serving platter. Spoon over pan juices. Serve.

Posted in Pork, Poultry, What I Love to Cook | Tagged , , , , , , , , , | 4 Comments