Freshly Baked. Salted Peanut Cookies…With A Hint Of Cocoa.

Salted Peanut Cookies

It’s been a long, long time since I’ve made peanut cookies. So much so I had forgotten just how fabulous they can truly be. For too long I’ve overlooked using peanuts in my baking  in favour of  rather  more sophisticated almonds, pistachios, walnuts, pecans and macadamia.  Not surprisingly,  it’s high time I redressed the situation.  Easy to do given there is always a foil sealed packet of peanuts in my pantry – ready to be transformed at a moments notice into a spicy satay sauce or used to add all important crunch and texture to a pad thai, massaman curry or asian slaw.

With just a hint of cocoa and a lingering salty hit, these peanut cookies are crisp on the outside yet soft and chewy in the centre. My idea of cookie nirvana. Truth be told at one point I did consider throwing in a handful or two of dark chocolate chunks into the mix, but at the end of the day I’m glad I didn’t. Peanuts, chocolate and salt are indisputably a marriage made in heaven, but at the end of the day this version is all about allowing the mellow toasty flavour of roasted peanuts to come shining through. And it truly does… in spades.

Salted Peanut Cookies
Makes 24 large cookies

250 g unsalted butter, softened
1 cup soft brown sugar
1/2  cup white sugar
2 eggs
2 teaspoons pure vanilla extract
2 1/2 cups self raising flour
1 heaped tablespoon Dutch process cocoa
1 1/2 cups  salted peanuts

PREHEAT  oven to 180C and line 2 or 3 baking trays with baking paper.
CREAM butter and sugars until light and fluffy
ADD eggs and vanilla and beat again until well incorporated
SIFT flour and cocoa into the bowl and mix lightly.
STIR in peanuts.
DROP tablespoons of mixture about 5 cm apart onto the baking trays, flatten slightly. Alternatively you can shape the dough into a log, wrap in cling film  and freeze for about 15 minutes before slicing into 1 cm rounds and placing on trays for  baking.
BAKE for 10-12 minutes until pale golden.
COOL on the trays for 2-3 minutes, then move to a wire rack to cool completely.

Posted in Baked | Tagged , , , , , , | 5 Comments

Deep Dish Pizza Friday… With Garlic Prawns and Mozzarella Cheese

We’ve always had a weakness for pizza at our house. In all its many guises… wood fired oven baked, barbecued on terracotta pavers, fried on the stove top pizzette style. Last year we acquired a shiny red electric bench-top pizza oven, and promptly fell in love with speedy, thin crust pizza rendered perfectly crisp in 10 minutes flat. This spring we’ve done a complete about turn. Our new favourite? Old style deep dish pizzas with golden focaccia crusts sturdy enough to hold a mountain of delicious sugo infused toppings. They’re delicious hot or cold and are easily prepared in advance. One deep dish pizza easily feeds four hungry people. Two means that there are plenty of leftovers for lunches next day.

I’ve made deep dish pizza countless times over the last month or so. I love how effortlessly it comes together once the pizza dough has been kneaded and set aside to prove. So much so that I have taken to doubling the recipe and storing big batches of dough in the freezer. I figure I’m investing in economies of scale time wise; it really doesn’t take much longer to knead a bigger batch of dough and proving time is exactly the same. Ditto the tomato sauce or sugo.

Today’s offering is a garlic prawn and mozzarella cheese rendition, but feel free to substitute whatever toppings take your fancy. Sometimes I just add roasted vegetables, other times cured meats or crumbled Italian sausage. As always there are no hard and fast rules, the only limitations being the contents of your fridge and pantry, or perhaps your imagination. Buon appetito.

Deep Dish Pizza With Garlic Prawns

Deep Dish Pizza with Garlic Prawns


Start with the pizza dough.  You will need to start making the dough at least 2 hours before you need it. You can make it the day before or even earlier if you like. Dough can be stored in the refrigerator for a day or two and is also suitable to freeze.

Pizza Dough
For two large deep dish pizzas

1kg  Tipo ‘00’ flour
1 level tablespoon fine sea salt
4 ½  teaspoons dried yeast
1 tablespoon sugar
4 tablespoons extra virgin olive oil
650ml lukewarm water
½ cup finely ground semolina flour, for kneading

COMBINE flour and salt in a large mixing bowl
IN A SEPARATE bowl combine the yeast, sugar, olive oil and lukewarm water.  Leave to stand for a few minutes to activate the yeast.  When the yeast is activated the mixture will begin to froth. A useful rule of thumb for tepid water is one part freshly boiled water to two parts cold.
ADD wet ingredients to dry and mix to a soft dough.
DUST a work bench with semolina flour. Turn the dough out onto the bench and knead for 5-10 minutes or until the dough is smooth and springy. Use the heel of your hand to push and stretch the dough. Lift and fold it towards you, making a quarter turn. Continue kneading, turning the dough a quarter turn each time, for 10 minutes or until the dough is smooth.
PLACE the ball of dough into a clean oiled bowl and cover with a tea towel. Leave it in a warm place to rest and relax for about an hour or until it has nearly doubled in size.
WHEN the dough has risen, punch the dough with your hands to knock the air out of the dough. Lightly knead for a minute or two on a bench top that has been freshly dusted with semolina flour.
DIVIDE the dough in half into two large balls. Give each ball of dough a quick knead and leave to rest for about 15 minutes before stretching.

While pizza dough is proving prepare the tomato sauce and garlic prawns:

Tomato Sauce
For two large deep dish pizzas

2 tablespoons olive oil
2 medium brown onions, finely sliced into half moons
2 garlic cloves, finely sliced
2 x 400 gm tins of crushed tomatoes
sea salt and pepper

WHILE PIZZA DOUGH IS PROVING, heat olive oil in a heavy based saucepan over medium heat. Add onion and garlic and a generous pinch of salt. Cook for 3-5 minutes until onion is soft and translucent.
ADD tomatoes. Reduce heat to low and simmer gently for 15 – 20 minutes until tomato mixture has thickened and is reduced by half.
SAUCE may be prepared in advance and stored in the refrigerator in an airtight container, and is also suitable to freeze.

Garlic Prawn and Mozzarella Cheese Topping
For two large deep dish pizzas

750g green prawns, peeled
5 large cloves of garlic, minced
1 long red chilli, minced
1 large bunch parsley, finely chopped
2 tablespoons olive oil
sea salt and freshly ground pepper
1 x 250g ball mozzarella cheese, sliced

IN A LARGE BOWL, combine prawns, garlic, chilli, parsley and olive oil. Season with a generous pinch of sea salt and a good grinding of pepper.
SET ASIDE in the refrigerator to marinate for at least an hour. Prawns may be marinated in advance – overnight works well.

To assemble and bake the deep dish pizzas:

PREHEAT oven to 250 C. Line two 30cm x 25cm x 6cm deep tins with baking paper.
ROLL or stretch out dough to fit the tins.
LAYER each pizza with half of the tomato sauce, garlic prawns and mozzarella slices.
BAKE in hot oven for 20 – 25 minutes until crust is golden. If pizzas appear to be browning too quickly cover with a sheet of foil after 15 minutes. Remove from oven and allow to cool for 10 minutes or so before slicing.

Posted in Pizza | Tagged , , , , , , | 4 Comments

Eat, Fast and Live Longer. A 5-2 Fast Day Recipe Idea Under 200 Calories. Donna Hay’s Asparagus “Risotto” With Snow Peas, Mozzarella and Basil.

Asparagus Risotto With Snow Peas, Mozzarella and Basil

This post takes it’s inspiration from our in season abundance of  beautifully fresh and vibrant spring greens. Casting around  for something new and interesting to try, I recently stumbled across The Huffington Post’s article Donna Hay Has Reinvented Risotto and It’s Spectacular. A risotto containing no carbohydrates or rice.  Just tender,  in season asparagus spears blitzed in the food processor to resemble grains. A technique I’m very familiar with having already experimented with “ricing” our winter staples of cauliflower and broccoli in previous posts.

Donna Hay’s reimagined asparagus risotto is fresh and light. A welcome counterpoint to winter’s comforting and much starchier rendition. After witnessing a huge platter brought to the table seemingly inhaled before my eyes, I’m inclined to agree with Huff Post’s verdict that this version is pure genius. In my eyes, it’s a healthy, feel good bowl of green deliciousness. Even better it’s easily adapted into an inspired 5-2 fast day recipe idea.

Spring Greens

As much as I love fresh balls of buffalo mozzarella (and even more decadently creamy, oozy burrata; in my opinion most possibly the heavenliest cheese on earth), to render Donna’s idea into an effortless fast day offering I’ve halved the quantities of cheese used in her recipe and used lighter bocconcini.

As originally stated a 250g ball of buffalo mozzarella accounted for a whopping 595 calories. Undeniably significant when you consider all the remaining ingredients combined yield just under 520 calories. One simple substitution brings each enormously satisfying serve in at just 186 calories, with no dilution of any of the flavour and just a little of the richness. Of course I’d happily make this dish on a feast day, using as much buffalo mozzarella or its even creamier cousin; burrata as I please.

Donna Hay’s Asparagus “Risotto” With Snow Peas, Mozzarella and BasilAdapted from  The Huffington Post Donna Hay Has Reinvented Risotto and It’s Spectacular 
Serves 4 (186 calories per serve)

1 kg (about 8 bunches) asparagus (200 calories)
1 tablespoon extra virgin olive oil (120 calories)
1 brown onion, finely chopped (45 calories)
2 cloves garlic, crushed (8 calories)
3 cups (750ml) hot chicken stock (60 calories)
sea salt and cracked black pepper

To Serve:
200g snow peas, blanched and shredded (84 calories)
½ tub (110g) fresh bocconcini (mozzarella balls), torn  (225 calories)
½ cup fresh basil leaves (2 calories)

SNAP off woody ends of asparagus and discard. Place asparagus in large bowl of  food processor in two batches and pulse until it resembles rice. Set aside.
HEAT oil in a large saucepan over medium heat, add onion and garlic and cook for 2–3 minutes or until softened.
INCREASE heat to high, add asparagus, stock, salt and pepper and cook for 6–8 minutes or until asparagus is just tender.
DIVIDE asparagus risotto between bowls, top with snow peas, torn bocconcini balls and basil and sprinkle with pepper to serve.

Posted in Vegetables, What I Love to Cook | Tagged , , , , , , , , , , , | Comments Off on Eat, Fast and Live Longer. A 5-2 Fast Day Recipe Idea Under 200 Calories. Donna Hay’s Asparagus “Risotto” With Snow Peas, Mozzarella and Basil.

Fool-Proof Kitchen Short Cuts. Ricotta Gnocchi with Little Italian Sausage Meatballs in Tomato Sugo.

I know. I have a confession to make.  It’s been over a month since my last post. Not intentionally by any means, more of an unplanned sabbatical. Sometimes everyday life just takes over and before you know it time runs away.  Each day slips into the next, a week passes and then another.

Granted life has been busy chez nous, so it’s hardly surprising  starved of attention my once faithful muse abandoned me. Literally and figuratively. So much so I’ve merely been going through the motions in the kitchen. On rotation and uninspired; nothing new to write about there.

In the past month I also managed to miss my blog’s three year anniversary. Has it really been that long? Perhaps I simply ran out of puff. It’s often said it takes just a month to break or establish a habit, and I’m inclined to believe that statement might just be true.

In an attempt to reignite my mojo I’m easing myself back into blogging with a taster of the fool proof kitchen shortcuts that have been the mainstay of my family’s dinner table over the last few weeks. A perennial favourite in our house? Anything pasta and meatballs.

When time is scarce, I squeeze my “meatballs” out of the casings of  good quality Italian pork and fennel sausages into a simmering saucepan of tomato sugo (simply prepared using tinned tomatoes). Throw in a promise of “gnocchi” , and I can always be guaranteed to co-opt a willing helper or two to come on board and help out.

In our house a quick fix version of gnocchi means substituting ricotta cheese for the more time consuming preparation of  potato. Light, fluffy and delicious they can be prepared and cooked in no time at all. Our record? Around 20 minutes. Simply set a large pot of water on the stove to boil, as you bring together a soft dough of ricotta, eggs and flour. Once rolled and cut, the gnocchi only need to be dropped into the simmering water until they float to the top. Mixed with the meatballs and sugo, they really do make a delightful kitchen shortcut.

Ricotta Gnocchi with Little Italian Sausage Meatballs in Tomato Sugo
Serves 4

ricotta gnocchi (recipe follows)
500 grams good quality Italian pork and fennel sausages
4 tablespoons olive oil
1 large brown onion, finely diced
3 cloves of garlic, crushed
2-3 teaspoons crushed chilli flakes
2 x 400g tins of chopped tomatoes
2 tablespoons finely chopped herbs, I like to use a combination of parsley, oregano and basil
a good pinch of sugar
a dash of balsamic vinegar
sea salt flakes and freshly ground pepper to season
1/4 cup grated Parmesan to serve

PREPARE the ricotta gnocchi according to the recipe below.
IN A large shallow frying pan over medium heat, sauté onion in olive oil with a pinch of salt until translucent. About 5 minutes
ADD garlic and crushed chilli flakes. Sauté until fragrant.
STIR in the canned tomatoes and cook until the sauce begins to thicken a little. Break down the tomatoes with the back of your wooden spoon as you stir.
ADD herbs,balsamic vinegar and sugar. Stir well to combine. Turn the heat down to low and simmer until  the sauce is rich and thick. Season to taste with salt and pepper.
SQUEEZE walnut sized balls of sausage meat out of their casings directly into the pan of simmering sauce. Cook for a further 5-10 minutes until meatballs are cooked through.
TOSS cooked gnocchi through the meatballs and sauce. Sprinkle with grated parmesan cheese to serve.

Ricotta Gnocchi
Serves 4

500g fresh ricotta
2 generous handfuls (about 2/3 cup) grated parmesan cheese, plus a little extra to serve
2 large eggs, beaten
a good grating of fresh nutmeg
1/4 teaspoon white pepper
1 teaspoon salt
1 cup plain flour, plus extra for dusting and rolling as required

PLACE ricotta in a bowl with grated cheese, eggs, nutmeg, white pepper and salt. Add flour and mix to form a dough.
KNEAD lightly, adding a little more flour as necessary until the dough is manageable and not too sticky and wet. Be careful not to overwork.
BREAK off  quarter portions of  the dough and roll into  2 cm diameter logs on a floured board. Cut into 3 cm lengths. Optional: If you have time indent each piece by rolling over the back of a fork.
PLACE on a floured tray until ready to use.
MEANWHILE bring a large saucepan of lightly salted water to the boil on high heat,
COOK gnocchi in two separate batches in the pan of simmering water. Remove with a slotted spoon one or two minutes after they float to the top.
DRAIN quickly on paper towels and transfer to a serving bowl ready to be tossed through with sauce.

Posted in Pasta, What I Love to Cook | Tagged , , , , , , | 3 Comments

Eat, Fast and Live Longer. A 5-2 Fast Day Idea Under 100 Calories. Skinny Masala Chai Latte.

Masala Chai Latte

I’m definitely a late comer to the masala chai tea party. My first taste was frankly quite off putting –  a very bland and thin offering concocted with a barely waved chai tea bag introduced into a pot of hot water. A jug of cold milk on the side. Politely I accepted a cup and wondered what all the fuss was about, making a mental note to stay well clear. Until recently a friend insisted I try a properly made wet chai. What a difference a good brew makes.

Chai simply translates as “tea” in Indian and masala chai as “spiced tea”. There are no hard and fast rules as to which spices to use but most contain a heady and warming mix of cardamom, cloves, cinnamon, pepper, ginger and star anise. You can buy chai spice mix ready to be added to loose leaf black tea or premixed chai tea at specialist tea shops and upmarket grocers. Of course you can always put together your own spice blend, if so inclined, a suggestion for an easy home made  loose leaf chai spice tea blend is included at the bottom of this post to get you started.

Spiced tea leaves in hand, I prefer to brew up a chai concentrate, use what I need and store the remainder in a glass jar in the refrigerator, ready to go. As  I love to add freshly frothed milk to my spiced tea –  masala chai latte has fast become my brew of choice. A worthy rival to my beloved cappuccino, no less.  And as I’m feeling particularly generous, I’ll let you into a little secret – it’s always easier to create a creamier froth using skim over regular milk with an espresso machine at home, hence skinny masala chai latte is the go. With just 83 calories per cup serve, it also happens to tick all the boxes for a perfect 5-2 fast day pick me up. Deliciously warming and satisfying, proof that fasting doesn’t need to be boring or anti social.

Masala Chai Tea

Skinny Masala Chai Latte
83 calories per cup serve

1/3 cup chai concentrate (2 calories)
2/3 cup skim milk (60 calories)
1 teaspoon honey (21 calories)

POUR 1/3 cup warm chai concentrate into a glass.
STEAM and froth 2/3 of a cup skim milk and add to the chai concentrate. I find it easiest to use my espresso machine’s frothing wand. Alternatively warm milk in a small saucepan on the stove top over low heat, then use an immersion or stick blender to froth milk.
ADD honey to sweeten. Serve.

Chai Concentrate

2 heaped tablespoons loose leaf chai spiced tea, purchased or home blended (recipe follows)
1 1/2 cups (375ml)  freshly boiled water

PLACE chai spiced tea blend into the infuser of a two cup teapot , add freshly boiled water.
ALLOW to steep for 5-7 minutes. Remove the infuser, use immediately or allow to cool and refrigerate in a glass jar until required.

Easy Home Made Loose Leaf Chai Spice Tea Blend
Makes about 4 tablespoons

4 whole green cardamom pods, cracked
1 teaspoon ginger
1 teaspoon cloves
1/4 teaspoon black peppercorns
3cm piece cinnamon stick
1 star anise
2 tablespoons black (assam or ceylon) loose tea leaves

DRY ROAST the spices in a hot oven until aromatic. Transfer to a mortar and pestle and pound until coarsely crushed.
ADD assam loose leaf tea, stir to combine. Store in an air tight container until required.

Posted in What I Love to Drink | Tagged , , , , , , , | 3 Comments

Like Bees To A Honey Pot. Bienenstich. German Bee Sting Cake.

German Bee Sting Cake

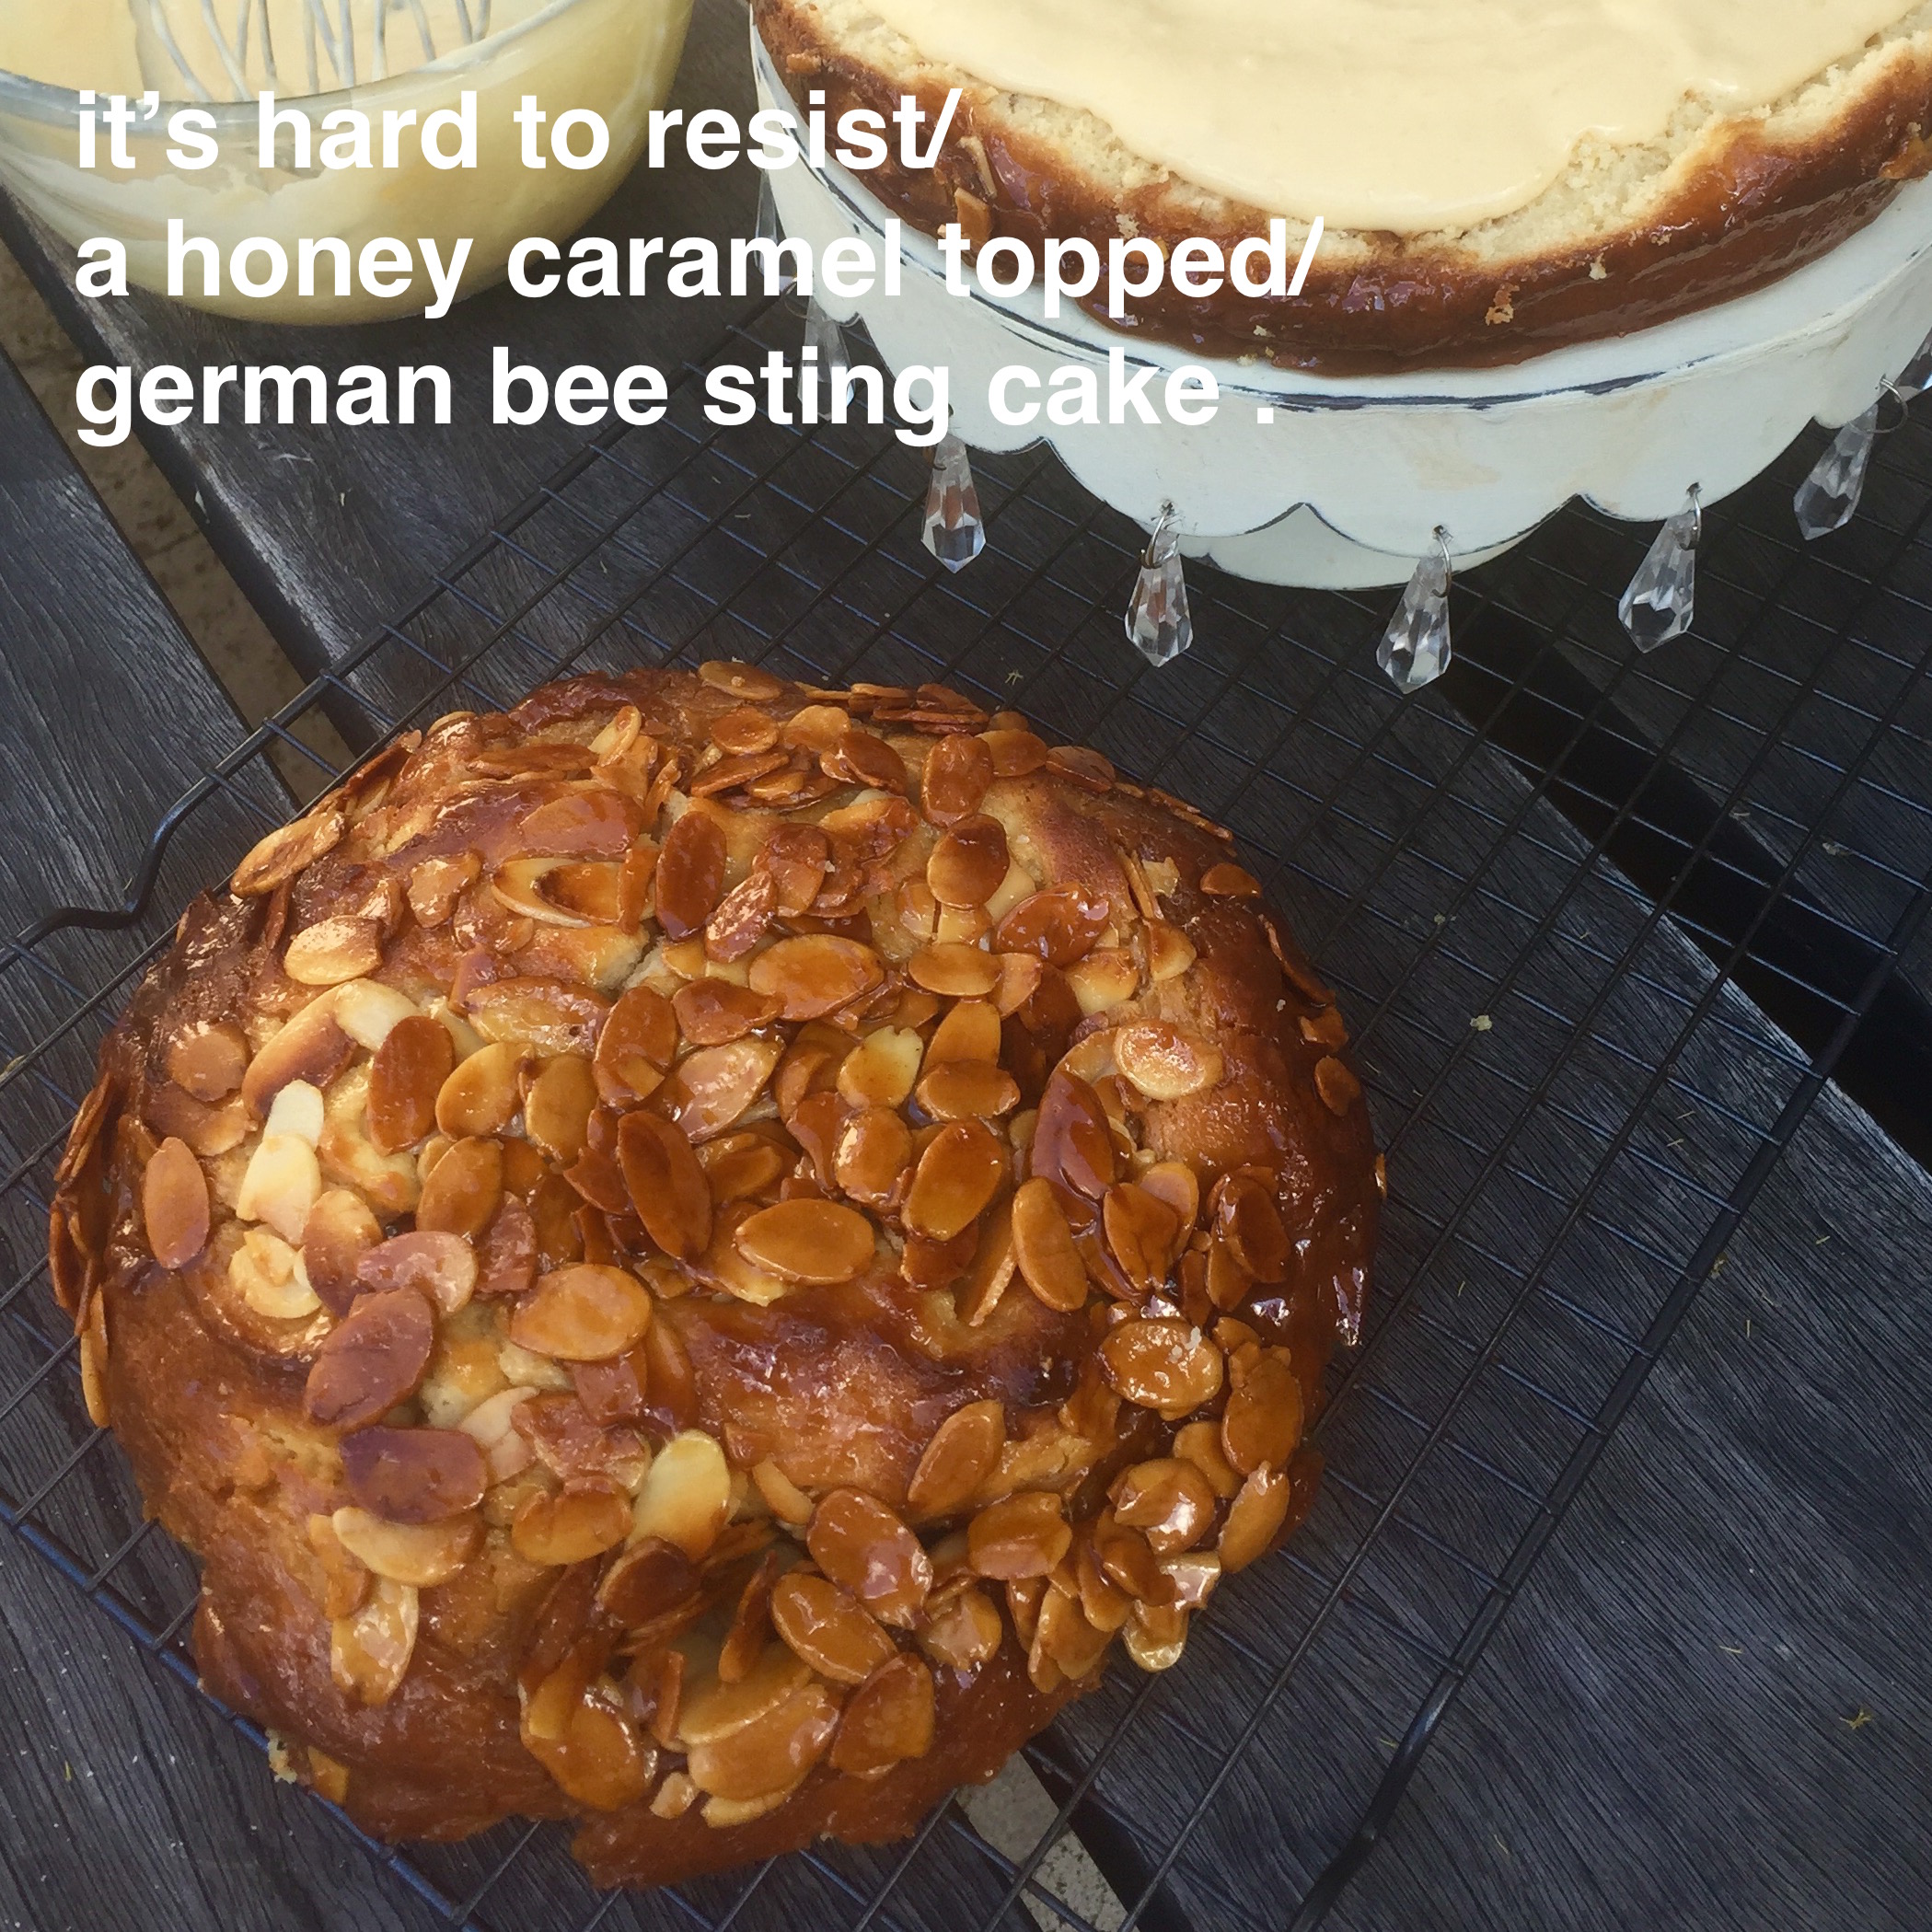
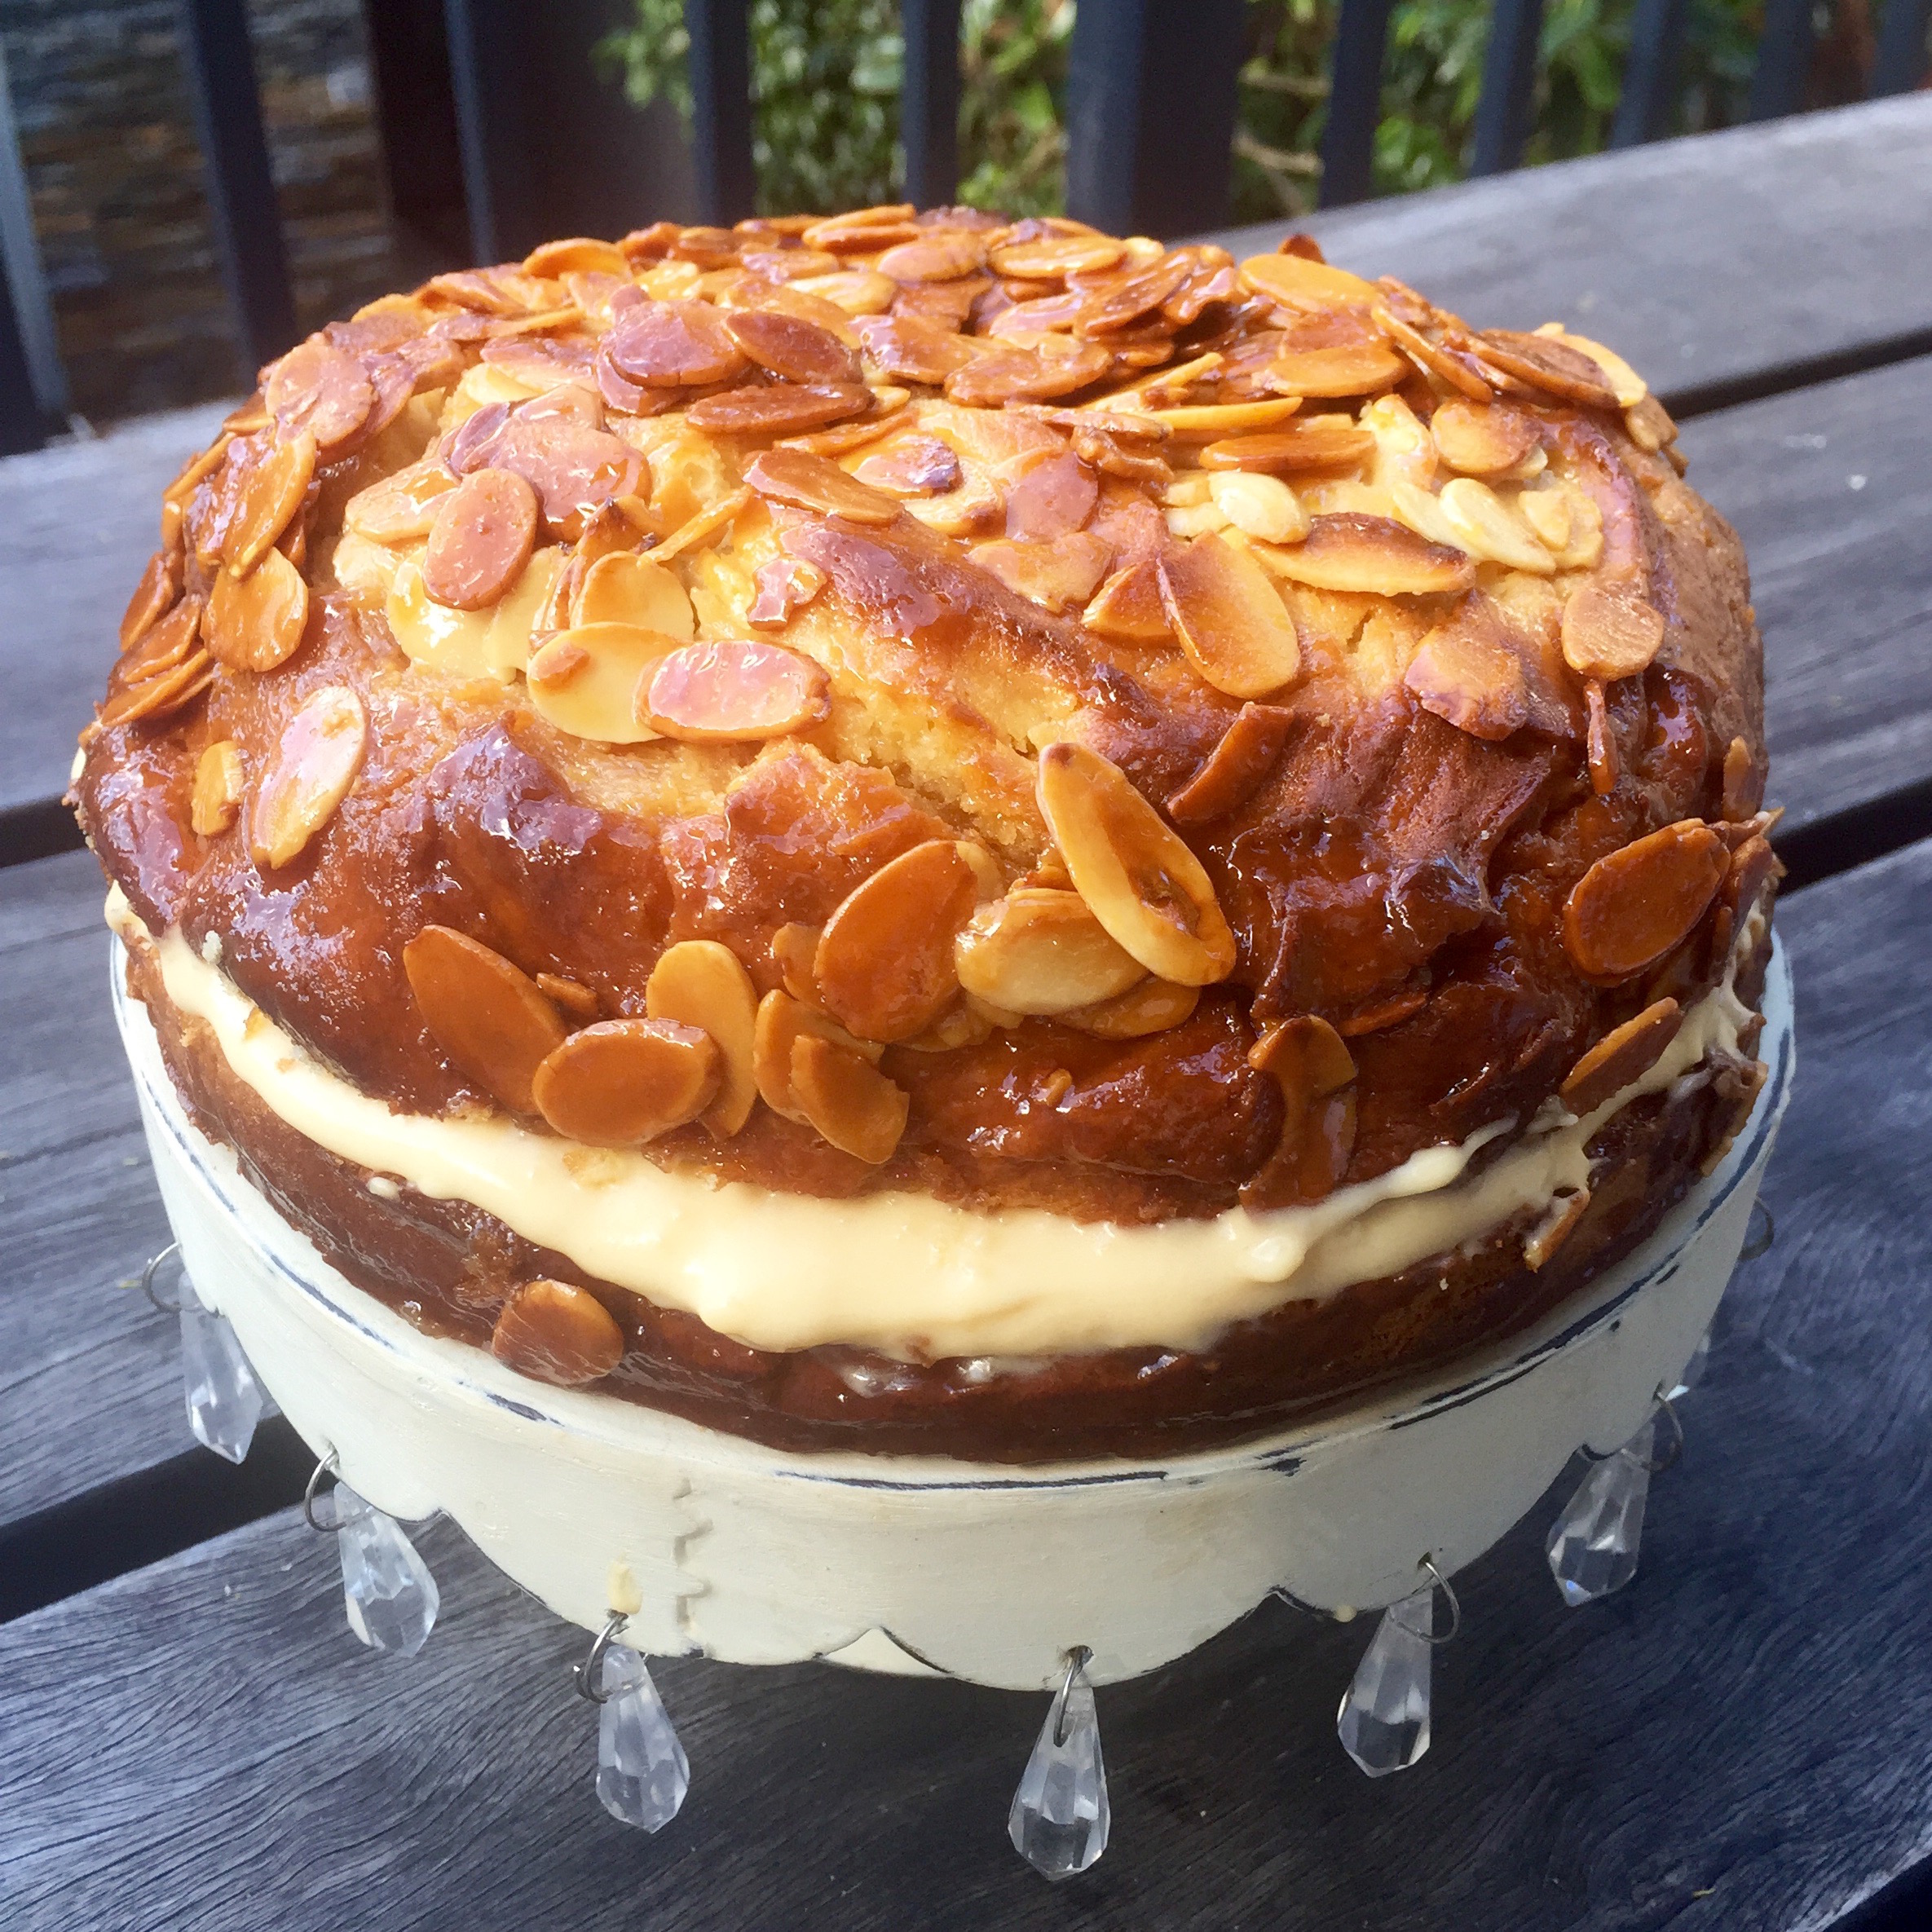
Bienenstich means bee sting in German. I was first introduced to this glorious honey almond caramel crusted, crème pâtissière filled confection at a Danish birthday party, many, many years ago. Freshly baked, its soft cake-y brioche like layers sublime, so utterly indulgent, I had never tasted anything quite like it before.

Unusual and rather exotic, this sweet yeast cake made quite an impression. Particularly so as it also has a rather charming story attached to it. Folklore has it bienenstich was invented by the bakers of Andernach to commemorate a famous day in 1474  when their townspeople successfully repelled invaders from the neighbouring town of Linz by lobbing beehives at them.  Stung by the bees the attackers fled, and to celebrate victory a very special honey cake was made. It’s almost ironic that Linz almost happens to be the home of one of my other all time favourite bakes Linzertorte, whose origins date back to 1653 and is widely touted to be one of the world’s oldest cakes. It does strike me that, if the legend is true, the origins of Andernach’s Bienenstich predate those claims by almost 200 years!

Over the years, on the basis of just one delicious yet fleeting memory, I have been on the hunt to rediscover bienenstich. Unfortunately bee sting cake is only rarely found on bakery or cafe menus, and when it does can often be disappointing. The secret to any wonderful cake is freshness. Yeasted cakes, in particular, are best eaten on the day they are made, not left to languish in refrigerators or display cabinets.

Just a fortnight ago, my interest in bienenstich was reignited through an image in my instagram feed promoting Oktoberfest. And so it was, that I have spent the better part of the week researching bee sting cake and cobbling together my version of the perfect trinity of soft, yeasted coffee cake, honey almond caramel and thick luscious crème pâtissière. Granted not an every day sort of bake, but I promise you it really isn’t as complicated as it might seem.

The cake layers require no kneading and come together quickly and easily with the aid of an electric mixer (without a dough hook attachment). Of course containing yeast the cake does need to be proved but can be left to do so overnight. The crème pâtissière can also be made ahead and stored in the refrigerator until needed, or perhaps purchased from a sympathetic bakery. The honey almond caramel is simply stirred together on the stove and baked to burnished perfection in the oven on top of the cake, so couldn’t be easier. For me, I love that the hunt is over and that I can make this cake at home, probably not often, but whenever I please.

Bienenstich

German Bee Sting Cake (Bienenstich)

Yeasted Cake
¾ cup milk
2 ¼ teaspoons dry yeast
1 tablespoon honey
2 cups plain flour
¼ cup caster sugar
¾ teaspoon salt
2 large eggs, at room temperature
4 tablespoons unsalted butter, at room temperature

Honey Almond Caramel Topping
¼ cup (4 tablespoons) unsalted butter
¼ cup sugar
¼ cup honey
generous pinch of salt
¾ cup sliced almonds

1 quantity crème pâtissière, prepared in advance (recipe follows)

SCALD milk to blood temperature. The easiest way to do this is to heat ¼ cup milk to boiling point then add ½ cup cold milk. If the milk is too hot or cold the yeast will not bloom correctly.
STIR together yeast, 1/4 cup of the warm milk, and 1 tablespoon honey in bowl of mixer until yeast is dissolved, then let stand until foamy, about 5 minutes. If mixture doesn’t foam, discard and start over with new yeast.
ADD flour sugar, salt, eggs, butter and remaining milk to the yeast mixture. Beat at low speed until it forms a soft and  sticky but cohesive dough, about 5-8 minutes.
SCRAPE down the sides, then cover with plastic wrap and leave to prove and rise in a warm, draught free place for an hour until light and puffy (not necessarily doubled in size).
BUTTER and base line a 20cm round spring-form (removable base) cake tin. Spread mixture in an even layer over the base of the tin. Cover with plastic wrap and set aside to prove for a further thirty minutes.
MEANWHILE prepare the honey almond caramel topping. In a medium saucepan, combine unsalted butter, sugar, honey and a pinch of salt.  Bring to a gentle boil, then remove from heat.  Add ¾ cup sliced almonds. Stir well to combine. Set aside.
PREHEAT oven to 180 C. Line an oven tray with foil or baking paper.
AFTER second proving, pour honey almond caramel topping evenly over the yeasted cake batter.
PLACE tin on lined tray to catch any caramel drips and bake in pre heated oven for 20-25 minutes until caramel is golden and a skewer inserted into the centre of the cake comes out clean.
REMOVE from oven and place tin on a wire rack to cool a little before loosening sides and removing cake from tin. You may need to gently run a palette knife around the rim, whilst the cake is still warm to loosen any residual caramel.
WHEN completely cold, use a long serrated knife to slice the cake in half crosswise into two layers.
SANDWICH with a generous amount of crème patissiere (recipe follows). Serve immediately or refrigerate until required.

Crème Pâtissière

2 cups (500 ml) milk
4 yolks from large eggs
2/3 cup caster sugar
¼ cup cornflour
1 vanilla bean
50 g unsalted butter (optional)
1 tablespoon Cointreau or another favourite liqueur (optional)

USE the tip of a sharp knife to split the vanilla bean lengthwise. Scrape along the cut surface to collect the seeds. Combine the milk, vanilla seeds and pod in a large heavy based saucepan and bring to a simmer.
WHILE the milk is heating, whisk the egg yolks with sugar in a large mixing bowl until pale, thick and creamy. Then add the cornflour and whisk to combine.
REMOVE the vanilla bean pod from the milk.  In a steady stream pour in half of the warm milk over the egg mixture and whisk until smooth. The heat will temper the eggs so that they are less likely to curdle when added to the remaining saucepan of hot milk and brought back to the boil.
POUR the egg mixture back into the saucepan with the remaining milk. Whisk quickly and constantly, over a medium low heat and bring the mixture mixture back to the boil. Remember to pay attention to the edges as you stir so the mixture doesn’t catch and stick to the bottom of the saucepan.
CONTINUE to whisk for another minute to cook the cornflour through. The mixture should  be very thick and smooth and a little difficult to stir.
REMOVE the saucepan from the heat.  If using the butter, allow the pastry cream to cool a little before gently stirring in a few cubes of butter at a time. The butter will give the pastry cream a richer taste and lovely sheen.
POUR the prepared pastry cream into a clean shallow baking dish and dust with icing sugar to prevent a skin from forming. Cover with cling wrap and cool completely, at least 2 hours. Refrigerate until needed, up to 3 days.
WHEN ready to use whisk the pastry cream to loosen a little. At this stage you can stir in a little liqueur if using. For a light pastry cream fold in a little softly whipped cream with a flat spatula, just before using.

Posted in Baked, What I Love to Cook | Tagged , , , , , , , , , , , | 10 Comments

Eat, Fast and Live Longer. A 5-2 Fast Day Recipe Idea Under 200 Calories. Poached Egg With Prosciutto Wrapped Asparagus Soldiers.

Eggs and Prosciutto Soldiers

For me one of the first signs that Spring has well and truly arrived is the appearance of plump, emerald green spears of sweet and tender new season asparagus. I love nothing better than to swaddle them in salty prosciutto. Baked or grilled until the prosciutto is golden and crisp, these little prosciutto wrapped asparagus “soldiers” also happen to be a wonderful accompaniment for perfectly poached farm fresh eggs.

And so it is that I have happily stumbled upon another effortless yet simply delicious 5-2 fast day idea. At just 102 calories per serve, it’s quickly becoming one of my all time fast day favourites. My go to late morning hunger buster that satisfies but more importantly still leaves room for that all important substantial evening meal.

Poached Egg With Prosciutto Wrapped Asparagus Soldiers
Serves 1 (102 calories per serve)

3 asparagus spears, trimmed (9 calories)
1 thin slice prosciutto (18 calories)
1 large fresh egg, preferably organic (75 calories)
1 teaspoon of white vinegar
a generous pinch of salt
finely grated lemon zest, chilli flakes and freshly ground pepper, to garnish

PRE-HEAT oven or grill to high.
BUNDLE together asparagus spears and wrap with a thin slice of prosciutto, starting at the bottom and spiralling to the tips.
PLACE prosciutto wrapped asparagus on an oven tray and place under hot grill for 5-6 minutes, turning once half way through, until prosciutto is crisp and asparagus spears tender.
MEANWHILE fill a medium saucepan with water and bring to the boil. Add a pinch of salt, and a teaspoon of white vinegar.
CRACK egg onto a small saucer. Stir the boiling water vigorously with a spoon until you have a whirlpool then slide the egg carefully  into its centre.
TURN heat down to low, and cook for three minutes – use a timer to prevent overcooking. Remove egg from the water with a slotted spoon, and drain on kitchen paper.
SERVE immediately with prosciutto wrapped asparagus soldiers. Garnish with a dusting of finely grated lemon zest, chilli flakes and freshly ground pepper.

Posted in Breakfast, What I Love to Cook | Tagged , , , , , , , , | 6 Comments

Dessert For Breakfast. Yoghurt Panna Cotta with Grilled Pineapple and Mint.

Yoghurt Breakfast Pannacotta

There’s a lot of mystery surrounding the perfect panna cotta. A traditional Italian dessert literally translating as “cooked cream” it consists simply of sweetened milk and cream, held together with a little bit of gelatin. The defining hallmark of  a well made panna cotta is most definitely its wobble. Not too firm to render it rubbery, not too soft that it falls apart. As Matt Preston once famously put it in a long ago aired episode of Masterchef  “the perfect panna cotta should wobble deliciously like a rubenesque woman on 5 inch heels”. An aptly amusing, if perhaps not strictly politically correct, analogy that most definitely makes me smile.

Like Goldilocks, it seems the secret to achieving wobbly panna cotta perfection lies in using just the right amount of gelatin.  And so it is that I spent a pleasant afternoon experimenting in the kitchen with a box of gelatin and in the absence of any cream in my refrigerator and far too lazy to take a trip to the nearest store, cartons of milk and tubs of Greek yoghurt.

Fortunately, making yoghurt panna cotta is a quick and easy process. Dissolve a little gelatin in cold water until it blooms, add to barely heated milk, then stir through yoghurt sweetened with a little honey and flavoured with vanilla.  It’s the setting that takes time and discerns the quality of the wobble – up to 24 hours depending on the quantities made and depth and size of the moulds used.

One important take-out, from those hours spent messing around in the kitchen, is for a smooth and velvety finish, anywhere between 1 1/2 to 2 teaspoons of powdered gelatin to 2 cups of dairy seems to do the trick. Dependent, of course, upon the creaminess and thickness of the yoghurt used. The safest, fool proof option is to set the panna cotta in half cup servings in clear glass tumblers. No unmoulding required. Definitely use 2 teaspoons of gelatin if unmoulding is a prerogative. There is nothing more ego deflating than watching a seemingly perfectly released pannacotta slowly disintegrate into a quivering puddle on a plate.

With copious quantities of variously set pannacotta in the fridge we’ve been enjoying it for breakfast.  Served with gloriously sweet grilled Bethonga pineapple, currently making a welcome appearance at the markets, and garden fresh home grown mint. Dessert for breakfast? In my books it’s a deliciously refreshing yet healthy start to the day.

Yoghurt Panna Cotta with Grilled Pineapple and Mint
Serves 4

3 tablespoons cold water
2 teaspoons powdered gelatin
1 cup milk
1 cup Greek yoghurt
1 tablespoon honey
1 teaspoon vanilla
4 slices pineapples, lightly charred and seared over a hot griddle pan or grill and sliced into wedges.
2 sprigs fresh mint, thinly sliced

SPRINKLE gelatin over two tablespoons of water in a small glass or bowl. Set aside to bloom and soften for ten minutes, without stirring.
MEANWHILE pour milk into a small saucepan, bring to a bare simmer over medium-low heat. Do not allow the milk to boil.
REMOVE saucepan from heat. Whisk through softened gelatin, stirring continuously until completely dissolved. Set aside to cool until lukewarm for ten or so minutes. This helps prevent any curdling when the mixture is added to the yoghurt.
SPOON yoghurt into a medium bowl and whisk until light and smooth. Gradually whisk in milk mixture, honey and vanilla.
POUR into half cup moulds or glasses, cover with gladwrap and refrigerate until set. Setting time will depend on the size and depth of the moulds or glasses used, a minimum of four hours for half cup set but overnight is best. If setting the panna cotta in one large mould or dish,  allow a minimum of eight hours. After 24 hours the gelatin will not set any further.
IF UNMOULDING  pannacotta, run a non-serrated knife gently around the rim to break the seal, place a serving plate on top and invert. Otherwise serve directly from the glasses.
GARNISH with grilled pineapple and fresh mint.

Posted in Breakfast, Fruit, Sweet Treats, What I Love to Cook | Tagged , , , , , , , , , | 2 Comments

Eat, Fast and Live Longer. A 5-2 Fast Day Recipe Idea Under 200 Calories. Charred Watermelon With Chilli, Lime, Mint and Feta.

Charred Watermelon With Chilli, Lime, Mint and Feta

I can’t quite recall where I first encountered the idea of charred watermelon. It does sound incongruous and strange; the searing of  a cool and refreshing summer fruit on a hot barbecue or grill, but it’s a juxtaposition of hot but cold, and savoury yet sweet, that really does work. I know. I’ve tried it and it’s true.

Usually we devour juicy watermelons as they come, sliced and chilled. In the height of summer when they’re ripe and heavy, and at their peak season best, I might transform them into refreshing paletas and granitas or  home-made lemonade. Other times they find their way into a simple salad or perhaps paired with grilled haloumi and chimichurri, all building blocks for an effortless but refreshingly delicious meal.

I love how charring caramelises the melon’s natural sugars and renders each slice impossibly juicy and plump. Paired with chilli, lime, mint and feta, it produces a sweet, spicy, salty and sour flavour sensation that easily disguises the fact that a generous serve is just 180 calories. All in all its a very clever 5-2 fast day recipe idea, that easily dispels any notion that healthy meals need to be boring.

Charred Watermelon With Chilli, Lime, Mint and Feta
Serves 2 (180 calories per serve)

500g seedless watermelon, rind removed and sliced into triangles (150 calories)
1/2 tablespoon extra virgin olive oil (60 calories)
1/2 teaspoon dried chilli flakes (1 calorie)
1 lime, finely grated zest and freshly squeezed juice  (12 calories)
1/4 cup fresh mint leaves, shredded (4 calories)
50g Danish feta cheese (132 calories)
sea salt and freshly ground pepper

HEAT a griddle pan until smoking. Lightly brush watermelon slices with olive oil and season with sea salt flakes and freshly ground pepper.
GRILL on each side for a minute or so until lightly charred and caramelised.
ARRANGE in a single layer on a serving platter.  Dress with a dusting of chilli, finely grated lime zest and fresh mint leaves. Crumble over feta and finish with a good squeeze of lime juice. Serve immediately.

Posted in What I Love to Cook | Tagged , , , , , , , , , , | 4 Comments

From Nanna’s Old Fashioned Kitchen. Lemon Scented Rice Pudding With Balsamic Basil Strawberries

Nana's Lemon Scented Rice Pudding

Anyone who follows my Instagram feed will realise that recently I embarked on the 100 day haiku challenge. Seventeen syllables of poetic creativity a day, structured into three lines; the first containing just five syllables, the second seven, and third five like the first. All food centric by my choosing.

It’s an addictively consuming and sometimes frustrating process. How to capture the essence of something in just a few short words. I’m getting back to basics and learning a lot about simplicity, clarity and economy of thought. Probably the last time I encountered a haiku was way back in primary school, set no doubt as a homework task for my ten or eleven year old self.

Surprisingly, I’m finding haiku writing to also be a rather nostalgic process. I’m delving into the half forgotten recesses of my mind and reminiscing about all manner of miscellaneous, sometimes peculiar things. Like old fashioned rice pudding. Straight out of any nanna’s old fashioned frugal kitchen. Well made it was lovely and comforting; gorgeously luscious and creamy.

Truth be told I honestly can’t remember the last time I made a rice pudding. If I believe my teenagers – never in their collective lifetime. And so it was that this past week I took a trip down memory lane and recreated Nanna’s rice pudding. My rather decadent modern version is lemon scented and uses arborio rice with copious, not so frugal, amounts of butter, eggs, milk and cream. All topped off with a balsamic, basil infused strawberry salad. A “dessert” that is equally delicious warm or cold and easily crosses over for breakfast or brunch.

Lemon Scented Rice Pudding With Balsamic Basil Strawberries
Serves 4

1 cup Arborio rice
25g unsalted butter
finely grated zest of one lemon
1 ½ cups milk
1 ½ cups cream
½ cup caster sugar

Custard
½ cup milk
2 eggs
1 tablespoon caster sugar
freshly squeezed juice of ½ lemon

Balsamic Basil Strawberries
1 punnet strawberries, hulled and sliced
1 tablespoon thinly sliced basil leaves
1 tablespoon caster sugar
1 tablespoon balsamic vinegar
freshly squeezed juice of ½ lemon

PREHEAT oven to 150 C.
MELT butter in a medium ovenproof saucepan over medium heat. Add rice and cook, stirring frequently, until well coated and lightly toasted, about 2 minutes.
ADD lemon zest and sauté until fragrant for 1 to 2 minutes, before adding milk, cream and sugar. Stir well to combine.
COOK rice gently over a low heat for about 20 minutes, stirring occasionally. Cover with a tight-fitting lid and place in preheated oven to bake for 10 minutes as you prepare the custard.
WARM milk in a small saucepan. In a separate bowl, whisk together eggs, lemon and caster sugar until pale and light. In a slow steady stream, pour the warmed milk into the egg mixture, whisking well to combine.
REMOVE rice from oven, uncover and add the custard mixture, stirring well to combine. Replace lid and return to the oven to bake for a further 20 or so minutes until thick and creamy, yet still a little loose. The custard will continue to thicken as it cools.
COMBINE strawberries, basil, caster sugar, balsamic vinegar and lemon juice in a medium bowl. Set aside to macerate for 5 minutes or so.
SPOON warm or cold rice pudding into small bowls or glasses. Spoon over balsamic basil strawberries and their juices. Serve immediately.

Posted in Rice, What I Love to Cook | Tagged , , , , , , , , , , | 2 Comments