Eat, Fast and Live Longer. A 5-2 Fast Idea Under 200 Calories. Creamy Dairy Free Cauliflower and Leek Mash.

Cauliflower Mash

Sometimes a successful fast day is all about an interesting side to accompany a little lean grilled chicken, red meat or fish. In summer the challenge is most definitely easier, with a wide array of interesting salads able to be thrown together at a moment’s notice as you fire up the grill. In winter, it’s all about resisting the lure of carbohydrate laden, dairy rich comfort food.

I will be the first to admit that I have a  huge soft spot for mashed potato. Who hasn’t been seduced by the rich smooth velvety decadence of a well made Paris mash? Granted the quantities of butter, cream and milk used to produce each delicious mouthful are so jaw droppingly obscene that chez nous it’s been relegated to special occasion status.  Most definitely not the sort of dish that will ever a grace my 5-2 table.

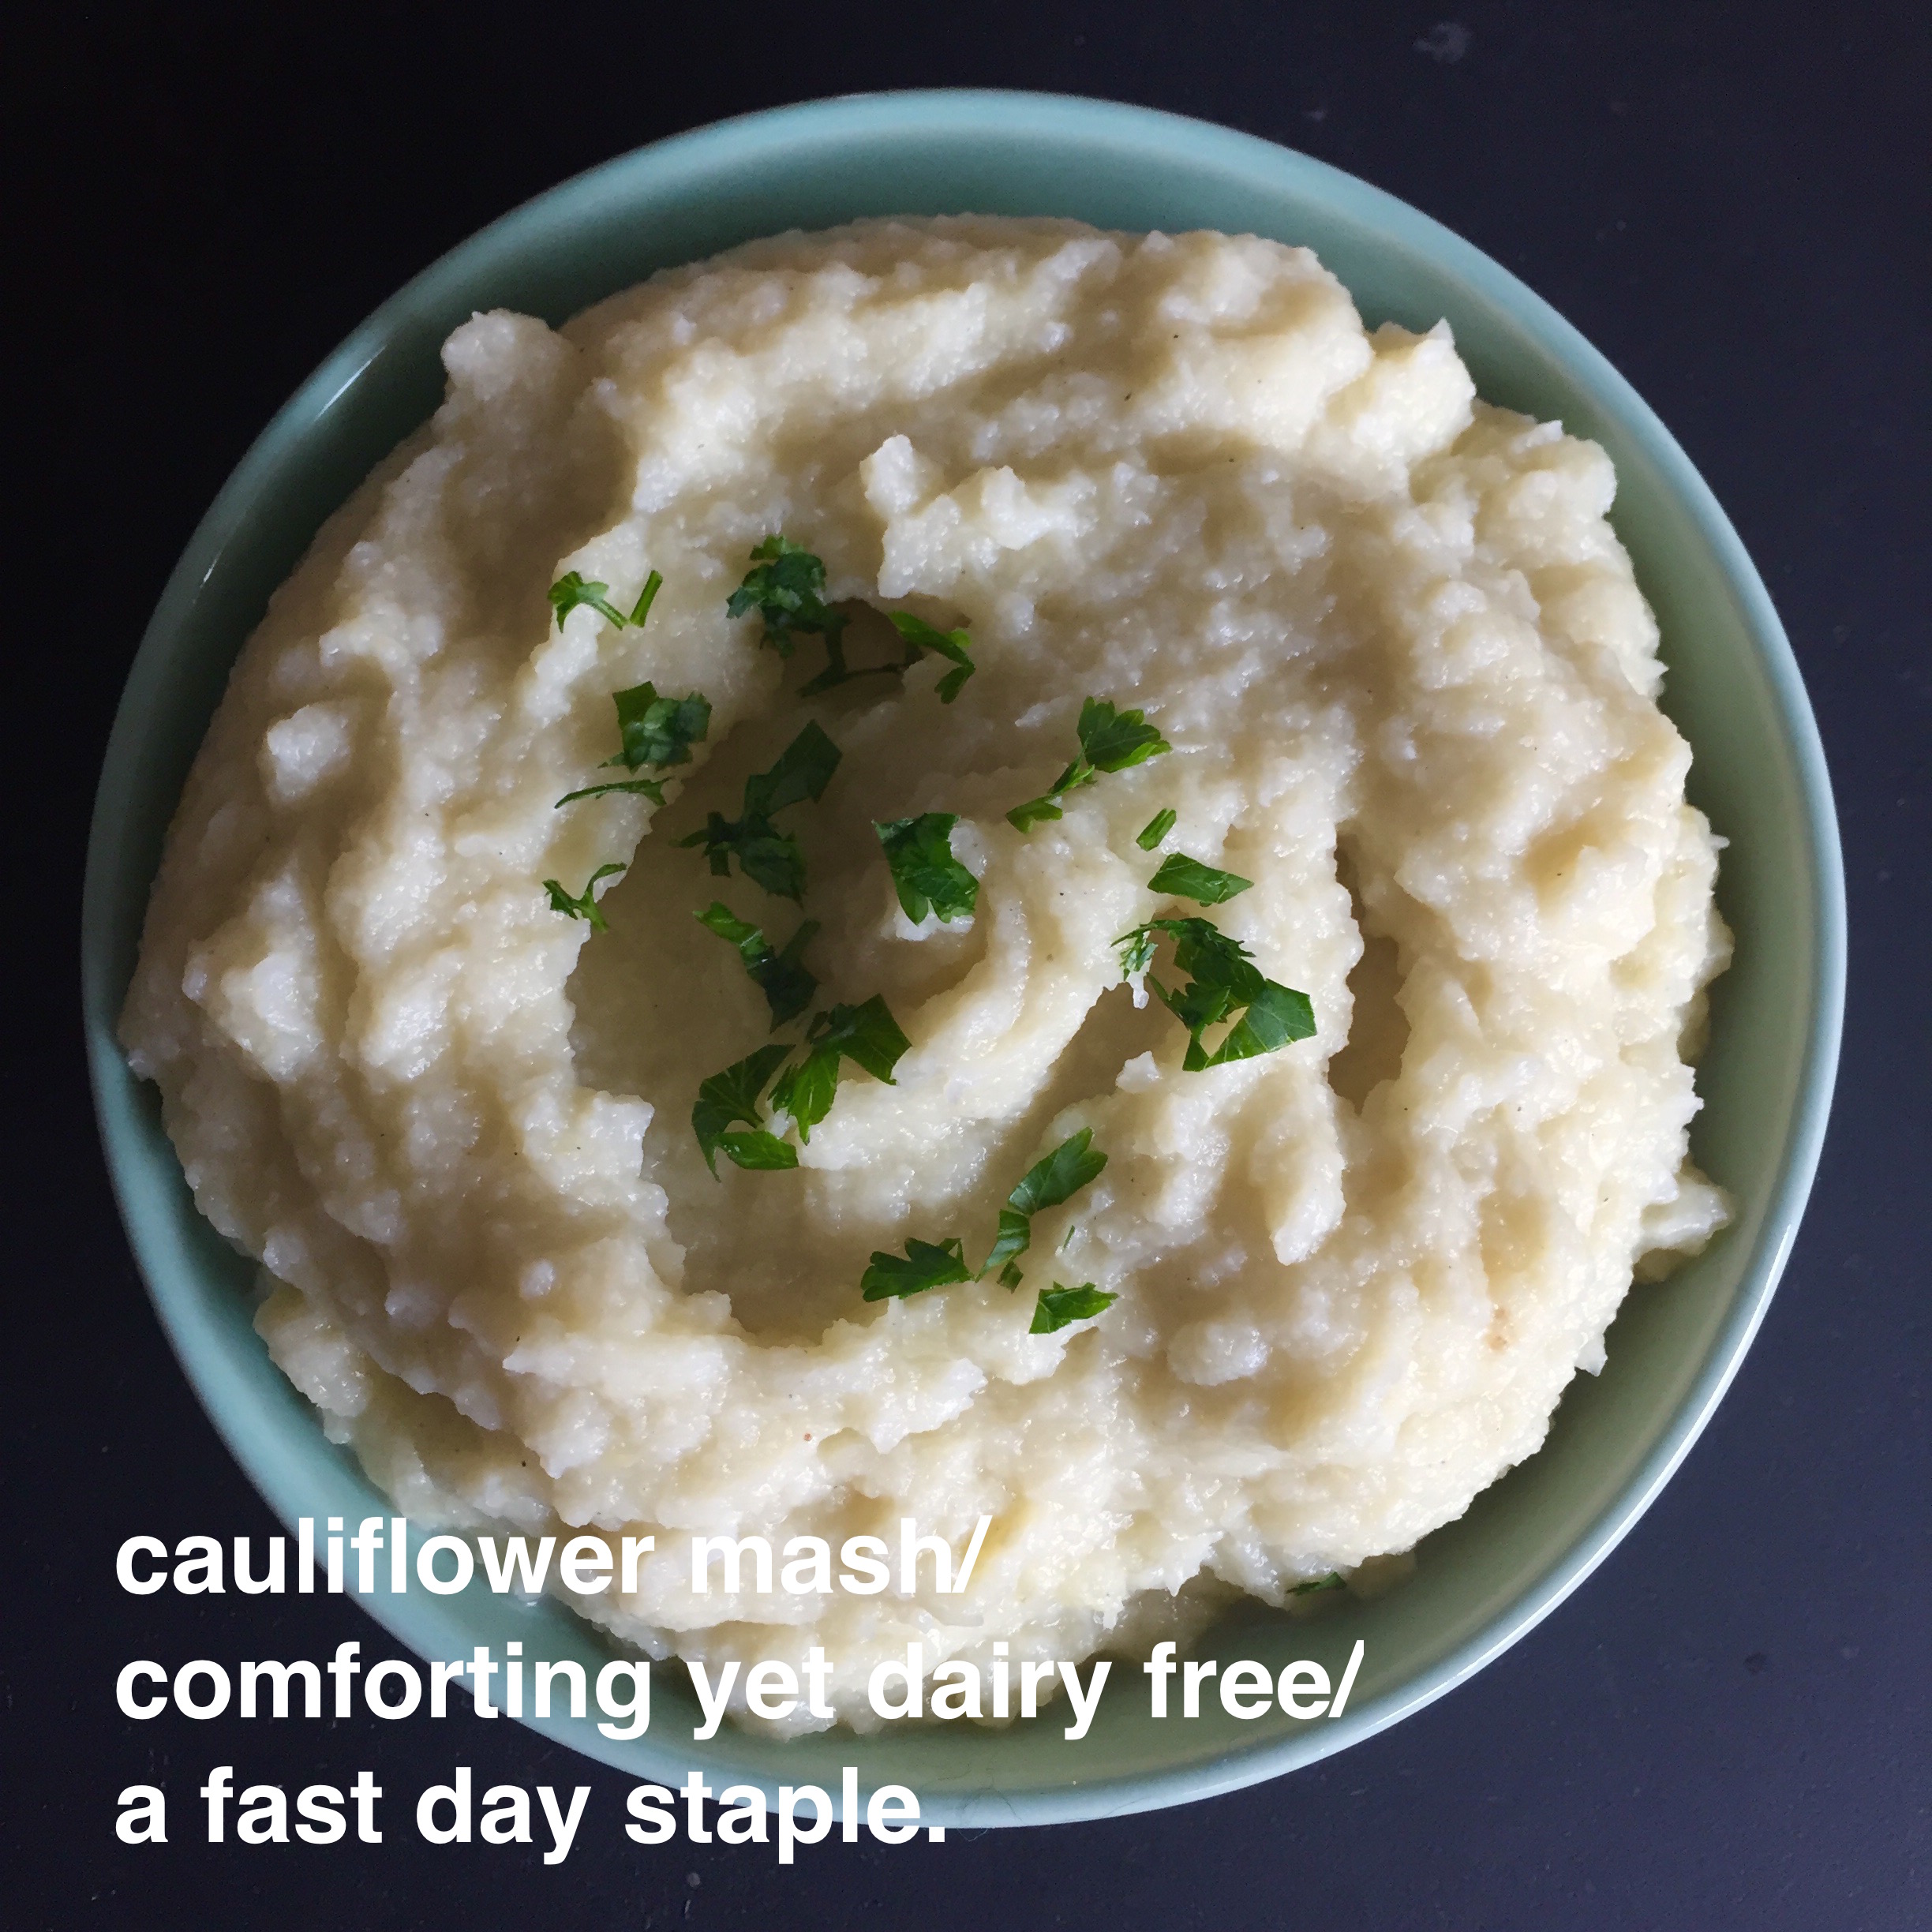
Where there’s a will, there is always a way. The only way to enjoy interesting meals on a 5-2 fast day is to get creative. Swapping out potato for cauliflower to reduce the carbohydrate count, replacing butter for the richness of leeks and garlic sautéed in a little olive oil and using chicken or vegetable stock instead of milk and cream produces a wonderfully creamy yet dairy free mash for just 142 calories per hearty cup serve. Of course you could always smear just a little on your plate to accompany lean grilled chicken, meat or fish, leaving room for a mountain of steamed greens or a substantial salad.

As always the choice is yours, guided largely by the progress or lack thereof of your day. Happily, unlike Paris mash, this version is so deliciously guilt free it easily transcends both fast and feast days. Who said fast days needed to be boring?

Creamy Dairy Free Cauliflower and Leek Mash
Makes 2 cups  (142 calories per cup)

1 tablespoon olive oil (120 calories)
1 leek, white part only, sliced ( 27 calories)
2 cloves garlic, crushed (8 calories)
1 medium head cauliflower, divided into small florets (146 calories)
125ml  (1/2 cup) chicken or vegetable stock (10 calories)
sea salt and white pepper, to season

HEAT oil in a large saucepan over medium heat. Add leek and garlic and cook, stirring, for 5 minutes until soft and transparent. Do not allow leeks to brown.
ADD cauliflower and stock. Bring to the boil, reduce heat to low, cover and gently simmer for 10-15 minutes, making sure there is enough stock to steam the cauliflower.  The florets should be tender but still a little firm to the touch, when done.
SEASON with sea salt and white pepper, then puree until smooth with a hand-held immersion stick blender.
SERVE hot as a side for lean grilled chicken, red meat or fish.

Posted in Vegetables, Vegetarian, What I Love to Cook | Tagged , , , , , , , | 8 Comments

The Original Mac ‘n’ Cheese. A Roman Classic. Cacio e Pepe.

Cacio e Pepe

When life gets busy and I’m travelling in the fast lane, I definitely do not want to spend a minute more in the kitchen than is absolutely necessary. Still wanting to eat beautiful, delicious food but never compromising on the quality of  ingredients used, I turn to simple classics.

Like this Roman specialty. Cacio e pepe. Or more simply put, cheese and pepper. Minimalistic. The simplest of all spaghetti sauces. Made with just four staple pantry ingredients. It’s the sort of recipe countless generations of time poor Italian nonna’s would have brought to the table.  To my mind it’s most likely the original mac ‘n’ cheese.  A dish all the family loves to eat.

Cacio e Pepe
Serves 4

500gm good quality dried spaghetti
6 tablespoons unsalted butter
1 tablespoon freshly ground black pepper, plus more for finishing
2 cups  (90  grams) finely grated pecorino, divided
sea salt

MELT butter in a large heavy skillet over low heat, then add freshly ground pepper (coarsely ground is best). Stir for a minute or so until until pepper is toasted and fragrant. Remove from heat and set whilst the spaghetti cooks.
COOK spaghetti  in a large pot of well salted boiling water following packet directions until al dente. Drain, reserving a scant cup of the cooking water.
ADD ¾ cup of the cooking water to the pepper infused butter mixture, return skillet to the stove and simmer over low heat for a few minutes until well combined.
ADD spaghetti to the skillet with 1 ½ cups of finely grated pecorino. Toss with tongs until the cheese has melted to create a creamy sauce that clings to the strands of spaghetti. Add a little more cooking water if sauce seems dry, continue to cook a little longer if it seems wet.
DIVIDE among bowls to serve, top with remaining pecorino and serve very hot.

Posted in Pasta, What I Love to Cook | Tagged , , , , , , | 4 Comments

Eat, Fast and Live Longer. A 5-2 Fast Day Recipe Idea Under 200 Calories.Warm Fennel Salad With Lemon, Parmesan and Herbs.

Warm Fennel Salad With Lemon, Parmesan and Herbs

I’ve always loved fennel; crisp, crunchy and raw it’s always a welcome addition to my salads and slaws. In season, I love to slice my bulbs as thinly as I can on my mandolin, toss them with peppery baby rocket leaves and dress with a lemony vinaigrette and parmesan shavings. For some, its subtle aniseed flavour might be an acquired taste, but I find it refreshing and palate cleansing.

Sautéed, roasted or grilled, fennel takes on an entirely different personality. Lightly charred or caramelised, it’s lusciously sweet, rich and complex. With market stalls  awash with fennel bulbs, it should come as no surprise it’s been finding their way into all manner of hearty late winter tray bakes, soups and braises.

For something a little different, recently I’ve taken to charring fennel wedges or slices over a hot grill and serving them warm, salad style. Simply dressed with lemon, parmesan and herbs. Delicious on it’s own, it’s also the perfect side to serve with all manner of steamed, roasted or grilled seafood. Needless to say at just 103 calories per serve, it’s now also attained new favourite status in my 5-2 fast day repertoire.

Warm Fennel Salad With Lemon, Parmesan and Herbs
Serves 2 (103 calories per serve)

1 large (250g) fennel bulb (35 calories)
1 tablespoon olive oil (120 calories)
1 tablespoon freshly grated lemon juice (3 calories)
2 tablespoons (10g) finely grated parmesan (44 calories)
1 teaspoon finely grated lemon zest (1 calorie)
1 tablespoon finely chopped parsley (1 calorie)
1 tablespoon finely chopped long green spring onions (scallions) (2 calories)
sea salt flakes and freshly ground pepper

TO PREPARE FENNEL, remove stalks, reserving tender green fennel fronds for garnish. Trim bulb of any tough outer leaves. Stand bulb upright and slice the fennel in half vertically from top to bottom, keeping the core intact to hold the slices together. The core will become tender with cooking.
SLICE each half into four or five ½ cm thick slices, depending on the size of the bulb
Brush with olive oil and season with salt and pepper.
HEAT a grill pan over medium-high heat, add any remaining olive oil to the pan and grill fennel slices turning until lightly charred on each side and firm yet tender to the touch, about 2 to 3 minutes on each side.
TRANSFER to serving a platter drizzle with lemon juice.  Scatter over finely grated lemon zest, parmesan, parsley, spring onions and reserved fennel fronds. Season with sea salt and freshly ground pepper. Serve warm.

Posted in Salads, What I Love to Cook | Tagged , , , , , , , , | Comments Off on Eat, Fast and Live Longer. A 5-2 Fast Day Recipe Idea Under 200 Calories.Warm Fennel Salad With Lemon, Parmesan and Herbs.

Retro Baking. Reinventing an Australian Classic. Wagon Wheel Slice.

Wagon Wheel Slice

I’ve always had a huge soft spot for wagon wheels. Sadly those huge chocolate-y jammy biscuity discs so nostalgically and iconically reminiscent of many an Australian childhood seem to have shrunk in size. They were my all time favourite treat  growing up. I well remember the race to the school tuckshop at morning recess time, silver coin in hand with the eager anticipation of the very first bite. In those days wagon wheels were enormous, so much bigger than my hand.

Of course good old fashioned country bakeries, the kind we so often encounter on our road trips have always made their very generous versions of this iconic bake. OK I have been sprung, that’s one reason why I always insist on taking those roads less travelled. Happily now, for my long suffering  family, wagon wheels can also occasionally be found on the menu at trendy inner city cafes.

Years ago, after yet another round of listening to my  seemingly endless lamentations on the amazing shrinking wagon wheel, a friend generously shared with me her “secret” family recipe for wagon wheel slice. So special and deliciously easy to make. A base of soft buttery shortbread, covered with a smear of tangy raspberry jam, a layer of soft homemade marshmallow and a melted chocolate topping. The beauty of the slice is that it can be made as a slab, set in the fridge and portioned into squares as needed. So much easier to bake and assemble than individual biscuits.

Of  course, as is my nature, over time I’ve fiddled with the original recipe. My idea of the perfect wagon wheel has always included a very generous billowing layer of fluffy marshmallow. It’s always been my favourite element. This time around I went in for the overkill. Piled sky high layers into a smaller tin, and once set used a deep, well greased food preparation ring to stamp out circles. After all the original wagon wheels were round not square. And yes these were enormous, a fitting tribute to my childhood recollections. But I will add, they were easily and quickly scoffed, by an enthusiastic band of taste testers, as every good wagon wheel should.

Wagon Wheel Slice

For the Shortbread Base
170g unsalted butter cubed
1 cup icing sugar, sifted
1 teaspoon vanilla extract
1 tablespoon honey
1 egg
2 ¼ cups plain flour
1 ½ teaspoons baking powder

For the Jam Layer
¾ cup raspberry jam

For the Marshmallow Layer
2 sachets (28g) gelatine powder
1 cup water
2 cups caster sugar
1 cup glucose or corn syrup
pinch of salt
1 teaspoon vanilla essence, rosewater essence or flavouring of your choice

For the Chocolate Layer
200g dark chocolate, broken into pieces
20g coconut oil

Shortbread Base
PREHEAT oven to 180°C fan-forced. Grease a deep 20cm x 30cm slice or lamington tin. Line base and sides with non stick baking paper, extending paper 2cm from edge on all sides.
PLACE butter, sugar and vanilla in a large mixing bowl and beat with an electric mixer for 5 minutes until pale and creamy. Remember to scrape down the sides of the bowl every now and then to make sure butter and sugar are well incorporated.
ADD honey and egg, beating until well combined.
SIFT over flour and baking powder, then stir well to combine.
PRESS mixture into prepared tin. Bake in pre-heated oven for 20 minutes or until golden.

Jam Layer
PLACE jam into a microwave proof jug or bowl and gently heat through on low power until warmed through and loose, about 1 minute.
SPREAD warm base with jam.

Marshmallow Layer
PLACE ½ cup water into a large mixing bowl. Sprinkle over the gelatin and set aside to soak and bloom while you prepare the syrup.
COMBINE sugar, corn syrup, salt and  remaining ½ cup of water in a saucepan over medium heat. Cover with a tight fitting lid and bring to a steady boil. After 2 minutes, remove the lid and brush down the sides of the saucepan with a pastry brush to dissolve any remaining sugar crystals.
USING a candy thermometer continue to boil the mixture, without stirring, until it reaches 115 C or soft ball stage.
REMOVE saucepan from heat, allow mixture to cool a little before adding the syrup in a steady stream to the gelatin, beating continuously with an electric mixer at low speed until all the syrup is incorporated.
CONTINUE to beat for another 10 or so minutes – starting on the lowest  setting  and progressing to the highest until the mixture has tripled in volume and is glossy.
SPREAD marshmallow over the shortbread and jam base. Allow to stand at room temperature for about an hour to set. The quantities given for the marshmallow layer are very generous – for a thinner layer divide quantities provided for this layer in half, or make a full batch, pouring any excess into another baking paper lined tin to set.

Chocolate Layer
MELT chocolate and coconut oil in a small heatproof bowl set over a saucepan of simmering water. Do not allow the bottom of the bowl to touch the water.
STIR well to combine and pour melted chocolate over top of marshmallow layer.
REFRIGERATE 30 minutes or until  chocolate is set. Stand at room temperature for 10 minutes before slicing into squares with a very sharp knife or stamping into rounds with deep metal food preparation rings. Store in an airtight container.

Posted in What I Love to Cook | Tagged , , , , , , , , , , | 7 Comments

Eat, Fast and Live Longer. A 5-2 Fast Day Idea Under 200 Calories. Sweet Roasted Carrot Hummus

Sweet Roasted Carrot Hummus

It’s the tail end of winter, only a few more weeks to go and we’ll be transitioning into spring. A season of fresh new produce – asparagus, broad beans, peas, baby leeks, rhubarb and sweet strawberries. For the moment we’re making the most of  a prolific supply of late season root vegetables.

I’ve always loved the intense sweetness of oven roasted carrots. They’re a trusty supporting act to any traybake or Sunday roast. Usually unacknowledged and taken for granted, yet another vegetable on the plate. With just a little tweaking, they can be transformed into something moreishly delicious and given the opportunity to be the star of their own show.

Like this sweet roasted carrot hummus. Served just this weekend with a  radicchio and fennel salad as a wonderful accompaniment to a pork loin roast. A fantastic, if not a little surprising flavour combination. All that was needed was a generous smear (about a quarter cup at 120 calories) to bring an interesting meal to the table.

Of course for a 5-2 fast day meal, I’d swap out the pork loin roast for a seared lean pork fillet at just 115 calories per 100g serve. And it goes without saying, no ifs or buts, that even the merest whiff of crackling would definitely be off the agenda. That said, this variation on hummus is equally delicious on its own. Served as a dip with an assortment of raw vegetable crudities, it easily becomes a very versatile 5-2 lunch or light meal.

Sweet Roasted Carrot Hummus
Makes about 2 cups (120 calories per 1/4 cup serve or 30 calories per tablespoon)

1 x 400g tin chickpeas, drained weight 240g (394 calories)
4 large carrots,peeled and sliced into chunks (120 calories)
2 tablespoons extra virgin olive oil (240 calories)
1 lemon, juiced and zest finely grated (12 calories)
2 tablespoons tahini (180 calories)
1 large garlic clove, peeled and bruised (4 calories)
1 teaspoon ground cumin (8 calories)
1/2 teaspoon sweet paprika (4 calories)
sea salt and freshly ground pepper

PREHEAT oven to 180 C. Line a baking tray with non stick paper.
TOSS peeled carrot chunks with olive oil, salt and pepper. Roast on prepared tray for 20-25 minutes until tender and golden  brown on the edges.
PLACE chickpeas, roasted carrots garlic, tahini, cumin, paprika, lemon zest and juice into a blender or small food processor. Pulse to break down, then with motor running add up to 1/2 cup of water in a thin steady stream until light and creamy.
BLEND to desired consistency – chunky or smooth. If the hummus is too thick, add a little more water to thin it out.  Season to taste with sea salt and freshly ground pepper.
TRANSFER to a bowl and chill until ready to serve.

Posted in Vegetarian, What I Love to Cook | Tagged , , , , , , , , , | 5 Comments

When Life Gives You Lemons… Little Lemon Meringue Tarts.

Little Lemon Meringue Tarts

We were the lucky beneficiaries of  a big bag of beautifully fresh and fragrant  homegrown lemons last weekend. Courtesy of my father’s garden. When life gives you  lemons, what better excuse than to bake little lemon meringue tarts?

Of course it also provides the perfect excuse to make a big batch of lemon curd, and truth be told these tarts are the answer to using up any jars of curd that may be languishing in the back of your pantry or freezer. Personally, I like to make my curd, one lemon at a time. In small batches. Using a foolproof one pot, ten lazy minutes method that effortlessly transforms a sugar, butter, egg and lemon into a smooth and silky curd. Every single time. No double boilers. No tempering of eggs. No curdling or catching of the mixture on the bottom of the pan.

These little tarts may look impressive but, believe it or not, involve no rolling of pastry or fiddly assembly. Just the forming of well rested shortbread dough into tablespoon sized balls which are gently pressed into a greased patty cake tin. A quick blast in the freezer prior to baking ensures this very short, crumbly tart base holds its shape in a hot oven. I like to bake the tart bases blind for ten minutes or so before filling with lemon curd and finishing with a flourish of meringue. All they need is a final five minutes in the oven to set the meringue and ensure the shortbread case is crisp and golden.

Finding it difficult to source patty pans? I do realise those old-fashioned shallow muffin style tins may not quite be  the de riguer at the moment, just use mini muffin tins instead. The quantities provided will make about 36 mini tartlets so you will need to use two tins. Roll heaped teaspoons (rather than level tablespoons) of the shortbread dough for the tart shells and fill each with up to  2 teaspoons of curd. They’re just as delicious, if not impossibly cuter, in miniature.

Little Lemon Meringue Tarts

Makes 12 tarts.

For The Shortbread
125g unsalted butter, room temperature
1/4 cup icing sugar
1 teaspoon pure vanilla extract
3/4 cup plain flour
2 tablespoons corn flour
generous pinch of salt

For the Lemon Curd Filling
50g butter, cubed
1/2 cup (100g) caster sugar
1 egg, whisked
2 tsp finely grated lemon rind
1/4 cup (60ml) lemon juice

For the Meringue Topping
3 egg whites
3/4 cup caster sugar
generous pinch of cream of tartar

LIGHTLY grease a 12 hole patty cake pan.
PLACE softened butter and sugar into a large bowl and beat together until smooth and creamy.
ADD the vanilla extract. Beat until just incorporated.
SIFT together the flour, cornstarch and salt. Add to the butter mixture, mixing until just combined.
FORM the soft shortbread dough into a ball, cover with plastic wrap and refrigerate for 30 minutes.
MEANWHILE MAKE LEMON CURD, whisk together sugar, egg, lemon rind and juice in a small saucepan. Add butter cubes and place the pan over low heat, stirring constantly with a wooden spoon for 5 minutes or until mixture boils and thickens. Remove from heat. Strain through a fine sieve into a bowl. Cover with plastic wrap and place in the fridge to chill and thicken for about half an hour.
REMOVE the dough from the refrigerator, unwrap and working quickly take level tablespoons of dough, roll into balls and place in the centre of each patty pan hole.
WITH clean fingertips, press each shortbread ball onto the bottom and up the sides of each hole to form tart cases.
COVER tray  with plastic wrap and place in the freezer for 10 -15 minutes. This will firm up the shortbread before baking and help prevent shrinkage.
PREHEAT oven to 170C.
REMOVE the tray from the freezer and bake the shortbread tart cases,unfilled, for an initial 10 minutes. The pastry should just be beginning to colour. Return to the oven for another few minutes if pastry looks soggy or undercooked.
MEANWHILE MAKE MERINGUE TOPPING, whisk the egg whites in a small bowl until soft peaks form. Add sugar, one tablespoonful at a time until the mixture is thick and glossy. Fold through a generous pinch of cream of tartar to stabilize the meringue.
REMOVE tray from oven. The shortbread will have puffed up a little, use the back of a tablespoon to press down gently in the centre of each tart case. Allow to cool a little then gently twist each tart shell to check that it will easily release from the tin after it has filled. The tart shell will crisp as it cools, making it easier to twist without crumbling or breaking.
FILL each shortbread tart shell with a tablespoon of lemon curd. Pipe a swirl of meringue on top.
RETURN the trays to the hot 170C oven and bake for a further 5 minutes until the tarts are nicely golden around the edges and meringue just beginning to colour .
REMOVE from oven, allow the tarts to cool in their tins for 15 minutes before placing on a wire rack to cool.

Posted in Baked, What I Love to Cook | Tagged , , , , , , , | 2 Comments

Eat, Fast and Live Longer. A 5-2 Fast Diet Recipe Idea Under 200 Calories. Apple, Fennel And Celery Slaw With A Lemon Mustard Vinaigrette.

Apple, Fennel And Celery Slaw With A Lemon Mustard Vinaigrette

In the winter months when I’m craving salad I make slaw. Usually with red and white cabbages, always in plentiful supply in the cooler weather, and whatever other fresh produce is available at the markets. Usually carrots, celery, fennel, beetroot, capsicum, radish, snowpeas and spring onion.  If it’s fresh and crunchy and is capable of being julienned or shredded it’s likely it will find its way into a big beautiful bowl of slaw. Always dressed, by personal preference with a light tangy vinaigrette rather than a heavier mayonnaise.

On my kitchen bench at the moment? A big bowl of crisp and crunchy, slightly sour granny smith apples. Gorgeous as they come and easily transformed into a breakfast compote or dessert crumble. Or perhaps paired with fennel and celery in a very simple but incredibly refreshing slaw. A lemon mustard vinaigrette not only adds bags of flavour but cleverly prevents the apples and fennel from discolouring. Being winter, adding a scattering of toasted pecans to my salad provides yet another dimension of flavour and texture.

Using my trusty Japanese mandolin I prepared my slaw in mere minutes as a light fast day lunch to tide me over to a more substantial dinner later in the evening. At just 130 calories per serve it served its purpose wonderfully. Delicious, crunchy and refreshing. Clean eating at its very best.

Looking over the recipe below I will admit most of the calories do come from the vinaigrette – but used judiciously its the most important element that ties everything together, elevating the slaw into something  interesting that I want to eat. As regular readers of this blog know, in my world I will sacrifice calorie count for flavour every single time. It’s quality over quantity with my preference always skewed, if necessary, towards a smaller serve of a beautifully presented plate of food.

Apple, Fennel And Celery Slaw With A Lemon Mustard Vinaigrette
Makes about 4 cups (130 calories per cup serve)

4 medium celery stalks (24 calories)
1 baby fennel bulb (100g) (30 calories)
2 small green Granny Smith apples (110 calories)
2 long green spring onions (scallions) finely sliced (20 calories)
4 tablespoons flat leaf Italian parsley, finely sliced (4 calories)
3 tablespoons lemon mustard vinaigrette (recipe follows) (244 calories)
2 tablespoons pecans (90 calories)

LIGHTLY toast pecans in a dry heavy based pan over a medium flame. Cool completely, then chop coarsely. Set aside
PEEL celery and slice into matchsticks, using either a sharp knife or the julienne blade on a mandolin.
PEEL and quarter the fennel bulb. Discard the core and slice into matchsticks using either a sharp knife or the julienne blade on a mandolin.
JULIENNE whole unpeeled apples to the core into using a mandolin. Alternatively core and quarter the apples before slicing into matchsticks with a sharp knife.
PLACE julienned apples, fennel and celery into a large bowl. Add finely sliced green spring onions and parsley.
TOSS immediately with 3 tablespoons lemon mustard vinaigrette until well combined. The salad should be lightly dressed and will prevent the salad from discolouring and turning brown.
TRANSFER salad to a  platter and scatter over coarsely chopped pecans. Serve.

Lemon Mustard Vinaigrette
Makes 6 tablespoons (81 calories per serve)

4 tablespoons extra-virgin olive oil (480 calories)
2 tablespoons freshly squeezed lemon juice (6 calories)
1/2 teaspoon Dijon mustard (2 calories)
1/4 teaspoon sea salt flakes

COMBINE all ingredients in a small jar with a tight fitting lid. Shake vigorously for 30 seconds until emulsified. Season to taste with a little more salt

Posted in Salad, Vegetarian, What I Love to Cook | Tagged , , , , , , , , , , , , | 1 Comment

Fool-Proof. A Light and Airy Fat-Free Chocolate Sponge.

Before I delve any further into this post, there is an important disclaimer I need to make. Fat free refers to the contents of my chocolate sponge, most definitely not the filling. Knowing there is no butter in the sponge batter, just five or so basic pantry ingredients; eggs, sugar, flour, cocoa and pure vanilla extract, my light and airy cakes are deliberately and quite unashamedly sandwiched together with a generous layer of thick and luscious full fat cream.

There was a time when the merest thought of baking a sponge filled me with dread and  trepidation. Somewhere, somehow I had bought into the hype. You know the drill; a good sponge requires an exceptionally  light hand, is susceptible to the vagaries of  a temperamental oven, and most daunting of all the domain of show ribbon bearing members of the CWA.  For years I opted to buy sponges from my very obliging bakery – filled or unfilled, round or square. They even make a slab sized version to order – perfect for slicing into squares, dipping in chocolate syrup and rolling in coconut for a “home-made” lamington. There. The secret is out.

A year or two ago I surrendered and went on the hunt for the perfect old-fashioned, traditional sponge cake recipe. The sort our nannas might have made in the days before the convenience of an open seven days bakery just down the road. I cornered just about everyone I knew who had the slightest interest in baking; read anyone who had baked a cake from scratch, at least once in their lifetime.

It seems the lightest and airiest sponge cakes contain no fat, eggs are separated into whites and yolks before beaten into voluminous submission, and dry ingredients sifted no less than three times (to be on the safe side I do five). That’s it, there’s nothing more to it.

To make the process foolproof and very easy, I always use three bowls. Flours sifted into the first, and eggs separated into the second and third. The oven is turned on and the tins base lined with non stick baking paper but sides never greased. I’m not entirely sure why, something to do with an airy rise or maybe simply because there’s no fat in the actual cake. Suffice to say, so far, none of my sponges have stuck to the sides of the tin. Touchwood.

After ten minutes of whisking and folding and twenty minutes baking time in the oven, two perfectly baked sponges are ready to be cooled and filled. All in less time than it takes to walk or drive to the bakery and return home. Of  course, I won’t be totally abandoning my bakery runs. After all, there is always a time and place for everything.

Light and Airy Fat Free Chocolate Sponge Cake

Light and Airy Fat-Free Chocolate Sponge
Serves 8

4 eggs, separated
3/4 cup caster sugar
1 teaspoon pure vanilla extract
3/4 cup cornflour
1/4 cup cocoa
1 tablespoon plain flour
1 1/2 teaspoons baking powder

300ml cream, whipped to soft peaks
1 punnet strawberries, washed, hulled and sliced
icing sugar to dust

PREHEAT oven to 190 C. Line the bases of 2 x 20cm non stick sandwich cake tins with baking paper. No need to grease the tins.
IN A FIRST BOWL, sift together flour, cornflour, cocoa and baking powder with a generous pinch of salt, 4 0r 5 times. This helps ensure a light and airy result.
IN A SECOND BOWL, whisk together egg yolks with vanilla extract until pale and tripled in volume. Set aside.
IN A THIRD BOWL, whisk egg whites to stiff peaks.  Stir through 2 tablespoons of hot water from a freshly boiled kettle before adding sugar, one tablespoon at a time. Beat well after each addition.
FOLD whisked egg yolk mixture into the meringue mixture, until just combined.
LIGHTLY and evenly fold through the cocoa and flour mixture, taking care not to knock the air out of the batter.
SPOON the mixture carefully and evenly into the prepared cake tins. Gently tap the tins  on your bench to remove any trapped air bubbles.
BAKE in preheated oven for 20 minutes or until well risen and the cakes are just beginning to shrink away from the sides of  tin. Turn out onto a wire rack to cool.
WHEN cold, place one cake on serving platter, spoon over whipped cream. Arrange sliced strawberries in an even layer over the cream, saving 1/3 of the punnet to decorate the top. Place the second cake on top, pressing down gently to make sure it is level. Decorate with remaining strawberries and a dusting of icing sugar.

Posted in What I Love to Cook | Tagged , , , , , , , | Comments Off on Fool-Proof. A Light and Airy Fat-Free Chocolate Sponge.

Eat, Fast And Live Longer. A 5-2 Fast Day Meal Idea Under 100 Calories. Whipped Feta

Whipped Feta

Sometimes all I need to tide me over on a 5-2 fast day is one simple but delicious element. Something like this gorgeously light and tangy whipped feta. Smeared on a plate it’s a gorgeous accompaniment to a roasted root vegetable salad, spread on a cracker it’s easily dressed with an endless array of fresh leaves and mandolin sliced garden vegetables, spooned into a pretty bowl and served with crudités it effortlessly transforms into a luscious dip.

Best of all it takes just moments to transform a handful of staple ingredients into something fabulous and moreish that is most definitely greater than the sum of its individual parts. All this for just 23 calories per tablespoon. It really doesn’t get much better than that.

Whipped Feta Cheese

Whipped Feta
Makes approx 1 1/4 cups or 20 tablespoons (23 calories per tablespoon)

1 cup (150g) feta cheese, crumbled (396 calories)
2 tablespoons natural Greek style yoghurt (35 calories)
freshly squeezed juice and finely grated zest of 1/2 lemon (6 calories)
1 teaspoon honey (21 calories)
sea salt, to taste
1-2 tablespoons hot water, as needed to achieve desired consistency

PLACE feta cheese, yoghurt, honey,  lemon juice and zest into the bowl of a food processor.
PULSE until smooth, adding 1-2 tablespoons of hot water, as needed to achieve a light and airy consistency.
SEASON to taste with a little sea salt. Serve with crackers and vegetable crudites.

Posted in Cheese, Small Bites, What I Love to Cook | Tagged , , , , , , | 5 Comments

More Old Fashioned Baking. Inspired By The Edmonds Cookbook. Ginger Crunch.

Ginger Crunch Slice

It seems like an age since I made Ginger Crunch. Another old-fashioned childhood slice, reminiscent of cake stalls, school fetes and fund raising drives. Utterly addictive,  this very simple slice combines a short, crisp and crunchy (almost shattering) biscuit base covered with a thin layer of tooth-achingly sweet yet spicy ginger topping.

Alas this much loved slice owes its roots not to Australia but our Kiwi cousins. Another stalwart of the New Zealand recipe bible The Edmonds Cookbook – along with two of my other favourite no nonsense bakes- Louise Slice and Afghan Biscuits.

What’s wonderful about each of these recipes is that they are incredibly easy and straightforward to make. No fancy ingredients, no complicated processes. As I’m partial to a spicy kick – I’ve added crystallised ginger to my base and a quick grating of fresh ginger to the topping. These spur of the moment additions intensify the heat and are a lovely counterbalance to the sweetness of the topping. Of course the original recipe uses only ground ginger, no doubt reflecting the staples of a well stocked nineteenth century pantry. It’s important that the topping is added to the base while hot to achieve a glossy finish. And rest assured the ratio of topping to biscuit crumb is perfect – rich, sweet and tangy a little really does go a long, long way.

Ginger Crunch

Ginger Crunch
Makes 20 squares

Base
175g butter, softened
3/4 cup caster sugar
2 cups plain flour
1 1/2 teaspoons baking powder
2 teaspoons ground ginger
2 tablespoons crystallised ginger, finely chopped

Topping
125g butter
1/4 cup golden syrup
1 1/2 cups icing sugar
4 teaspoons ground ginger
1 tablespoon fresh ginger, finely grated

PREHEAT oven to 180 C. Grease and line a 20cm x 30cm slice or lamington tin with baking paper.
CREAM butter and sugar until light and fluffy. Stir in flour, baking powder, ground and crystallised ginger.
PRESS crumbly biscuit dough mixture evenly into prepared tin.
BAKE for 20-25 minutes until mixture is golden and firm to touch.
MEANWHILE prepare topping. Heat butter, golden syrup, icing sugar and ground ginger in a small saucepan over medium heat. Whisk constantly until butter has melted and mixture is smooth. Bring to the boil then remove immediately from heat. Stir in fresh ginger.
POUR hot ginger topping over hot slice base. Tilt tin to ensure topping spreads in an even layer over the base. Set aside to cool before cutting into squares.
STORE in an airtight container,  in the refrigerator is best as the topping can become a little tacky in humid weather.

Posted in Baked, Sweet Treats, What I Love to Cook | Tagged , , , , , , , , | 3 Comments