


Before I delve any further into this post, there is an important disclaimer I need to make. Fat free refers to the contents of my chocolate sponge, most definitely not the filling. Knowing there is no butter in the sponge batter, just five or so basic pantry ingredients; eggs, sugar, flour, cocoa and pure vanilla extract, my light and airy cakes are deliberately and quite unashamedly sandwiched together with a generous layer of thick and luscious full fat cream.
There was a time when the merest thought of baking a sponge filled me with dread and trepidation. Somewhere, somehow I had bought into the hype. You know the drill; a good sponge requires an exceptionally light hand, is susceptible to the vagaries of a temperamental oven, and most daunting of all the domain of show ribbon bearing members of the CWA. For years I opted to buy sponges from my very obliging bakery – filled or unfilled, round or square. They even make a slab sized version to order – perfect for slicing into squares, dipping in chocolate syrup and rolling in coconut for a “home-made” lamington. There. The secret is out.
A year or two ago I surrendered and went on the hunt for the perfect old-fashioned, traditional sponge cake recipe. The sort our nannas might have made in the days before the convenience of an open seven days bakery just down the road. I cornered just about everyone I knew who had the slightest interest in baking; read anyone who had baked a cake from scratch, at least once in their lifetime.
It seems the lightest and airiest sponge cakes contain no fat, eggs are separated into whites and yolks before beaten into voluminous submission, and dry ingredients sifted no less than three times (to be on the safe side I do five). That’s it, there’s nothing more to it.
To make the process foolproof and very easy, I always use three bowls. Flours sifted into the first, and eggs separated into the second and third. The oven is turned on and the tins base lined with non stick baking paper but sides never greased. I’m not entirely sure why, something to do with an airy rise or maybe simply because there’s no fat in the actual cake. Suffice to say, so far, none of my sponges have stuck to the sides of the tin. Touchwood.
After ten minutes of whisking and folding and twenty minutes baking time in the oven, two perfectly baked sponges are ready to be cooled and filled. All in less time than it takes to walk or drive to the bakery and return home. Of course, I won’t be totally abandoning my bakery runs. After all, there is always a time and place for everything.
Light and Airy Fat-Free Chocolate Sponge
Serves 8
4 eggs, separated
3/4 cup caster sugar
1 teaspoon pure vanilla extract
3/4 cup cornflour
1/4 cup cocoa
1 tablespoon plain flour
1 1/2 teaspoons baking powder
300ml cream, whipped to soft peaks
1 punnet strawberries, washed, hulled and sliced
icing sugar to dust
PREHEAT oven to 190 C. Line the bases of 2 x 20cm non stick sandwich cake tins with baking paper. No need to grease the tins.
IN A FIRST BOWL, sift together flour, cornflour, cocoa and baking powder with a generous pinch of salt, 4 0r 5 times. This helps ensure a light and airy result.
IN A SECOND BOWL, whisk together egg yolks with vanilla extract until pale and tripled in volume. Set aside.
IN A THIRD BOWL, whisk egg whites to stiff peaks. Stir through 2 tablespoons of hot water from a freshly boiled kettle before adding sugar, one tablespoon at a time. Beat well after each addition.
FOLD whisked egg yolk mixture into the meringue mixture, until just combined.
LIGHTLY and evenly fold through the cocoa and flour mixture, taking care not to knock the air out of the batter.
SPOON the mixture carefully and evenly into the prepared cake tins. Gently tap the tins on your bench to remove any trapped air bubbles.
BAKE in preheated oven for 20 minutes or until well risen and the cakes are just beginning to shrink away from the sides of tin. Turn out onto a wire rack to cool.
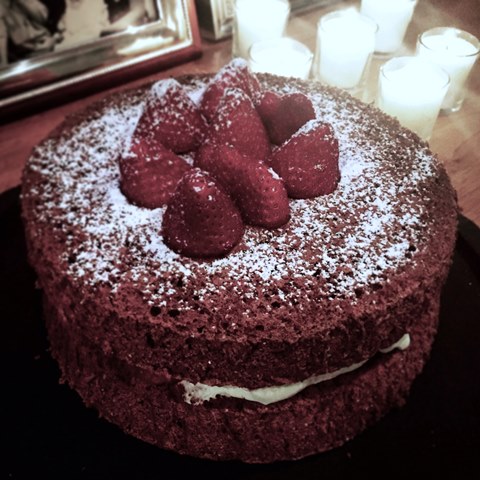
WHEN cold, place one cake on serving platter, spoon over whipped cream. Arrange sliced strawberries in an even layer over the cream, saving 1/3 of the punnet to decorate the top. Place the second cake on top, pressing down gently to make sure it is level. Decorate with remaining strawberries and a dusting of icing sugar.
