Eat, Fast and Live Longer. A 5-2 Fast Diet Recipe Idea Under 300 Calories. Pumpkin and Spinach Dahl.

Pumpkin and Spinach Dahl

As always, we returned from our Easter long weekend road trip with a car boot full of organic produce from my father’s autumn garden. Each time we visit my family in Canberra I am reminded what a privilege it is to be able to prepare meals from scratch, with just picked fruit and vegetables from the garden just a little over 100 metres from the kitchen window. Organic, fresh and bursting with flavour.

Each visit our bounty is different, reflecting the changing of the seasons. In Autumn, with the onset of frosts and cold, the emphasis is well and truly on hardier offerings. Soft berries, stone fruit, tomatoes, zucchini, eggplant, cucumber, beans and lettuces give way to sturdier offerings . This time around there were pumpkins, silverbeet, capsicums, chillies, pomegranate and a huge array of sturdier herbs. We were even lucky enough to score the very last of the summer basil before it’s left to go to seed.

Autumn Garden Produce

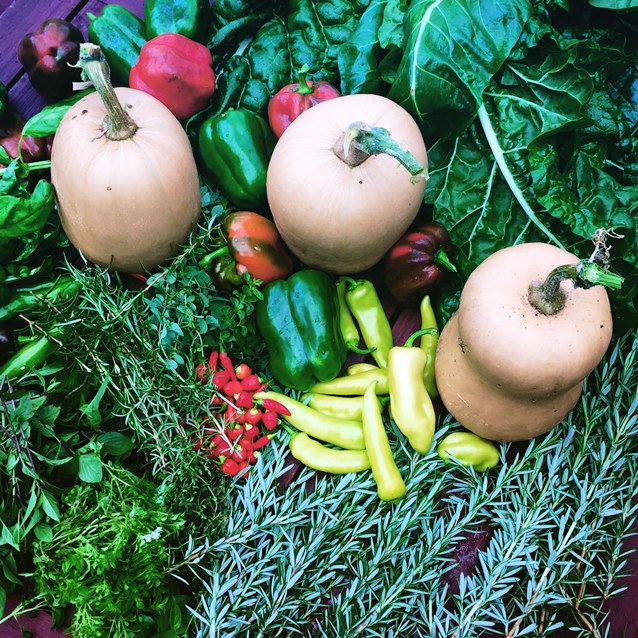
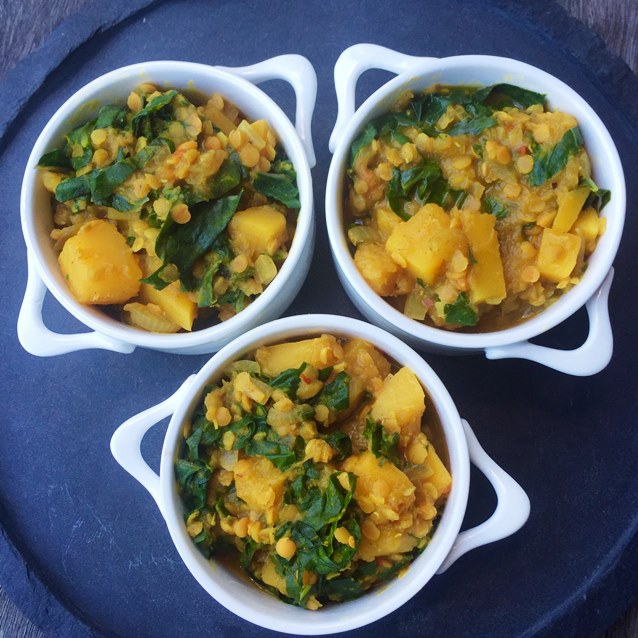
Three hundred food miles later, back in my Sydney kitchen and reeling from my long weekend of Easter overindulgences, I’ve decided to put some of that produce to good use. The result? A 5-2 fast day Pumpkin and Spinach Dahl. It’s fresh, vibrant and enormously satisfying. And may I unreservedly say – 216 calories (for a very generous overflowing cup serve) never tasted so good. Thanks Dad. We so appreciate your labour of love, your garden.

Pumpkin and Spinach Dahl
Makes 6 cups (216 calories per generous cup serve)

1 cup red lentils (675 calories)
1 butternut pumpkin, peeled, de seeded, cubed into 2.5cm chunks (500g prepared weight) (130 calories)
2 vine ripened tomatoes, peeled and diced (44 calories)
2 tablespoons olive oil (240 calories)
1 medium brown onion, finely chopped (44 calories)
1 long red chilli, finely chopped (18 calories)
1 tablespoon fresh ginger, grated (6 calories)
2 garlic cloves, finely chopped (8 calories)
1 teaspoon turmeric (8 calories)
1 teaspoon garam masala (10 calories)
½ teaspoon chilli powder (4 calories)
½ teaspoon sweet paprika (3 calories)
½ teaspoon ground cumin (4 calories)
½ teaspoon ground coriander (3 calories)
3 cups (750 ml) vegetable stock  (60 calories)
thinly peeled rind of 1 lemon, peel only not bitter white pith
3 cups spinach or silverbeet, leaves only, no stalks, shredded (21 calories)
freshly squeezed juice of 1 lemon (12 calories)
sea salt and freshly ground pepper, to taste

PLACE lentils in a bowl and wash thoroughly until the water runs clear. Drain and set aside.
HEAT one tablespoon oil in a heavy based pan or wok  and sauté pumpkin pieces until they are golden all over. Remove to a large bowl and set aside.
ADD the remaining tablespoon oil to the wok, then add onion and cook until soft and translucent.
ADD chilli, ginger and garlic. Fry for a minute or so until fragrant, then add turmeric, garam masala, chilli powder, paprika, cumin and coriander. Stir well to combine before stirring in lentils, pumpkin, tomatoes, lemon peel and stock.
SIMMER, covered, over medium heat for about 20 minutes, stirring occasionally, until lentils have collapsed and pumpkin is soft.  Add more stock or water, as required if the dhal becomes too thick.
STIR through shredded spinach or silverbeet. Simmer for another 2 – 5 minutes or so until greens have wilted, bearing in mind that the spinach will cook faster than the silverbeet.
REMOVE from heat, discard lemon peel. Season to taste with plenty of sea salt and freshly ground pepper.
SERVE with freshly squeezed lemon juice.

Posted in Vegetables, Vegetarian, What I Love to Cook | Tagged , , , , , , , , , , , | 19 Comments

Easter Long Weekend Brunch. Caramelised Apple Dutch Baby Pancakes.

Caramelised Apple Dutch Baby Pancake

This week has been a frantic whirlwind of activity. With Easter coinciding with the end of school term holidays, I’m looking forward to having all my family under one roof and getting away for a long weekend break. There will of course be lots of bonding as we gather together over long leisurely meals. Not wanting to spend a minute more than I have to in the kitchen, I’ll be concentrating on bringing to the table platters of food with an undeniable wow factor that come together with little effort, yet taste like I spent hours on preparation.

Dishes like this. Caramelised Apple Dutch Baby Pancakes. A one pot, or more appropriately skillet, wonder. Prepared on the stove top and finished off with a quick blast in a very hot oven, it’s a clever Dutch take on a perennial family brunch favourite. No time consuming standing in the kitchen and flipping pancakes required. Rather, a whole bowl of batter is simply poured into a hot skillet and baked to golden puffy perfection.

I have no idea why these are called Dutch baby – there’s nothing small or diminutive about them at all.  To make my pancakes just that  little more special and Easter Long Weekend brunch worthy, I added caramelised apples to the mix. Taking advantage of gloriously crisp, sweet yet tart, new season Granny Smith apples. Oh, and one last admission, to feed my rather greedy family I made three batches.

Another huge departure from my seriously healthy 5-2 fast day recipes I know. But…it is Easter and I’ll be celebrating and feasting, and hope you will be too.

Caramelised Apple Dutch Baby

Caramelised Apple Dutch Baby Pancakes
Serves 2-3

For the Dutch Baby Pancake

4 large eggs
1/2 cup pouring cream (or substitute milk)
1 teaspoon vanilla extract
1/2 cup plain  flour
1 tablespoon caster sugar
pinch of salt
sifted icing sugar, for dusting
maple syrup, for serving

For the Caramelised Apples

4 tablespoons unsalted butter
3 granny smith apples, peeled, cored and thinly sliced
1 tablespoon brown sugar
1/2 teaspoon cinnamon
pinch of salt

PREHEAT oven to 220 C.
SIFT the flour, sugar and salt into a large mixing bowl. Make a well in the centre of the bowl.
ADD the eggs and a little of the cream. Using a wooden spoon, stir from the centre gradually drawing in the flour from the sides of the bowl.
GRADUALLY add the remaining cream. Beat well until the batter is smooth.
ALLOW batter to stand in a cool place for at least an hour.
MEANWHILE melt two tablespoons butter in a 20 cm oven proof, heavy based skillet over medium-low heat.
ADD apples, sugar, cinnamon, and salt. Toss gently to combine, then cook, stirring occasionally, until apples are soft, about 10 minutes.
SPOON half the caramelised apple mixture into a small bowl and set aside to use as a topping for the baked pancake.
ADD the remaining two tablespoons butter to the skillet. When butter has melted pour pancake batter evenly over the caramelised apples.
CAREFULLY transfer the skillet to the oven, and bake, uncovered, in a hot oven for 15 -20 minutes, or until golden and puffy; when cooked the tip of a knife inserted into the centre should pull out clean.
SERVE immediately with reserved caramelised apples and a generous drizzle of maple syrup.

Posted in Baked, Breakfast, Fruit, What I Love to Cook | Tagged , , , , , , | 2 Comments

Eat, Fast and Live Longer. A 5-2 Fast Diet Recipe Idea Under 300 Calories. Cold Sesame Soba Noodle Salad With Smoked Salmon, Spinach And Cucumber.

Cold Sesame Soba Noodle Salad With Smoked Salmon, Spinach And Cucumber

On fast days I like to adopt an eating clean mindset and fill my plate with minimally processed, natural foods.  I’ve always loved the simplicity and elegance of Japanese food, so it’s no surprise that I often turn to its cuisine for fast day inspiration.

This cold sesame soba noodle salad celebrates and highlights the flavours, textures and colours of early Autumn seasonal produce. Deliciously light and refreshing, yet improbably satiating, it’s filled with generous slivers of smoked salmon, spinach and late harvest cucumbers. An added bonus is that apart from putting on a pot of water to  parboil the noodles, there’s no cooking involved; just a little slicing, shredding and grating before dinner is served. A beautiful plate of food for just 264 calories per cup serve.

Cold Sesame Soba Noodle Salad With Smoked Salmon, Spinach And Cucumber
Makes 6 cup (264 calories per cup serve)

270g packet soba noodles (960 calories)
250g smoked salmon, thinly sliced (290 calories)
1 cucumber, spiralised or thinly sliced (45 calories)
3 cups baby spinach, shredded (21 calories)
4 long green spring onions, finely sliced on the diagonal (20 calories)
finely grated zest of 1 lemon (5 calories)
1 tablespoon sesame oil (120 calories)
3 cm piece of ginger, peeled and finely grated (4 calories)
30ml (2 tablespoons) light soy sauce (20 calories)
90ml (6 tablespoons) freshly squeezed lemon juice (16 calories)
2 teaspoons sugar (32 calories)
1 tablespoon sesame seeds, lightly toasted for garnish (52 calories)

BRING a large saucepan of salted water to the boil. Add the soba noodles and cook for 3 to 4 minutes or until tender. Drain. Transfer to a large bowl. Rinse with cold water and drain again.
MEANWHILE place sesame oil, ginger, soy sauce, lemon juice and sugar in a small jug or bowl. Whisk well to combine.
IN A LARGE BOWL, combine cooked soba noodles, thinly sliced smoked salmon, spiralised cucumber, shredded spinach, lemon zest and spring onions.
DRIZZLE over dressing. Toss well to combine.
TRANSFER salad to a platter. Scatter over toasted sesame seeds. Serve.

Posted in Salads, Seafood, What I Love to Cook | Tagged , , , , , , , , , , | 6 Comments

Gloriously Gluten Free. Hazelnut and Chocolate Bon Vivant Torte.

It always amazes me at how many deliciously different ways there are to combine four of my most loved pantry staples; butter, eggs, sugar and chocolate. This flourless Bon Vivant adds hazelnut meal to create a torte that transcends all expectations. Rich and decadent, its hazelnut meringue base is topped with a luscious dark chocolate mousse layer which cracks under a brownie like crust as it bakes. All of my favourite chocolate tastes and textures rolled into one.

It’s a very clever and easy torte to put together, the most taxing element involves separating the eggs into yolks and whites. The whites are whipped into a voluminous, fluffy meringue cloud with a little sugar before hazelnut meal is gently folded through to give the torte’s base a little structure. While the base bakes for twenty minutes in a hot oven, chocolate and butter is melted in a heatproof bowl over simmering water, and the yolks are beaten into a frenzy with a little more sugar until thick and pale. Chocolate and yolks combine to form a rich, airy mousse, which is poured over the half cooked hazelnut meringue and returned to the oven for a further twenty minutes until the filling is puffed and set to wobbly perfection; its crust just beginning to crack.

It’s always a close judgement call determining the exact moment to take this torte out of the oven. If I’m making it for dessert I’m happy for it to be a little oozy, for afternoon tea I might give it a few minutes longer.  You need to be aware that the filling does continue to cook by residual heat once removed from the oven, and firms up beautifully in the refrigerator. Of course the wider the cake tin, the thinner the mousse layer and the less time the torte needs in the oven for its second baking. If using a smaller baking tin, reduce the oven temperature to 170 C and allow the torte to bake for 30 minutes or so until the mousse layer is cracked but set. Allow the torte to continue to cool and set in the refrigerator for at least two hours, but overnight is best, before serving

I had intended to serve my Bon Vivant for Sunday night dessert, but somewhere along the way those plans were well and truly derailed. Caving into pressure, I removed it from the fridge, and all but the smallest sliver of that irresistable, slightly oozing torte was inhaled well before dinner, for afternoon tea.

Chocolate Hazelnut Bon Vivant Torte

Hazelnut and Chocolate Bon Vivant Torte
Serves 8

8 eggs
1/2 teaspoon salt
3/4 cup (180g) caster sugar
2 1/2 cups (250g) ground hazelnuts ( or use ground almonds or a mixture of both)
1 block (220g) dark chocolate
125g  butter
1 teaspoon pure vanilla extract
1 teaspoon cocoa, sifted
120g (1/2 cup) caster sugar

PREHEAT oven to 180 C. Generously butter sides and base of a large 26cm round spring form (removable base) cake tin. Line base with non stick baking paper. Place tin in the refrigerator.
BEAT egg whites with 1/2 teaspoon salt until soft peaks form. Gradually add the sugar, one tablespoon at a time, beating well after each addition until thick and glossy.
FOLD through hazelnuts. Pour batter into prepared tin and bake in preheated oven for 20 minutes.
BREAK chocolate into pieces and gently melt with butter in a heatproof bowl set over a pan of simmering water (don’t let the bowl touch the water). Remove from heat, stir through vanilla extract and sifted cocoa. Set aside to cool slightly.
MEANWHILE using an electric mixer beat egg yolks with sugar until thick and pale. Gradually add the cooled chocolate mixture, beating well until combined.
REMOVE hazelnut meringue from oven, and carefully pour chocolate mousse topping over the base.
RETURN to 180 C oven, centre rack position, and bake for a further 20 minutes until filling is puffed and surface just beginning to crack.  The centre of the torte should still have a slight wobble when the tin is gently shaken.
PLACE tin on a wire rack to cool before transferring to the refrigerator to set completely, allow at least 2 hours, preferably overnight.
TO SERVE, remove torte from tin and dust with icing sugar before slicing.

Posted in Baked, Chocolate, What I Love to Cook | Tagged , , , , , , , , | 7 Comments

Eat, Fast and Live Longer. A 5-2 Fast Diet Recipe Idea Under 400 Calories.Twice Baked Sweet Potatoes Loaded With Spiced Lamb.

Every now and then a deliciously satisfying 5-2 fast day recipe idea comes along that actually makes me forget that I am fasting. This is one of them. In my books baked stuffed potatoes have always been well and truly synonymous with stick to your ribs comfort food. Think roasted carbohydrates loaded with butter, finished with a dollop of sour cream for good measure. Sinful and delicious. Most definitely not a meal I’d usually even consider putting anywhere near my fast day plate. Or is it?

Remember those old nuggety words of wisdom  “Where’s there’s a will, there’s always a way?”  Imagine that you swap out regular white potato for high in beta carotene and vitamin A sweet potato, and replace all the high calorie dairy loadings with a heavily spiced lamb. Here’s what happens. You’re able to enjoy a gorgeous, enormously satisfying twice baked sweet potato bursting with flavour for just a fraction of the original calorie count. 

I know these loaded sweet potatoes are going to make a regular appearance on my fast day plate as we move into the cooler months. It’s one of those meals that can be prepared in advance and will feed the whole family; the lucky non fasters do not have to stop at just one. Of course the leftovers, if there are any, are delicious next day – cold or warmed through.

For good measure I like to source my lamb mince directly from my butcher, it tends to be leaner and contains less fat than the pre packaged offerings available at the supermarket. A final word of warning, the filling can be quite spicy, so if you’re not a spice lover, do adjust the heat accordingly. 

Baked Sweet Potato Stuffed With Spiced Lamb.

Twice Baked Sweet Potatoes Loaded With Spiced Lamb
Serves 4 (358 calories per serve)

1 teaspoon olive oil (40 calories)
4 medium (600g) whole sweet potatoes, unpeeled (516 calories)
1 medium brown onion, finely diced (46 calories)
2 garlic cloves, crushed (8 calories)
1 teaspoon ground cumin (8 calories)
1 teaspoon ground coriander (6 calories)
1 teaspoon ground cinnamon (6 calories)
½ teaspoon chilli powder (3 calories)
500 g lean lamb mince (720 calories)
2 vine ripened tomatoes, peeled, seeded and diced (70 calories)
1/2 cup fresh flat-leaf parsley leaves, finely sliced (8 calories)
sea salt flakes and freshly ground black pepper
freshly squeezed lemon juice, to serve (5 calories)

PREHEAT oven to 180 C. Thoroughly wash and dry sweet potatoes, then place on a baking paper lined oven tray and bake for 45-55 mins, until tender.
WHILE the sweet potatoes are roasting, heat a large, heavy saucepan over medium heat. Add minced lamb in a thin layer. Brown evenly, using the back of a wooden spoon to break up any lumps as you stir.
ONCE lamb mince is golden brown, stir through cumin, coriander, cinnamon and chilli. Continue cooking for another minute or so until fragrant. Transfer the mixture to a medium bowl and set aside.
ADD olive oil to the pan, then add onion, garlic and a good pinch of sea salt. Sauté for 5  minutes or so until onion is soft and transparent. Remove from heat and add to the  lamb mixture.  Season generously with sea salt and freshly ground pepper. Set aside.
WHEN sweet potatoes are cooked through, remove them from the oven and allow to stand until they are cool enough to handle.  Take a long slice from the top of each potato, then use a teaspoon to scoop out the flesh from each skin, being careful to not pierce the sides.
ROUGLY mash the sweet potato flesh with a fork. When cool stir through the lamb mixture along with diced tomatoes and parsley. Season mixture with sea salt and pepper.
RETURN the scooped out sweet potato shells to your paper lined roasting tray. Generously fill with the lamb and sweet potato stuffing mixture.
BAKE in a preheated 180C oven for 15-20 minutes until golden and heated through. Serve with a generous drizzle of freshly squeezed lemon.

Posted in Lamb, Vegetables, What I Love to Cook | Tagged , , , , , , , , , , , , | 12 Comments

It’s All In The Technique. Sweet and Simple Peanut Brittle.


Brittle

Toffee making and I have had a long and chequered history. I have the scars to prove it. Over the years I have experimented with all sorts of permutations in my quest to achieve toffee nirvana. Recently I discovered a new and very simple technique. Maybe fifteen minutes prep time and an hour of  waiting for the brittle to cool. Here’s how.

Simply melt sugar in an even layer over medium heat in a wide, heavy based saucepan or wok. There’s no need to combine the sugar with water to make a simple syrup first. There’s no need for the addition of honey, corn syrup or vinegar to stabilise the mixture and prevent re crystallisation of the sugar as it heats.

This technique is bold but fast. Yes, the sugar needs to be watched like a hawk as it melts, once heated through the sugar liquefies very, very quickly. Use the widest pan you can – even a skillet will do. Resist the urge to stir. The best way to achieve an even distribution of heat is to gently swirl and tilt the pan. I find it easiest to use my wok as it has a long handle and I know from bitter experience how painful toffee burns can be. A word of warning – stirring the sugar will cause it to clump and resemble something that looks like moon rocks. I’ve been there, done that. The good news is that the toffee can still be rescued – with a little patience those moon rocks will eventually melt into the sugar syrup – the process just becomes more time consuming and messy.

Once the sugar has melted, add nuts and butter. Cook for a few moments longer until all the ingredients are well incorporated and the mixture reaches hard crack stage. For a sweet and salty hit, at this point I also like to stir through some sea salt flakes. Transfer the mixture to a preheated oven tray; the secret to achieving a thin, even layer of brittle with a minimum of fuss. Leave to cool before snapping the crisp buttery brittle into satisfying shards.

Peanut Brittle

For a trouble shooting guide to making perfect toffee the old-fashioned way without a candy thermometer click through the link to my previous post It’s The Shatter That Matters. Old-Fashioned Homemade Honeycomb.

2 cups sugar
2 cups roasted peanuts or any other nuts of your choosing
125g unsalted butter
1/2 tablespoon sea salt flakes

LINE a large oven tray with baking paper. Place in a preheated 150 C oven to heat through.
PLACE a large wide heavy based non stick pan or wok over medium heat.
ADD all the sugar in an even layer.
HEAT, without stirring,  until the mixture caramelises, swirling the pan every now and then until all the sugar crystals have dissolved and the mixture is a light golden colour. The mixture will begin to caramelise very quickly in a matter of minutes. This should take about 5 minutes depending on the size of your wok or saucepan. The wider the base, the quicker the sugar will melt. As the sugar melts it may clump together, those clumps will dissolve as the sugar heats and liquifies.
REDUCE heat to low.  Watch the mixture like a hawk and continue to heat through until the sugar turns a rich golden colour ( 130 C on a candy thermometer or test for hard ball stage by dropping a teaspoon of the mixture into a small glass of water).
STIR  through peanuts and then butter. Allow to cook for a few more minutes, stirring constantly until the butter and nuts are completely incorporated ( 150 C on a candy thermometer or test for hard crack stage by dropping a teaspoon of the mixture into a small glass of water).
STIR in sea salt. Remove wok from heat.
REMOVE preheated tray from oven and quickly pour over the nut brittle mixture. The heat of the tray will help the brittle spread thinly and evenly. You can use a rubber spatula to smooth the edges, if desired.
ALLOW to cool completely, about an hour at room temperature. If it is a humid day, place the tray in the freezer for 10 minutes to harden.
BREAK the brittle into shards and store in an airtight container at room temperature.


Posted in Confectionery, Sweet Treats | Tagged , , , , , , , | 9 Comments

Eat, Fast and Live Longer. A 5-2 Fast Diet Recipe Idea Under 200 Calories. Sautéed Green Beans With Roasted Cherry Tomatoes.

Sautéed Green Beans With Roasted Cherry Tomatoes

The inspiration for this week’s 5-2 fast day offering? Green beans. Or fagiolini as they were fondly referred to in our house. Growing up, the contents of our dinner plates were always influenced by what was in season and plentiful supply in my father’s thriving vegetable garden. My earliest memories of late summer and early autumn are of afternoons spent in the bean patch, picking off fat pods full of beans from the trellis. If memory serves me correctly, in peak season those beans needed to be picked almost every day. Hence at a certain time of year beans were our constant dinner companion.

These days I no longer have access to a sprawling vegetable garden, and more often than not source fresh fruit and vegetables from my local farmer’s market. At the moment the trestle tables at those markets are awash with piles and piles of in fresh, crisp, in season beans. Fabulous paired with sweet yet tart, beautifully ripe, in season tomatoes, they bring back fond memories of one of my favourite fagiolini dishes; sautéed green beans cooked in a home made tomato sauce. This dish has long been a staple late summer side dish on our family dinner table. Here I have adapted it a little, dressing it up with the addition of roasted cherry tomatoes to become a more substantial 5-2 fast day meal.

Sautéed Green Beans With Roasted Cherry Tomatoes
Serves 4 (141 calories per serve)

500g green beans, rinsed, topped and tailed, sliced in half on the diagonal if very long (150 calories)
2 tablespoons olive oil, divided (240 calories)
1 medium brown onion, finely diced (46 calories)
2 cloves garlic, finely sliced (8 calories)
1 long red chilli, finely sliced (18 calories)
400g tin crushed tomatoes (32 calories)
1 punnet cherry tomatoes (54 calories)
a good pinch of sugar (5 calories)
a dash of balsamic vinegar (5 calories)
1/4 cup basil leaves, shredded (4 calories)
sea salt flakes and freshly ground pepper to season

PREHEAT oven to 200C. Line an oven tray with baking paper.
IN A MEDIUM BOWL, toss whole cherry tomatoes with a tablespoon of oil. Generously season with sea salt and freshly ground pepper. Arrange in a single layer on the prepared tray.
ROAST in hot oven for 10-15 minutes until blistered and tender, turning once after 10 minutes. Remove from oven and set aside in a warm place.
MEANWHILE heat the remaining  tablespoon of oil in a large heavy based saucepan over medium heat. Add onion and sauté with a pinch of salt until soft and translucent.
ADD garlic and chilli. Sauté until fragrant.
ADD green beans and continue to sauté  for a further 3 minutes.
ADD the tinned tomatoes and cook until the sauce begins to thicken. Break down the tomatoes with the back of your wooden spoon as you stir.
ADD balsamic vinegar and sugar. Stir well to combine. Turn the heat down to low and simmer for 15 minutes until the sauce is rich and thick but beans still al dente. Stir through roasted cherry tomatoes and shredded basil. Serve.

Posted in Vegetables, Vegetarian, What I Love to Cook | Tagged , , , , , , , , , , | 2 Comments

Seafood Sunday. Barbecued Whole Snapper With Coriander, Chilli And Lime.

Seafood Sunday. Barbecued Whole Snapper With Coriander, Chilli And Lime.

We may well and truly be in the midst of Autumn here in Sydney, but the weather is still hot and humid as we languish through a seemingly endless Indian summer. In our busy household, lazy unscheduled Sundays are a rarity; particularly mid term as we lurch from one commitment to another. What to do with a precious free Sunday? In my books I can’t quite think of anything more perfect than a casual get together with friends around a seafood barbecue.

Of course, in our house at least, all the best seafood barbecues entail a visit to the busy and chaotic Sydney Fish Markets in Blackwattle Bay. To pick up a veritable bounty of scrupulously fresh seafood; this time a generous haul of fresh local prawns, oysters and whole snapper. It really is true, the fresher the fish, the less preparation is required to produce a delicious spread.

We served freshly shucked oysters au naturel with plenty of lemon, and giant whole cooked prawns in their shell with crusty baguette and a very rustic avocado salsa. All washed down with glasses of crisp dry white wine as the piece de resistance – a whole coriander, chilli and lime infused snapper was grilled to perfection on the barbecue. Simple, stunning and undeniably delicious. The only drawback? In all the impatient excitement of devouring that fish, all my best intentions of taking a happy snap of that grilled snapper in its plated glory completely flew out of my head. I know, I know, raw seafood as captured in the photo above isn’t all that pretty – but it’s honest and real. And perhaps not truly ugly.

Seafood Sunday

Barbecued Whole Snapper With Coriander, Chilli And Lime
Serves 4

1 x 1.5 kg whole snapper, gutted, cleaned and scaled
1 teaspoon cumin seeds, dry roasted
2 long red chillies, finely sliced
1 bunch coriander, tender stems and leaves
finely grated zest and juice of one lime
2 tablespoons olive oil
sea salt and freshly ground pepper

RINSE snapper inside and out under cold running water. Pat dry with paper towel. Make 3 shallow cuts, 1cm-deep, in thickest part of each side of flesh.
USING a mortar and pestle, coarsely pound dry roasted cumin. Add chilli, three quarters of the bunch of coriander stems and leaves, lime zest and juice. Continue to pound to a rough paste. Stir through olive oil and season with sea salt and pepper.
PLACE a large sheet of baking paper on top of a large sheet of foil on a flat surface. Place snapper in centre of paper.
SMEAR a generous amount of the coriander, chilli and lime marinade into the cavity of the snapper, and generously rub remaining marinade all over the outside of the fish.
FOLD baking paper and foil to enclose fish, scrunching outer layer of foil to secure. Place snapper parcel in fridge to chill for at least half an hour.
PREHEAT barbecue to medium-high with hood closed. Remove snapper parcel from fridge.
BARBECUE snapper parcel, with hood closed, for 12 – 15 minutes each side.
UNWRAP and check that snapper is cooked. Insert tip of a knife into the thickest part of the fish to check flesh is moist and flakes slightly. Rewrap and return to the barbecue for a few more minutes if necessary.
TRANSFER snapper to a serving plate. Top with remaining coriander stems and leaves. Serve with plenty of lime wedges and salad.

Posted in Marinades, Pastes and Dressings, Seafood, What I Love to Cook | Tagged , , , , , , | 4 Comments

Eat, Fast and Live Longer. A 5-2 Fast Diet Recipe Idea Under 300 Calories. Larb Gai. Thai Chicken Salad.

Larb Gao.Thai Chicken Salad

Another 5-2 fast day, another salad. This time Larb Gai, an incredibly refreshing sweet, spicy, hot and sour Thai chicken salad. I love this dish not only for its big, bold, flavours but also for it’s lazy preparation. After just a little slicing and dicing and a very quick sear in a hot wok, the salad comes alive in a matter of moments. Deliciously fragrant, it’s a riot of colour on my plate. Little wonder it’s one my fast day favourites, especially so at the end of those days when my stomach won’t stop rumbling and all I can think about is food.

Larb Gao.Thai Chicken Salad.

Larb Gai. Thai Chicken Salad.
Serves 4 (293 calories per serve)

2 tablespoons uncooked jasmine rice (90 calories)
1 tablespoon peanut oil (120 calories)
2 garlic cloves, crushed (8 calories)
2 long red chillies,  minced (36 calories)
1 stalk lemongrass, white part only, chopped (10 calories)
1 thumb sized piece of fresh ginger, peeled and roughly chopped (18 calories
500g lean free range chicken mince (680 calories)
juice and finely grated zest of 2 limes (12 calories)
2 tablespoons fish sauce (12 calories)
1/2 tablespoon brown sugar (26 calories)
1/2 medium red onion, quartered and thinly sliced (24 calories)
1 cup bamboo shoots, rinsed (25 calories)
1/2 cup coriander leaves, picked from stems (8 calories)
1/2 cup mint leaves, picked from stems (8 calories)
separated leaves of one small head of lettuce, to serve (45 calories)
1 Lebanese cucumber, finely diced, to serve (24 calories)
1/2 punnet cherry tomatoes, halved or quartered, to serve (27 calories)

HEAT wok over medium heat. Add rice and cook, stirring continuously, for about 3 minutes until lightly golden brown. Transfer to a mortar and gently pound with a pestle until crushed. Set aside.
ADD oil to wok and swirl to coat. Add garlic, chilli, lemongrass and ginger. Stir-fry until fragrant.
INCREASE heat to high, add chicken and continue to stir fry, using the back of a wooden spoon to  break up any lumps, for 10 minutes until mince begins to brown and is cooked through. Remove from heat.
COMBINE lime zest and juice, sugar and fish sauce in a small jug or bowl. Pour over chicken mixture. Set aside for 10 minutes to cool slightly. Check seasoning. If mixture is too salty add a little more lime, too sour a little more fish sauce.
ADD red onion, bamboo shoots, mint and coriander leaves. Toss gently before transferring to a platter to serve. Scatter over toasted ground rice.
SERVE with lettuce leaf cups and garnish with diced cucumber and cherry tomatoes.

Posted in Poultry, Salad | Tagged , , , , , , , , | 10 Comments

Rich, Fudgy And Delicious. Not Quite Sacher Torte.

This post is for my dear friend Jane. Who recently reminded me of the joys of  sacher torte, a rich and decadent chocolate cake invented in Vienna in 1832 by a young apprentice chef Franz Sacher for Prince Metternich. Jane was fortunate enough to eat her cake whilst on a recent ski holiday to Austria. Lucky girl! How I wish I’d been there.

I well remember my first taste of Sacher Torte many, many moons ago. Air-freighted all the way from Vienna in honour of a house mate’s significant birthday. It caused quite a frisson of excitement, arriving nestled in a little embossed wooden crate. How chic and sophisticated. At least to our Antipodean eyes.

Fast forward to this week. Welcome Autumn. Given the stifling heat and humidity of a long, hot summer it’s been a while since I’ve baked anything with chocolate. Ever practical, I’ve blamed the weather. Too melty and liable to disintegrate into an unholy mess. With a very gradual cooling of temperatures, however, our household has suddenly developed more than a little hankering for rich, deep, dark chocolate cake. The perfect excuse to finally bake a sacher torte. In mini portion controlled form to save those of us who are resolutely sticking to a 5-2 fast day regime and don’t need the unnecessary temptation of a unfinished cake sitting on the kitchen bench to railroad our best intentions.

And so it was I pulled out my mini spring form tins to bake a rather rustic, need I say it, Antipodean interpretation of  the classic Viennese Sacher Torte. As ever, always fiddling with a concept at the edges, I eschewed the traditional apricot topping for plum, using a jar of my mother’s home-made jam. A very worthy and delicious pairing for the fudgy chocolate cake. Wanting to use every last bit of it’s gorgeous flavour, I chose not to sieve my jam, hence it’s thick, rather bumpy appearance. Drenched with a final flourish of rich chocolate glaze, those little tortes were incredibly moist and fruity. And very, very moreish.

Of course purists with a craving for The Original Sacher Torte could always order a cake on-line. From the Hotel Sacher no less. They’re still making them over 175 years later, almost entirely by hand from Franz Sacher’s closely guarded recipe, and for those of us living far, far away shipping them world-wide. Out of curiosity I checked. Of course, dear Jane, next time I visit I’ll make my Not Quite Sacher Torte version for you. They’re really not quite as complicated to make as they might sound, and most definitely worth the effort.

Rich And Fudgy Not Quite Sacher Torte

Not Quite Sacher Torte
Adapted from a recipe by Taste
Makes 6 small 10 cm round tortes

200g dark chocolate
150g unsalted butter, cubed
1 teaspoon pure vanilla extract
4 large eggs, separated into yolks and whites
2 large egg whites, extra
a generous pinch of  salt
1 cup caster sugar, divided
1/2 cup plain flour
1/2 cup almond meal
2 tablespoons sifted cocoa powder, for dusting tins

For The Glazing
1 1/2 cups of your favourite jam, traditionally apricot jam is used for an authentic sacher torte but I used plum
220g dark chocolate, chopped or broken into pieces
1 cup caster sugar
1/2 cup water

PREHEAT oven to 180 C. Grease and base line six 10cm round spring-form cake tins with baking paper. Dust greased inner sides of tins with cocoa powder.
BREAK chocolate into pieces and gently melt with butter in a heatproof bowl set over a pan of simmering water (don’t let the bowl touch the water). Remove from heat, stir through vanilla extract and set aside to cool slightly.
MEANWHILE beat egg yolks with 1/4 cup sugar until very thick and pale.Best to do this with an electric mixer. Gradually add the cooled chocolate mixture, beating well until combined.
IN A SEPARATE bowl, whisk all 6 egg whites  to soft peaks. Gradually add remaining 3/4 cup sugar, one tablespoon at a time, whisking until stiff and glossy.
FOLD one-third of the meringue into the chocolate mixture to loosen, then gradually fold in remaining meringue.
SIFT flour and almond meal over the chocolate meringue mixture. Gently fold through until just combined.
SPOON batter into the prepared tins. When filled tap the tins gently on the kitchen bench to evenly distribute the batter.
BAKE for 25 – 30 minutes or until well risen at the top. A toothpick or skewer inserted into the centre of each cake should come out clean. Don’t worry if the tops of the cakes crack a little, as these will become the bottom of the tortes when inverted from their tins.
COOL cakes slightly in their tins before carefully inverting onto a wire rack. Peel off the baking paper and leave the cakes to cool completely.

To Glaze The Cakes

MELT jam in a saucepan over medium heat. For a smooth finish pass jam through a sieve to remove any chunks of fruit. Set aside to cool slightly.
PLACE a large sheet of tin foil or baking paper under the wire rack holding the cakes.
Carefully brush jam evenly over top and sides of each inverted cake, allowing any excess to drip through the rack. Transfer rack and jam glazed cakes to a large tray and chill for at least 30 minutes in the refrigerator or until glaze is set.
MEANWHILE bring  sugar and water to the boil in a saucepan, stirring until sugar dissolves. Add chocolate, remove from the heat and stir until smooth. Transfer to a glass jug and set aside to cool and thicken slightly until glaze is of a coating consistency.
REMOVE rack of  jam covered tortes from the refrigerator. Place rack over a large sheet of tin foil or baking paper to catch any drips as you continue to glaze the cakes.
POUR chocolate glaze onto the centre of each cake. Using a palette knife spread glaze gently and evenly over the top and down the sides of the cakes. Return cakes to the refrigerator to chill for an hour or so until glaze is set.

Posted in What I Love to Cook | Tagged , , , , , , , , , , | 7 Comments