Hermann the German Friendship Cake with Apples, Cherries, Almonds and Rum

Hermann the German Friendship Sourdough Cake starter survived a road trip through Daylesford and the Macedon ranges and the altitude of a plane trip. He settled easily into his new home in Sydney and is alive and well. Yesterday was Day 9 of what I like to think of as the feeding and breeding program. He spawned 3 little baby Hermanns; one for the oven, one to keep and two to adopt out to new homes.

There have been no shortage of offers to adopt baby Hermanns.  Talk about reverse psychology at its very best. Last week in my post I was adamant that I wouldn’t inflict any baby Hermann’s on unsuspecting friends. To keep up with overwhelming demand it looks like I will be feeding and breeding Hermanns for quite some time. For those of you who are new to the blog or haven’t been following the story, here’s the link to the original post, From Daylesford With Love. Hermann the German Friendship Cake.

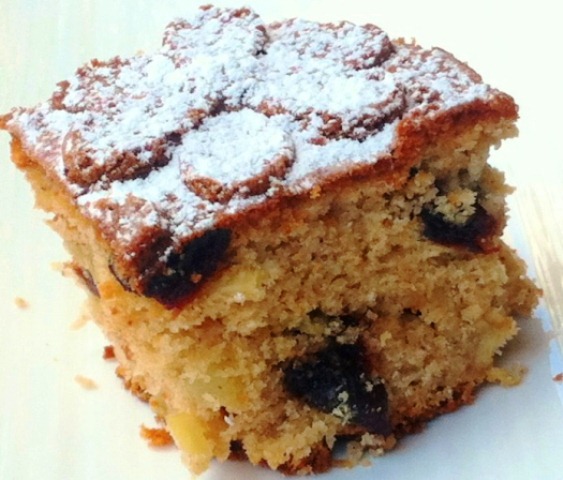
I’m delighted to report that I have successfully baked my first cake. Decisions. Decisions. Which flavourings was I going to use? After much contemplation I settled on apples, dried cherries, almonds and rum.

Here’s Hermann on Day 10 frothing wildly, preparing for his trip to the oven.

After nine days of stirring and the occasional feeding, making the actual cake  was a breeze. I beat the following ingredients into a very hungry Hermann with nothing more than a wooden spoon:

2 cups of self raising flour
1 cup caster sugar
2 teaspoons of mixed spice
1/2 teaspoon of salt
2/3 cup olive oil
2 eggs
2 apples, peeled and cut into chunks
1 cup of dried cherries, softened in hot water for 20 minutes, drained
1/2 cup slivered almonds
1 teaspoon pure vanilla essence
1 teaspoon pure rum extract.

After a good beating, I poured the batter into a 30 cm by 22 cm rectangular cast iron daisy cake pan. To be honest I had forgotten I had this until I went rummaging through my cupboards looking for a suitable tin in which to bake my Hermann. It must be a long, lost relic of one of my daughters’ birthday parties when they were very young.

I brushed some melted butter on top – the recipe called for 1/4 cup but this seemed way too much so I only used half. Then I sprinkled some brown sugar on top, again not quite as much as the 1/4 cup sugar specified in the recipe. Here’s the cake ready to be baked in the oven.

And here’s how Hermann the German Friendship Cake looked emerging from the oven, studded with apples, cherries and almonds.

Look how pretty he looked turned out of the pan and dusted with a little icing sugar. More of a Hermione than a Hermann I think.

Good enough to eat! Warm and delicious, just out of the oven!

Posted in Baked, Sweet Treats, What I Love to Cook | Tagged , , , , , , , , | 7 Comments

Rich and Decadent. Whiskey, Chocolate and Hazelnut Cake with Rhubarb Compote and Creme Fraiche

I was lucky enough to be introduced to this gorgeous flourless chocolate cake many years ago by my neighbour, Amber. She whipped up ten of these for her brother’s wedding! We were the grateful recipients of some leftovers. At the time I had some rhubarb compote and creme fraiche in the refrigerator. The sourness of the rhubarb and creme fraiche cut beautifully through the richness of the cake.

Believe me this cake is so very, very rich. Even the most dedicated chocoholic would need just a small sliver to satisfy any  chocolate cravings. It features both chocolate and cocoa enriched with whiskey, egg yolks and butter, all folded through a hazelnut meringue. Once baked it has a crisp crust encasing a soft almost crumbly chocolate and hazelnut filling.

I like to finely chop the roasted and skinned hazelnuts by hand. It doesn’t take long, is oddly satisfying and gives the finished  cake a wonderful texture. Use a food processor to chop the hazelnuts if you must but be careful not too over-process. I would imagine using pre packaged hazelnut meal won’t quite work in this recipe, it is way too fine and would compromise the texture of the cake.

The original recipe comes from the November 2008 edition of Gourmet Traveller, and calls for 150 ml of whiskey.  Amber warned me that she had used only about a third of that in her cakes. It’s obviously an error. The first time I baked the cake I used 75 ml of whisky and it was way too overpowering. Now I use 50 ml and as Goldilocks would say, it’s just right. I have also occasionally substituted Kahlua  for the whiskey with stunning results.

This is definitely the dessert cake to make when you’re out to impress your guests. It’s perfect for chocolate lovers, gluten-free and deceptively simple to make. If you can melt chocolate and whip up a meringue, this recipe is for you. Try it. You won’t be disappointed.

Whiskey, Chocolate and Hazelnut Cake
 Gourmet Traveller, November 2008

This flourless cake has a beautiful crumbly texture and a lovely crust. Be patient and let it cool properly before serving because it does need time to settle.

100 g unsalted butter, coarsely chopped.
2 tablespoons Dutch-process cocoa, plus extra for dusting.
280 g dark chocolate (70% cacao), coarsely chopped.
50 ml Scotch Whiskey*
6 eggs, separated.
3/4 cup (175 g) sugar
100 g hazelnuts, roasted, peeled and finely chopped.

*original recipe called for 150 ml but this was quite obviously an error.

PREHEAT oven to 190 C.
BUTTER a 22 cm diameter cake spring form cake tin and dust with cocoa
MELT chocolate and butter in a heatproof bowl placed over a saucepan of simmering water, stirring until smooth. Remove from heat, stir through whiskey, cocoa and egg yolks.
WHISK egg whites and sugar until soft peaks form and fold with hazelnuts into chocolate mixture.
POUR into pan and bake until cake rises and top cracks (20 – 30 minutes).
COOL in pan, gently pressing on top so it falls back evenly. Stand for 15 minutes on a rack. Remove from tin, dust with cocoa and serve.

I like to serve this cake with rhubarb compote and creme fraiche to cut through the richness of the chocolate.

Rhubarb Compote

1 bunch rhubarb, stalks only
1/2 cup sugar
strips of lemon zest from 1 lemon
juice of 1 lemon
dash of pure vanilla essence

TRIM rhubarb, wash well and cut into 4 cm chunks
PLACE rhubarb, sugar, lemon  zest and juice in a heavy bottomed saucepan and simmer on low heat until soft, about 10 minutes
REMOVE from heat and stir in a dash of pure vanilla essence.
COOL compote completely. Mixture will thicken as it cools. Refrigerate in a glass jar until needed.

Posted in Baked, Chocolate, Sweet Treats, What I Love to Cook | Tagged , , , , , , , , , , | 2 Comments

Chinese Master Stock. Soy Poached Chicken with Soba Noodles and Greens

My family loves chicken soup. In all its many guises. Chicken Noodle Soup, Chicken Soup with Wontons, Tofu and Bok Choy, Chicken and Sweet Corn Soup, Chicken and Leek Soup, the list goes on and on. It’s fair to say that there is always home-made chicken stock on the stove, in the fridge or even the freezer at our house. It might be white or brown chicken stock or even my version of Chinese Soy Master Stock.

Years ago we were hooked on Masterchef. Remember Alvin Quah’s Drunken Chicken with Bruised Salad for the Seven Deadly Sins challenge? We were salivating. So the very next day I downloaded the recipe and cooked the chicken for dinner that night. I absolutely loved it but my family baulked at the litre of shaoxing (Chinese rice wine) used in the recipe. They said they found it overpowering. But the chicken was so tender and delicious. Almost silken in texture. There was no way I was going to give up this method of cooking.

If you google Chinese Master Stock pages and pages of recipes pop up on-screen. Originally the stock would have been kept simmering on a wood stove for years and replenished again and again.  The base of the Master Stock is made from typical Chinese ingredients; water, soy sauce sugar and rice wine to which a variety of spices and flavourings are added, such as spring onions, shallots, star anise, cassia bark, citrus peel, peppercorns, garlic, ginger and dried mushrooms.

Here’s my version of Master Stock without the shaoxing and using ingredients which are usually available in my fridge and pantry. Of course the Master Stock is a little bit different each time I make it depending on what is on hand at the time. There are no hard and fast rules. The key to a great tasting master stock is tasting as you go and adjusting the flavours accordingly. Be warned though the stock is salty. Perfect for poaching a chicken but it needs to be diluted with either chicken stock or water if you are going to turn it into a soup or sauce.

This recipe may seem like a bit of effort the first time but once  cooled, strained and refrigerated can be used again and again. I like to cook two small chickens so I can have leftovers for lunch the next day. The chicken is so moist, tender and delicious. It is excellent shredded in a salad or sandwiches.

I like to freeze my leftover master stock in 2 cup capacity Tupperware containers. This is the perfect size for poaching a chicken breast or two for a quick meal. The breasts need to be simmered in the broth for just 10 minutes, and steeped in the covered pot for another 20 minutes. Once defrosted, I always replenish the stock with fresh garlic, ginger, shallots and aromatics as I bring it to a simmer.

Soy Poached Chicken with Soba Noodles and Greens

For the Soy Master Stock

2 Free range chickens weighing about 1.2 kg each
10 cups water
1 cup light soy sauce
1 cup dark soy sauce
1/2 cup mirin
3 stalks celery, cut into 5cm lengths
1/2 bunch fresh coriander, roots, stems and leaves
2 leeks cut in half lengthwise
strips of orange zest from 1 small orange or mandarin
2 tablespoons grated palm sugar
2 thumb sized pieces of ginger,sliced thinly
6 green shallots trimmed, cut into 5cm lengths
3 garlic cloves, bruised
1 long green chilli, whole
10 peppercorns
4 star anise
1 cinnamon quill

USE a large pot that is big enough to submerge 2 whole chickens.
POUR 10 cups of water into the pot. Add all of the listed ingredients. Bring to the boil on medium heat.
REDUCE heat and simmer stock for around 15 minutes, skimming off any impurities.
CAREFULLY drop the whole chickens, breast side down into the pot, topping up with water if necessary to ensure the chickens are fully submerged.
BRING to the boil on medium heat. Reduce heat to low and simmer for an additional 15 minutes.
REMOVE pot from heat, and cover with lid. Allow the chicken to steep in the stock for up to three hours. The chicken will be cooked in around 90 minutes.
LIFT chicken out of the master stock and chop into eight pieces. I like to do this Chinese style.
STRAIN the Master Stock. When cool refrigerate or freeze for future use.

For Soy Poached Chicken with Soba Noodles and Greens

250 g packet soba noodles
2 cups Master Stock
2 cups chicken stock
a selection of favourite green vegetables, eg snow peas, beans, spinach, bok choy, broccolini; blanched and then sliced or shredded
2 spring onions, sliced thinly
1 red chilli, sliced thinly
coriander leaves to garnish

COOK soba noodles in a separate saucepan according to the directions on the packet. This will prevent the soup from becoming cloudy.
ADD Master Stock and chicken stock to a saucepan and bring to a simmer on medium heat.  Taste the broth to ensure that it is full of flavour but not too salty. Adjust with extra spoonfuls of stock or water if required.
PLACE drained and cooked soba noodles into shallow bowls.
SHRED or cut the chicken meat into bite size chunks and place on top of noodles with green vegetables.
LADLE over the broth.
GARNISH with finely sliced spring onions, chilli and coriander leaves.

Posted in Poultry, Soup, What I Love to Cook | Tagged , , , , , , , , , , | 2 Comments

Afternoon Tea. Lavender Scones at Lavandula Swiss Italian Farm

Lavandula. The botanical name for the perfumed lavender plant.  Also the name of a glorious Swiss-Italian lavender farm located in Shepherds Flat, in rural Victoria. Ten minutes north of Daylesford, and just outside Hepburn Springs, Lavandula is a little slice of the Mediterranean in the Victorian countryside. If you didn’t know better you would swear you were in Provence in France or even Tuscany in Italy. This magical place was one of the highlights of my recent visit to Daylesford and the Macedon Ranges.

Operating today as a boutique lavender farm,  Lavandula was originally built in the 1860’s by Italian speaking Swiss immigrants from Ticino in Southern Switzerland. For over four generations it was run by the same family as a dairy farm.  Twenty years ago a local, Carol White, bought the property and was inspired to restore the buildings and  re-create the traditional mixed farm lifestyle of those earlier settlers. Generously she has opened up the property and its gardens to the public.

Lavandula is just delightful to visit. It has four original buildings made from local stone — the homestead, an old post office, the dairy and a barn. There’s also a charming olde worlde cobbled courtyard shaded by grapevines, rows of Lombardy poplars and a 30 metre suspension bridge across the bubbling Jim Crow’s Creek. A perfectly pastoral tableau nestled amidst olive and chestnut groves, vineyards and the wonderfully expansive lavender fields from which the property takes its name.

But wait there’s more! There’s a fabulous café. Of course there is, after all this is a food blog. The La Trattoria Café.  Occupying a stone loggia. Shaded by ash trees. Serving honest, simple, rustic food.

Lavandula’s productive garden supplies La Trattoria  with fruit, nuts, berries, olives and vegetables. Herbs and green salad leaves are picked daily. The  café makes  all its own jams, pickles and chutneys, cordials and sauces, and bakes its own scones, biscuits and cakes. And I am not ashamed to say that the draw card for our visit was afternoon tea. More specifically Lavandula’s superb Lavender Scones.

Washed down with  Lavender Lemonade and a pot of Lavender tea.

I can honestly and unequivocally say that those scones were the best scones I have ever tasted. They were fluffy and light with just a hint of lavender. As luck would have it I am in possession of Stephanie Alexander’s excellent food bible The Kitchen Garden Companion: Dig, Plant, Water, Grow, Harvest, Chop, Cook published in October 2010 by Quadrille Publishing. There on page 365 is Lavendula’s Lavender Scone Recipe. The trick it seems is to use a discrete touch of lavender and a light hand.

Unfortunately, just last week I dug up my lavender bush to make way for my father’s tomato plants but that is another story and another post. No worries though, as about 50 metres up the road someone has planted lavender in a garden bed on the nature strip adjacent to the roundabout. Its been there for years and I have only just noticed it. How serendipitous! Only in Paddington.

For those of you interested in maybe visiting Lavandula or perhaps having a peek at their website, here are the details.

Website:  www.lavandula.com.au
Where:  350 Hepburn-Newstead Road, Shepherds Flat via Daylesford, Victoria, Australia

And for the avid cooks out there who just have to try these amazing scones, I’ve taken the liberty of  posting Stephanie’s wonderful recipe here. Thank you Stephanie and I hope you don’t mind.

Lavandula’s Lavender Scones

From: Stephanie Alexander’s The Kitchen Garden Companion: Dig, Plant, Water, Grow, Harvest, Chop, Cook. Quadrille Publishing. October 2010.

Makes 8 – 10 scones

2 1/2 cups self-raising flour, plus extra for dusting
1/4 cup pure icing sugar, sifted
1/2 teaspoon dried lavender flowers
1/2 cup thickened cream
2/3 cup milk
jam and double cream to serve

PREHEAT oven to 240 C
SIFT flour and icing sugar into a mixing bowl and then add lavender.
CUT cream in with a pastry scraper or broad spatula.
MIX in milk quickly.
SIFT a little flour over a chopping board and over a baking tray.
TURN  dough onto floured board.
PAT into a rectangle. Cut with decisive cuts into approximately even-sized 6 cm squares.
SEPARATE and place dough squares onto floured baking tray.
BAKE for 5 minutes or until browned on top.
REDUCE oven temperature to 180 C and bake for a further 10 minutes.
LINE a large mixing bowl with a dry tea towel and place cooked scones inside.
FOLD ends towel over scones to stop them becoming too hard.
SPLIT and serve with the best jam and thick double cream.

Posted in Baked, Sweet Treats, What I Love to Cook, Where I Love to Eat | Tagged , , , , , , , , , , , , , , | 4 Comments

Massaman Lamb Shanks with Sweet Potato and Peas

Its October and that means tender spring lamb is in season.  At this time of year  lamb shanks are readily available at the butcher, and  they are sweeter, smaller and more delicious than at almost any other time of year. Curries are a favourite in our house, so that undoubtedly means its time for a lamb shank curry.

This is another meal I love to cook midweek simply because I can put it in the oven and go about my business knowing that dinner will be on the table within minutes of  my walking through the door. Sometimes I will pre-cook the curry up to the point where I am just ready to add the peas. Then its just a matter of reheating the dish and finishing it off to serve. Ten minutes and I’m done.

Massaman Lamb Shanks with Sweet Potato and Peas
Adapted from Vali Little’s Delicious. Simply the Best.

Serves 6

2 tablespoons vegetable oil
6 french trimmed lamb shanks
1 large brown onion, sliced
400 ml can coconut milk
1/2  250g jar Charmaine Solomon’s Massaman Curry Paste or similar
2 kaffir lime leaves
1 tablespoon palm sugar, grated
2 cups (500 ml) beef stock
800 g sweet potatoes, peeled and cut into chunks
Juice of 1/2 lemon
1 tablespoon fish sauce
Sea salt and freshly ground pepper

PREHEAT oven to 180C
ADD half the oil to a large oven-proof pan. Season lamb shanks with sea salt and freshly ground pepper. Add to hot pan and sear over medium heat until brown. Remove from pan.
HEAT remaining oil in same pan.  Cook the onion over medium heat until soft and translucent.
ADD curry paste, stirring, until fragrant. Then add sugar, kaffir lime leaves, coconut milk,  and stock. Bring to the boil.
REMOVE from heat. Add lamb shanks. Cook in oven, covered, for about 90 minutes
ADD sweet potato and cook in oven for a further 30 minutes until tender.
TRANSFER pan from the oven to the stove. Add peas and simmer on low for about 10 minutes, uncovered, until peas are tender and sauce has thickened a little.
STIR through freshly squeezed lemon juice and fish sauce to taste.
DIVIDE lamb shanks, sweet potato and sauce among serving plates.

Posted in Lamb, What I Love to Cook | Tagged , , , , , , , | Comments Off on Massaman Lamb Shanks with Sweet Potato and Peas

Summer Breakfast. Bircher Muesli with Seasonal Fruit.

One of my daughters swims. Five mornings a week. I am very fortunate that my husband is an early riser and invariably will drop her off at the pool at 5.30 or 6 am! My end of the bargain is to collect her, feed her and drop her at school by 8.15 am. It’s a very tight morning schedule at our house and I don’t want to be fussing around too much. In winter I take her a steaming wide necked Thermos of oats with honey and fruit; compote, fresh or frozen. Basically whatever is on hand. Luckily she adores oats and they are very easy to prepare. With summer fast approaching it is time to vary the menu and switch from warming oats to a cooling Bircher Muesli.

I have always adored Bircher Muesli. Its one of those breakfast options that  is always available at the breakfast buffet when we travel. Healthy and delicious its fresh, light, tasty and very, very good for you. A most virtuous start to your day, especially if you have overindulged the night or dare I say weekend before.

Many moons ago, before children, my husband and I spent a week at a health retreat and came home brimming with energy and a terrific Bircher Muesli recipe.  For months I diligently prepared our muesli for breakfast until slowly over time our bad, slovenly habits returned. Well that Bircher Muesli recipe, or at least an approximation of the original, is back on the menu at our house. Let me tell you I had to dig deep into the recesses of my overtaxed memory for this one.

My home-made version consists of rolled oats, lemon juice, yoghurt, honey, fresh fruit and nuts, and is surprisingly easy to prepare. Simply soak your oats with any dried fruit and nuts you are using in apple or orange juice overnight. In the morning add yoghurt, coarsely grated apple and  seasonal fruit. You can use any combination of  fruit and nuts. Use just enough lemon to balance the sharpness of the  yoghurt. Double the recipe to make enough for several days’ breakfasts – it tastes even better after a little time in the fridge.

Bircher Muesli with Seasonal Fruit

Serves 2

Overnight
1 cup rolled oats
½ cup apple juice (or freshly squeezed orange juice)
1 tablespoon honey
2 tablespoons currants
2 tablespoons slivered almonds
a sprinkling of ground nutmeg
a sprinkling of ground cinnamon

Next Morning
1 granny Smith apple, coarsely grated (skin on)
½ cup yoghurt
juice of 1/2 lemon
seasonal berries to serve.

COMBINE  rolled oats, apple juice, currants, almonds, honey, nutmeg and cinnamon in a large bowl and stir together.
CHILL overnight (or for at least two hours).
NEXT MORNING stir in yoghurt, grated apple and lemon juice.
SERVE with seasonal berries.

Posted in Breakfast, What I Love to Cook | Tagged , , , , , , , , , , , , , | 3 Comments

From Daylesford With Love. Hermann the German Friendship Cake

Last weekend I travelled with my great friend Amanda to Daylesford and the Macedon Ranges in the Victorian countryside to  visit the lovely Jane. We’ve all been friends for over 25 years and it was a much-anticipated visit as  the three of us have not been together in the same place, at the same time, for over three years. Sadly Jane’s mother very recently passed away so it was something of a bitter-sweet reunion. Vale Vera. We’re taking good care of Jane and had a wonderful visit. We even made her laugh, perhaps you were laughing with us too.

What can I say? The Daylesford and Macedon Ranges region is true foodie heaven. Home to more markets, growers, producers, wine makers, providores, restaurateurs, cooks, chefs and publicans per square kilometre than you can ever hope to cover in an extended weekend. Thankfully, the farm gate community has had the foresight to band together and publish A Tasty Little Touring Map of the area. My advice? Study it carefully, choose wisely and drive!

I have so many wonderful food memories to write about from this visit but pride of place must go to Jane’s wonderful glace ginger, walnut and pear cake. I will preface this by saying that in the twenty-five years that I have known Jane I have never, ever seen her bake a cake. In fact, I don’t recall Jane having spent much time in the kitchen. Full stop. That’s her husband Russell’s domain.

When Jane rang me the night before our departure to say the weather had turned and to bring warm clothes, she casually mentioned in an offhand way she was baking ‘a cake thing’ and hoped it would turn out alright. That cake thing turned out to be her version of Hermann the German Friendship Cake.

I’d never heard of Hermann before, and to my uninitiated ears it sounds like the culinary equivalent of a chain letter. Someone presents you with a jar of yeasty starter dough, together with a sheet of detailed feeding and baking instructions which need to followed over a ten day period. On the tenth day you divide the mixture into quarters, share three with friends and, with the last bake yourself a cake. Sounds quite biblical to me. Connotations of manna from heaven perhaps?

A fellow teacher at school had bequeathed to Jane a baby Hermann sour dough starter. I’m not sure whether that colleague was unaware that Jane is not a baker or just plain desperate to dispose of her multiplying Hermanns. I’m not even sure why Jane baked the cake in the first place but I am glad she did. It was beyond delicious. The flavourings she used were 2 chopped pears, 1/2  cup chopped glace ginger, 1/4 cup chopped walnuts, and 1 tsp cinnamon.

The upshot is that I have now acquired a baby Hermann. I’ll nurture him and bake him. Perhaps with cherries and chocolate and almonds and a dash of rum. Don’t worry, I won’t inflict any unsolicited baby Hermanns on my friends. Except Amanda who was there for the first. After all we wouldn’t want to risk Hermann becoming known as the Unfriendship Cake. I won’t murder any unwanted baby Hermanns either. Ill just bake them and send them into school with my son.

 Hermann the German Friendship Cake

Hello, my name is Hermann. I am a sour dough cake starter. I’m supposed to sit on your bench top for 10 days without a lid, covered with a clean tea towel. You can’t put me in the fridge or I will die. If I stop bubbling, I am dead!

Day Instructions
1 Put Hermann in a large mixing bowl and cover loosely with a tea towel.
2 Stir well
3 Stir well
4 Hermann is hungry! Add 1 cup each of plain flour, sugar and milk. Stir well.
5 Stir well
6 Stir well
7 Stir well
8 Stir well.
9 Hermann is hungry again! Feed him. Add 1 cup each of plain flour, sugar and milk. Stir well. Divide into 4 equal portions and give 3 baby Hermanns away to friends with a copy of these instructions. Keep the last Hermann to bake.
10 Hermann needs a holiday. He likes to go to a hot resort. The oven is his favourite. Pre-heat oven to 180ºC (170ºC fan-assisted oven) and generously grease a cake tin. Prepare Hermann for his holiday by stirring well and adding the following:
1 cup sugar
½ tsp salt
2 cups self-raising flour
2/3 cup cooking oil
2 eggs
2 tsp vanilla essence
2  apples or pears, sliced into chunks
1 cup dried fruit or nuts of your choice, chopped
2 heaped tsp cinnamon or any spice of your choice.MIX everything together and put into a large, greased baking tin.
SPRINKLE with ¼ cup brown sugar and ¼ cup melted butter.
BAKE for 45 mins at 180 deg. C. When cold, cut into fingers.Hermann freezes well and is also delicious warm with cream or ice-cream
Posted in Baked, Sweet Treats, What I Love to Cook | Tagged , , , , , , , , , , | 8 Comments

Chocolate Chunk Cookies with Pecans

A plate of freshly baked cookies just out of the oven with a glass of milk. Like a warm hug from mum as my daughters like to say. It’s a very popular after school treat in our house.

There are literally hundreds of chocolate chip cookies out there. Everyone seems to have their own special recipe and over the years I’ve road tested a lot of them. My son and his friends LOVE chocolate chip cookies. It’s the third most popular request on my regular Sunday night baking schedule, following closely on the heels of chocolate caramel slice and chocolate cake. These connoisseurs of all things baked love to eat and always give feedback. Here’s the current favourite which uses chocolate chunks in lieu of the traditional chips and includes the addition of chopped pecan nuts. These cookies are delicious even if I do say so myself. I like my cookies crisp on the edges yet soft and chewy in the centre. How do you like yours?

Chocolate Chunk Cookies with Pecans

Makes 24 large cookies

250 g unsalted butter, softened
1 cup (220 g) soft brown sugar
1/2  cup (110 g) white sugar
2 eggs
2 tsp vanilla extract
2 1/2 cups (300g) plain flour
1 tsp sea salt
1 tsp baking powder
200g block dark chocolate, chopped into chunks (or 1 1/2 cups chocolate chips)
1 cup (140 g) chopped pecans (or walnuts)

PREHEAT  oven to 180C and line 2 or 3 baking trays with baking paper.
CREAM butter and sugars until light and fluffy
ADD eggs and vanilla and beat again until well incorporated
SIFT flour, salt and baking powder into the bowl and mix lightly.
STIR in the chocolate and nuts.
DROP tablespoons of mixture about 5 cm apart onto the baking trays, flatten slightly. Alternatively you can shape the dough into a log, wrap in cling film  and freeze for about 15 minutes before slicing into 1 cm rounds and placing on trays for  baking.
BAKE for 10-12 minutes until pale golden.
COOL on the trays for 2-3 minutes, then move to a wire rack to cool completely.

Posted in Baked, Chocolate, Sweet Treats, What I Love to Cook | Tagged , , , , , | 1 Comment

My Pantry Staple. Confit Garlic with Herbs, Chilli and Peppercorns.

It’s no secret that I love garlic. The problem is my husband dislikes it. Intensely. A while ago I decided to have a deep and meaningful discussion with him about this garlic aversion. I have spent years sneaking garlic into my cooking, the flip side being he has probably spent an equivalent amount of time pretending he hasn’t noticed.  Take a good look at the recipes in this blog, if it’s a savoury dish then its a sure bet there is garlic lurking somewhere in the ingredient list. I could never understand why he could happily eat a garlic laden at an Italian restaurant but bring that same dish to the table at home and  let the complaining begin. It appears the smell of cooking garlic makes him feel physically ill. I can empathise with him to some extent as the acrid smell of burnt garlic makes me nauseous. But wait. Is he implying I burn my garlic? Talk about waving a red rag to bull.

I believe every problem has a solution. If you look hard enough. My solution to this particular dilemma? Two words. Confit garlic. Sounds fancy but it couldn’t be easier. Its simply garlic simmered in olive oil at a very low temperature for a very long time. The long slow cooking process transforms the cloves into  soft, subtle, sweet,  nuggets of deliciousness.  More importantly gentle poaching means there is almost no chance of burning the garlic and no acrid smell!

I love to mash warm confit garlic cloves with sea salt and a few drops of their poaching oil, then spread the mixture on lightly toasted sour dough bread. Pure ambrosia. Top with some pan-fried mushrooms and fresh goats curd with a drizzle of the oil and it transforms into a divine bruschetta. Confit garlic adds a delicious complexity of flavour to almost any recipe:  dips and sauces, soups and casseroles, pastas and pizzas. If it calls for garlic try substituting the confit version. And promise me you won’t even dream of wasting the oil. Use it in salad dressings and marinades, drizzle it on veggies, or just dip some bread in it. Its delicious on its own.

Last night I made a simple Pizza Margherita for dinner. Fresh cherry tomatoes  on a bed of mashed confit garlic topped with a little basil and mozzarella with a drizzle of the oil. I may have purchased the pizza base but the result was sublime.

Confit Garlic recipe is as easy as it gets. One hour, one pot, garlic, olive oil and aromatics is all it takes  For those of you that live in Sydney,  Norton Street Grocer even sells packets of freshly peeled garlic. So really there’s no excuse. And yes, before you ask, I paid a visit to Norton St Grocer yesterday – for the garlic and a prepared pizza base.

Confit Garlic with Herbs, Chilli and Peppercorns

2 cups peeled garlic cloves (about 6 whole heads of garlic)
4 sprigs thyme
2 small bay leaves
2 fresh chillies
2 cups pure olive oil

COMBINE all of the ingredients in a medium saucepan and simmer over low heat until the garlic is tender but not coloured, about an hour. I like to place a simmer mat or diffuser under the pan.
COOL. Using a slotted spoon, transfer the garlic, herbs and chillies into clean, sterilised jars (instructions for sterilising jars follows). Pour the cooking oil on top, seal and refrigerate for up to a month.

Sterilising  Jars

To prevent contamination and lengthen the shelf life of homemade preserves it is essential that jars are sterilised. Here’s how its done.

PREHEAT oven to 110°C. Wash jars and lids in hot, soapy water. Rinse well. Place  in a deep saucepan. Cover with cold water.
BRING water to the boil over high heat. Cover pan. Reduce heat to medium and boil gently for 10 minutes.
LINE a baking tray with a clean tea towel. Using metal tongs, remove jars and lids from boiling water and place upside down on tray. Place in oven and heat for 15 minutes.
REMOVE from oven and allow to cool. Jars are ready to be filled.

Posted in Pizza, Vegetables, Vegetarian, What I Love to Cook | Tagged , , , , , , , , , | 5 Comments

Pasta Genovese with Asparagus, Snow Peas and Kipfler Potatoes

Pasta again for dinner tonight. This time its Genovese style with Pesto, Asparagus and Kipfler Potato. My daughter has a swim meet this weekend and she’s carbohydrate loading. Only joking. About the carb loading that is. If the truth be known I’m using up the leftover pesto in the refrigerator, my husband is at a drinks function tonight and I want to be in and out of the kitchen as fast as I can. And there is nothing simpler and faster than this.

I’ve used asparagus and snow peas in this dish simply because they are in season and more importantly on hand in my refrigerator. I like to blanch the asparagus but shred the snow peas to add texture and crunch. Substitute beans or garden peas for the asparagus or snow peas. Any combination of vibrant, green vegetables is fabulous in this dish.

Pasta Genovese with Asparagus, Snow Peas and Kipfler Potatoes

Serves 4

400 g dried pasta, penne, casarecce or similar
3 kipfler potatoes, steamed, peeled and sliced into chunks
1 large bunch of asparagus, trimmed, spears sliced into thirds
100 g snow peas, topped, tailed, strings removed and shredded
1 cup pesto, recipe follows
Sea salt and pepper to taste
Parmesan, grated or shaved to serve

COOK the pasta in a large pot of salted, boiling water according to the instructions on the back of the box.
ADD asparagus to the pasta for the final minute of cooking time, to lightly blanch.
STEAM and prepare kipfler potatoes while the pasta is cooking.
DRAIN pasta and asparagus, reserving 1/4 cup of the cooking water to loosen the pesto.
TOSS the pasta and asparagus with the steamed potatoes, shredded snow peas and pesto, adding just enough of the reserved cooking water to the pesto to allow it to coat the pasta evenly.
SEASON with sea salt and a good grinding of pepper.
SERVE with parmesan.

Pesto

The pesto will keep in the refrigerator for up to a week if stored in a glass jar. Seal exposed surface of the pesto with a thin layer of olive oil to prevent oxidation.

Serves 4

25 fresh basil leaves
1 clove garlic, bruised
100 ml extra virgin olive oil
40 g pine nuts, toasted
25 g parmesan cheese, freshly grated
25 g pecorino cheese, freshly grated
Sea salt and pepper

PLACE basil leaves, garlic, pine nuts and olive oil into the bowl of a food processor with a pinch of salt.
PULSE until finely chopped, but not pureed.
ADD parmesan and pecorino cheeses. Pulse once or  twice to combine.
SEASON to taste, adding a further drizzle of olive oil if required to loosen the pesto.

Posted in Pasta, Vegetables, Vegetarian, What I Love to Cook | Tagged , , , , , , , , , , , , , , , , | 2 Comments