Eat, Fast and Live Longer. A 5-2 Fast Diet Recipe Idea Under 200 Calories. Dairy Free Pea And Watercress Soup

Pea and Watercress Soup

This week I was delighted to find big, bright and beautiful  bunches of peppery, emerald green watercress gracing the stalls at our local Farmer’s Market. A delicate salad leaf it has a very short season here in Australia, its availability usually limited from October to December.

Earlier this year researchers at William Patersen University in New Jersey tested and ranked 47 different powerhouse fruits and vegetables according to  nutritional value in a bid to find an overall  superfood. The list contained all the usual suspects kale, spinach, rocket, chard, pumpkin, capsicum, beetroot, tomato, brussels sprouts, cabbage and broccoli but quite surprisingly watercress trumps them all. Time magazine reported on the findings in an article 41 Superfoods, Ranked By How Healthy They Are and it makes for very interesting reading. Trendy kale, for example, haled as the darling of 2013 comes in at number 15.

Watercress makes a wonderful addition to salads and is delicious in Asian style stir fries paired with garlic, chilli and ginger. Here I have adapted it to one of my favourite soups, substituting watercress for rocket in Pea and Rocket Soup.  As watercress is far more delicate than rocket it only needs to be wilted rather than cooked, particularly important to retain all its nutritional benefits. Hence it’s added to the hot pea soup at the very end for a final pulse in the blender. Given this is a fast day offering I’ve also omitted using parmesan cheese, choosing to prepare a deliciously creamy but dairy free alternative that comes in at just 116 calories per cup serve.

Dairy Free Pea And Watercress Soup
Makes 6 cups (116 calories per serve)

1 tablespoon olive oil (120 calories)
1 leek, white and pale green parts only, finely chopped (54 calories)
1 clove garlic, finely chopped (4 calories)
500g peas, freshly podded or frozen (405 calories)
1/4 cup fresh mint leaves, roughly chopped (4 calories)
1/4 cup fresh parsley, roughly chopped (4 calories)
4 cups (1 litre) hot vegetable or chicken stock, preferably home-made (80 calories)
1 bunch (200g) watercress (22 calories)
sea salt and pepper

HEAT oil in a large pan over medium heat.
ADD onion and garlic. Sauté until transparent and soft, about 5 minutes.
ADD peas, parsley and mint. Sauté until herbs have wilted, then add hot stock.
REDUCE heat and simmer for 5 minutes.
COOL slightly,  place three quarters of the pea soup mixture into a food processor or blender and pulse until smooth,
ROUGHLY chop three quarters of the watercress, reserving remainder for garnish. ADD chopped watercress to the puréed pea mixture. Continue to blend or process until smooth.
RETURN the puréed peas and watercress to the remaining soup, stirring well to combine.
SEASON with sea salt and pepper. Ladle into bowls and  garnish with reserved watercress.

Posted in Vegetables, Vegetarian, What I Love to Cook | Tagged , , , , , , , , , | 5 Comments

Lazy Holiday Baking. Blueberry And Lemonade Cream Scones.

Blueberry And Lemonade Cream Scones

In our house school holidays are synonymous with road trips. Taking the road less well travelled. Meandering through country towns, unearthing all manner of bric a brac at antique stores before stopping for an inevitable Devonshire tea of freshly baked scones with jam and cream. These holidays certainly were no different, particularly with a learner driver in our midst needing to accumulate the requisite 120 hours driving experience under his belt.

Needless to say over the last six months I have become quite the aficionado. The perfect scone must be enjoyed piping hot straight from the oven and be meltingly soft and fluffy on the inside but gloriously crisp and golden on the outside. Each road trip I remember how much I love this honest, simple treat and wonder why I tend to overlook them when I bake at home.  They’re so very easy to prepare and come together in mere minutes. One of the first recipes I learnt to make.

I have of course already posted my favourite regular scone recipe in an earlier post Bring a Plate. Australia’s Biggest Morning Tea. Freshly Baked Scones With Jam and Cream and Stephanie Alexander’s Lavender Scone version in another Afternoon Tea. Lavender Scones at Lavandula Swiss Italian Farm.

But now it’s time for something a little different. A lazy holiday version using super sweet peak season blueberries and two rather unusual ingredients;  lemonade and cream. Wonderfully fragrant, light and delicious, my daughters and I made the most of our can of lemonade and before the first batch was out of the oven, busied ourselves whipping up a second. I think the plan was to place at least some into the freezer for another day, but sometimes plans and resolve go astray. We can attest those scones were particularly moreish and disappeared at speed from the wire racks as they cooled. Not to worry. The girls are keen to bake some more tomorrow.

Blueberry And Lemonade Cream Scones
Makes 8 Scones

2 cups self-raising flour, sifted
1/2 teaspoon fine table salt
1/4 cup caster sugar, plus a little extra for sprinkling
1/2 cup pouring cream
1/2 cup lemonade
1/2 cup blueberries

PREHEAT the oven to 220 C. Line a baking tray.
PLACE flour, sugar and salt in a large bowl. Make a well in the centre, then add the cream and lemonade.
USING a flat-bladed knife mix until dough just begins to come together. Place onto a lightly floured surface and knead very gently into a ball being careful not to overwork the dough or the scones will be tough. Flatten with the palm of your hand until dough is 2 cm thick.
SCATTER over blueberries in an even layer then fold dough over in half and pat down very gently to distribute the berries through the scones.
DIVIDE dough in half. Flatten each half  into a 2 cm thick disc and slice into four wedges.
PLACE scones at least 2 cm apart on paper lined tray and sprinkle a little caster sugar over the top of each scone.
BAKE for 15-20 minutes, until golden brown and well risen. Serve warm.

Posted in Baked, Fruit, What I Love to Cook | Tagged , , , , , , | Comments Off on Lazy Holiday Baking. Blueberry And Lemonade Cream Scones.

Crisp And Crunchy. Sweet and Salty Five Seed Crackers.

I’ve always loved seeded crisp-bread. Crisp and crunchy it’s delicious on its own, yet pairs beautifully with an endless array of dips, charcuterie and cheese board. There is a well known brand I purchase almost by the trolley load at an upmarket delicatessen at rather inflated prices, swearing each time I reach the checkout that perhaps I should try making my own. Of course I never do. Until today, that is.

The light bulb moment? An article I was idly perusing, ironically whilst  on holiday away from my kitchen, on the versatility of chia seeds. Yet another trend that has passed me by.  Apart from a myriad of acknowledged nutritional credentials, it seems the binding qualities of this tiny, energy packed super-food, when hydrated, can circumvent the need to use flour when making crackers. Little known fact; each tiny chia seed is capable of absorbing up to ten times its capacity in liquid as it transforms into a sticky, glutinous substance. Look closely at the image of the pale, unbaked cracker above, its transparent sheen is courtesy of the chia seed

Now I’m pretty certain that my favourite seeded crackers contain rye and, try as I might I have never come close to even finding a recipe that might replicate them. My interest was most definitely piqued with a new challenge to myself. Using chia seeds as a building block, bake a light and crisp seeded cracker I would love to eat.

Fortunately google is my friend, there are a wealth of recipes out there, some by the earliest of adapters dating back eight or more years ago. Vegan, gluten free, soy free and nut free to boot it’s a bandwagon that has captured the imagination of many an on-line community.

Here is my version. Slightly sweet. Lightly salted. Bursting with goodness and packing a powerful punch with the inclusion of five different seeds: chia, sunflower, pumpkin, sesame and linseed. Crisp, golden and crunchy.  Absolutely divine. Yet delicious as they might be, I can only manage to eat a few at a time. They’re undeniably satiating. Little wonder the ancient Mayan civilisations revered chia seeds for their strength and endurance dubbing them “Indian Running Food” to fuel long journeys. Perfect iron man food for my resident swimmer and perhaps my aspiring rower.

Sweet And Salty Five Seeds Crackers

Sweet and Salty Five Seed Crackers
Makes 60

Five Seeds
1/2 cup chia seeds
1/2 cup sunflower seeds
1/2 cup pumpkin seeds
1/2 cup sesame seeds
1/4 cup linseed

3/4 cup warm water
1 tablespoon coconut oil
2 tablespoons honey
1 teaspoon sea salt

PREHEAT oven to 160 C fan-forced and line two 30cm square oven trays with baking paper.
PLACE all the seeds into a large bowl and stir well to combine.
WHISK together warm water, honey, coconut oil and sea salt in a glass jug.
POUR liquid ingredients over the seeds, stir until well combined then allow to stand for 10 – 15 minutes until thick and sticky but spreadable. The chia seeds will absorb the water and bind the ingredients together. If mixture becomes too thick slowly add a little more water, a tablespoon at a time.
DIVIDE mixture in half and  bake the crackers in two batches.

To Bake Each Batch

USE a silicon spatula to spread half the mixture in a thin layer (no more than 2-3 mm thickness) over the entire base of the first of the prepared trays. Make sure any holes or gaps are patched over before baking.
PLACE tray in preheated oven, middle rack position, and bake for 15 minutes until lightly golden on top.
USING oven mitts, remove tray from oven and invert cracker onto the second tray baking paper lined tray. The easiest way to do this is to place the second tray, baking paper side down, over the first and flip.
PEEL away the top layer of baking paper and with a heavy knife score the cracker into 30 individual 5 cm squares.
RETURN to oven for another 15 minutes and bake until fully dry, golden and crunchy before removing to a wire rack and breaking the cracker into individual pieces along the score lines. The centre squares of the cracker may not be as dry as those around the outer edges, I like to return them to the oven for just a few minutes longer to bake through.
ALLOW crackers to cool completely before storing in an airtight container for up to two weeks. The crackers will continue to harden and crisp up as they cool.
REPEAT process for the second batch.

Posted in Baked, Small Bites, What I Love to Cook | Tagged , , , , , , , , , | 6 Comments

Eat, Fast and Live Longer. A 5-2 Fast Diet Recipe Idea Under 300 Calories. Spring Vegetable Frittata With Asparagus And Broccolini.

Spring Vegetable Frittata With Asparagus And Broccolini

I adore early Spring, each week brings an ever growing abundance of garden fresh vegetables. At the moment I’m pairing the last of Winter’s broccolini with tender, new season spears of emerald green asparagus. Sautéed in a little olive oil and garlic, they make a wonderful addition to a Spring vegetable frittata.

Laden with vegetables and packed full of protein the humble frittata is nutritious, delicious and  incredibly easy to prepare. Another recipe that is easily adapted to a perfect fast day meal simply by cutting back on fats and making judicious use of low calorie vegetables. This version comes in at just under 300 calories per serve. It’s enormously satisfying and more importantly looks substantial on a plate.

Spring Vegetable Frittata With Asparagus And Broccolini

Serves 2 (299 calories per serve)

1 tablespoon extra virgin olive oil (120 calories)
1 small brown onion, finely diced (29 calories)
1/2 clove garlic, finely sliced (2 calories)
1/2 red capsicum, deseeded and diced (16 calories)
1 1/2 cups broccolini stems and florets, sliced into bite sized pieces on the diagonal (45 calories)
4 asparagus spears, sliced into bite sized pieces on the diagonal  (20 calories)
4 eggs (300 calories)
2 tablespoons grated cheddar cheese (58 calories)
2 tablespoons freshly chopped parsley (2 calories)
finely grated zest and juice of half a small lemon (6 calories)
sea salt and freshly  ground black pepper

PREHEAT oven grill to high.
HEAT oil in a heavy based 18 cm non-stick oven-proof fry pan over medium heat.
ADD onion and garlic and sauté until the onion has softened but not browned. Then
add capsicum, broccolini and asparagus. Cook, stirring occasionally, until just tender.
MEANWHILE whisk eggs until combined. Season with salt and freshly ground black pepper, then stir in grated cheese and parsley.
ADD egg mixture to the pan, tilting the pan as you pour to ensure the egg mixture spreads evenly over all the vegetables.
REDUCE heat to low and continue to cook the frittata on the stove top for 10-15 minutes until almost firm.
REMOVE from heat and place pan into the oven under a hot grill for a further 5 minutes, until the frittata is golden and puffed.
SCATTER over finely grated zest and finish with a good squeeze of lemon. Serve immediately.

Posted in Eggs, Vegetables | Tagged , , , , , , , , , , | 2 Comments

Inspired By Black Star Pastry. Pistachio Dacquoise With Rose Water Infused Watermelon, Berries And Marscapone Cream.

Today’s post continues with my watermelon theme. A couple of weeks ago my very good friend Susan introduced me Black Star Pastry’s magnificent Watermelon Cake. A light as air layered confection of almond dacquoise and rosewater infused berries, watermelon and cream. The flavours may be a little on the unusual side, but  work well together and are absolutely divine. Floral, fresh and vibrant, with more than a passing nod to the Middle East. Not at all what I expected when it was first described to me. Susan knows me well. Having piqued my interest, she threw down the gauntlet; what would my reinterpretation be?

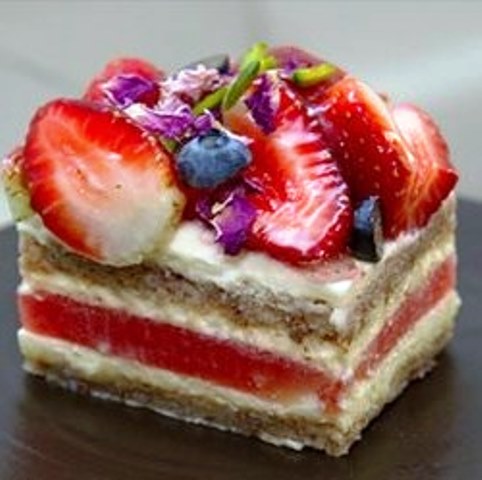
For those of you who are curious, here is a photo of the original slice that inspired this post. If you are lucky enough to live in Sydney, you can visit their bakery and cafe stores in inner city Newtown and  Rosebery.  Or check out their website at http://www.blackstarpastry.com.au.

Black Star Pastry's Strawberry And Watermelon Cake

But wait there’s more. A quick search of the world wide web revealed that in December 2010 Black Star’s original Watermelon Cake recipe was published in the Australian Gourmet Traveller magazine courtesy of the Fare Exchange.

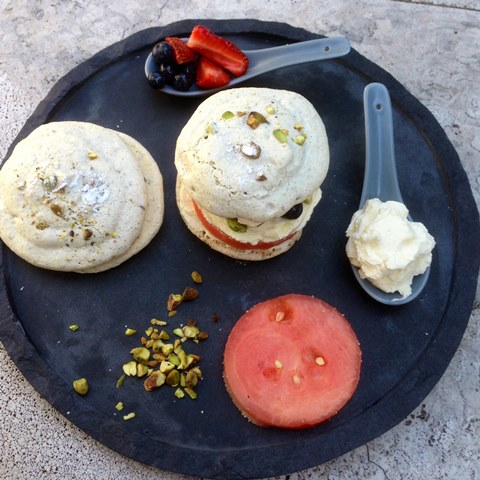
Never one to shy away from a challenge I carefully read the recipe and considered my options. Given that I’m certainly no pastry chef (far from it in truth) I decided to deconstruct that cake layer by layer into something a little more casual and easy to prepare.  My version uses crisp and crunchy individual pistachio dacquoise to top and tail soft, fragrant layers of rose scented watermelon, berries and cream. Whilst the original flavour notes remain intact, the finished product does bear an uncanny resemblance to an over sized but nevertheless delicious macaron.

To give my rose scented cream a little more structure so that it would not ooze and spread I used a combination of marscapone and thickened cream with the teeniest, scant pinch of xantham gum added to the mix. I’d read somewhere that xantham gum was used in molecular gastronomy to stabilise ingredients. It seems it’s also used extensively in commercial preparations of ice creams, sorbets and panacotta. I’ve been dabbling in gluten free baking lately, and having a packet of xantham gum on hand thought why not see what happens. A little goes a long, long way and by happy accident I discovered my cream filling had sufficient structure that all the elements of the dessert could be thrown together at a moment’s notice without the need for a lengthy chill in the refrigerator.

Constructing the pistachio dacquoise stacks is far less labour intensive than it sounds in the recipe. Making sure the rosewater infused fruit is dry is key, and I used a liberal sprinkling of almond meal between each layer to absorb any errant moisture.

All in all, the consensus was these were a resounding success. For an even simpler dessert you could consider layering the rose scented watermelon, berries and marscapone cream in parfait glasses with crushed amaretti. The possibilities are endless, but thank you Susan and  Black Star Pastry for the incredible inspiration.

Pistachio Dacquoise With Watermelon, Berries and Rosewater Marscapone Cream

Pistachio Dacquoise With Rose Water Infused Watermelon, Berries And Marscapone Cream.
Makes 8

I have started this recipe with the final assembly stage as this is a layered dessert and it made more sense to set it out this way. Instructions for each of the component parts; the pistachio dacquoise, rose water marscapone cream, macerated watermelon and berries, follow separately.

16 pistachio dacquoise shells
1 quantity rose scented marscapone cream
8 rose water macerated watermelon slices
500g rose water macerated berries
1/4 cup pistachios, shelled, roasted and roughly chopped
1/4 cup almond meal

PAIR UP 16 similar sized dacquoise shells so that each finished dessert will be beautiful.  Use the most attractive shells for the top of the desserts and the remainder for the bases.
GENTLY  flip over the shells and place in pairs on a wire rack for assembly so the flat sides face up. Arrange the 8 dried rose water macerated watermelon slices on a separate wire rack.
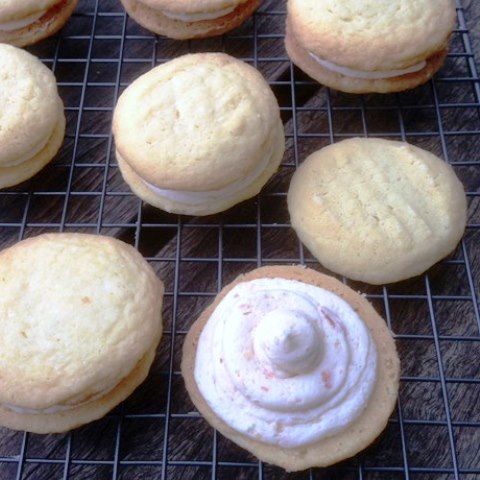
CAREFULLY pipe two thirds of the marscapone cream mixture evenly over the flat surface of each shell. If not using a piping bag dollop a tablespoon of the mixture over each shell and using a palette knife smooth cream evenly over the shell being careful not too press too hard and shatter their fragile bases.
SPRINKLE one third of the almond meal over the top surface of the watermelon slices, then pipe or spread over the remaining marscapone cream. Sprinkle another third of the almond meal over the cream layer. The almond meal will absorb any moisture from the fruit and  help prevent the dacquoise shells from softening too much.
SPRINKLE the remaining almond meal over the cream layer of the 8 base dacquoise shells.
PLACE the watermelon slices, cream and almond meal side facing up, over the cream covered base shells.
DIVIDE rose water macerated berries over the cream and almond meal topped watermelon slices. Scatter over coarsely chopped pistachios.
TOP the dessert with the 8 remaining dacquoise shells, cream and almond meal side facing down. Serve immediately or prepare ahead and refrigerate for no more than 3 hours as the dacquoise shells will soften.

Pistachio Dacquoise Shells
Makes 18 (16 for the dessert plus 2 spare for taste testing or any mishaps)

1 1/2 cups  shelled whole pistachios
1/2 icing sugar, plus two tablespoons extra for dusting
6 large egg whites, at room temperature
a good pinch table salt
1 1/4 cups caster sugar
1/2 tsp. cream of tartar
1 teaspoon pure vanilla extract

PREHEAT oven to 160 C. Line 3 baking trays with non-stick baking paper. Using a 7 cm diameter metal food presentation or tart ring, draw 6 circles on each. Set aside.
DRY  roast the pistachios in a heavy based pan until golden brown and fragrant. Remove to a paper towel lined plate and set aside to cool.
FINELY  grind one cup of the pistachios with icing sugar. Roughly chop the remaining half cup pistachios. Set aside for later.
BEAT egg whites in a clean, dry bowl until firm peaks form. Gradually add caster sugar, 1 tablespoon at a time, until the sugar dissolves and the mixture is thick and glossy.
GENTLY fold in the cream of tartar, vanilla extract and ground pistachios. Divide the meringue mixture evenly among the prepared trays using the back of a spoon to smooth the surfaces. Alternatively if you prefer to use a piping bag, attach a plain tip to your bag, fill with the dacquoise mixture and pipe  the meringue around the circumference of each circle, spiralling inward, filling the circles.
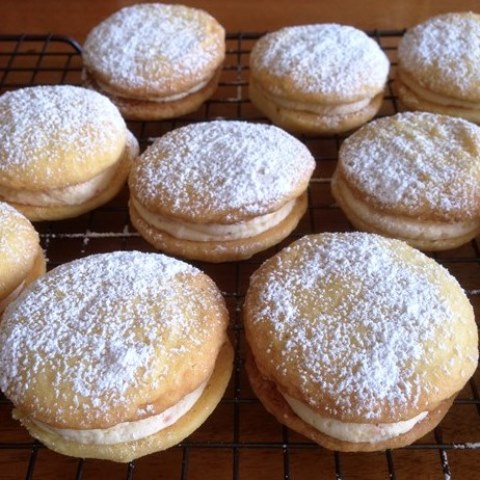
SPRINKLE the discs with 1/4 cup of the remaining chopped pistachios (the rest will be used as a garnish to finish the dessert. Dust the circles with a little more  pure icing sugar.
PLACE the trays in the oven and bake for 15 minutes, or until lightly golden. Turn off oven and leave the trays in the cooling oven for an hour.
REMOVE trays from oven. Allow the dacquoise discs to cool completely before gently peeling them away from the baking paper.store in an airtight container for up to three days until ready to use.

Rose-Scented Marscapone Cream

250g tub marscapone
250 ml (1 cup) thickened cream
2 tablespoons caster sugar
2 tablespoons rosewater
scant pinch of xantham gum (optional to stabilise the cream)

Whisk cream, mascarpone and sugar together in a bowl until light soft peaks form. Sprinkle over xantham gum if using Then gradually add  rosewater, whisking until stiff peaks form being careful not to over-whisk.

Rose Water Infused Watermelon Slices

1/2 large sweet watermelon
1 tablespoon rosewater
2 tablespoons caster sugar

CUT watermelon into two 3 cm thick slices. Using a 7 cm food preparation or tart ring stamp out two watermelon discs out of each slice.
SLICE each of the four discs in half horizontally so you end up with eight perfectly round watermelon slices.
ARRANGE watermelon slices in a single layer on a wire rack. Sprinkle with rosewater, then scatter with sugar. Stand to infuse for 30 minutes, then pat dry with absorbent paper towels.

Rose Water Infused Berries

250g punnet strawberries
250g punnet blueberries
2 tablespoons rose water
2 tablespoons caster sugar

COMBINE berries, rosewater and sugar in a bowl, toss to combine and set aside for at least 15 minutes.
PLACE berries into a fine mesh sieve and strain over a bowl just before assembling the cakes.

Posted in Baked, Fruit, Sweet Treats | Tagged , , , , , , , , , | Comments Off on Inspired By Black Star Pastry. Pistachio Dacquoise With Rose Water Infused Watermelon, Berries And Marscapone Cream.

Eat, Fast and Live Longer. A 5-2 Fast Diet Recipe Idea Under 300 Calories. Watermelon And Grilled Haloumi Salad With Chimichurri Dressing.

Watermelon And Haloumi Salad With Chimichurri Dressing

With winter well and truly over, new season produce is hitting our farmer’s market stalls. After a long hiatus watermelons from Far North Queensland are making a very welcome reappearance. The secret to choosing the sweetest and juiciest melons? Tap them. The hollower sounding, the better. Or so the market stall holder advised me as with some trepidation I selected my orb, dubious that any watermelon would be perfectly ripe so early in the season. So confident was he in his method that he promised me if I wasn’t happy with the sweetness to come back and he would give me another free.

What to do with an entire 8 kg watermelon? I have three days to figure it out before we go on holidays. Last summer I incorporated sweet, refreshing, low calorie melon into my 5-2 recipe repertoire. On hot, humid days we feasted on a 181 calorie per serve Watermelon, Feta & Mint Salad with Pistachio & Parsley and Lime, and our freezer was well stocked with 57 calories per stick Watermelon, Mint and Lime Paletas.

As always, on a fast day, I’m on the hunt for big, vibrant flavours that trick my mind into thinking I am eating a more substantial plate of food. Today we’re trying something rather unusual. Cool, crisp watermelon slices paired with salty, squeaky, char-grilled haloumi. The whole platter drizzled with a zesty, chilli infused, herbaceous chimichurri dressing. Granted, on paper, it is a decidedly odd sounding combination, but it’s a taste explosion in your mouth that most definitely works. Better still its an interesting plate of food for just 215 calories a serve.

The star of the show that brings everything together is the chimichurri dressing. Packed full of a cornucopia of fresh garden herbs, my version substitutes hot water for a substantial portion of the third cup olive oil traditionally used. At just 26 calories per tablespoon, it’s a dressing I will be using liberally this summer feast day or fast. It pairs beautifully with all manner of grilled, fish, meats a chicken, and is a great condiment for burgers and sandwiches.

Watermelon And Grilled Haloumi Salad With Chimichurri Dressing.
Serves 4 (215 calories per serve)

250g seedless watermelon, rind removed and sliced into 3cm squares (75 calories)
180 g block  haloumi cheese (612 calories)
1 teaspoon olive oil (120 calories)
2 tablespoons chimichurri dressing (52 calories)

HEAT a griddle pan until smoking.
MEANWHILE slice the haloumi into 10 -12 thick rectangular slices. Place into a shallow bowl and drizzle over a teaspoon of olive oil. Toss well to coat.
GRILL the haloumi  cheese on both sides until golden brown. Set haloumi slices aside to cool slightly as you start to assemble the salad.
ARRANGE watermelon and haloumi slices attractively over a large platter. Drizzle over the chimichurri sauce. Serve immediately.

Chimichurri Dressing
Makes 3/4 cup or 12 tablespoons (26 calories per tablespoon)

2 cups soft green herbs, roughly chopped, stems removed (I used a combination of basil, coriander,mint and parsley from my herb garden)(44 calories)
2 stems fresh oregano, leaves stripped (2 calories)
3 garlic cloves, peeled and bruised (12 calories)
1 long red chilli (8 calories)
2 tablespoons red wine vinegar (6 calories)
2 tablespoons olive oil (240 calories)
1/4 cup hot water
2 teaspoons sea salt flakes
a good grinding of black pepper

COMBINE all ingredients, except for the olive oil, in a food processor, and pulse until well blended.
POUR mixture into a small bowl, and whisk in the oil. Cover and refrigerate for at least 2 hours to allow the flavours to meld.
REMOVE from the refrigerator about 20 minutes before using to bring the dressing to room temperature before serving.

Posted in Cheese, Fruit, Marinades, Pastes and Dressings, Salads, Vegetarian | Tagged , , , , , , , , | 2 Comments

Fish on Fridays. Flathead Burgers With Marie Rose Sauce.

Flathead Burgers With Home Made Cocktail Sauce

After what seemed to be an awfully long hiatus Australian tiger flathead is in plentiful supply at the fish markets at the moment. Sweet and succulent it is a firm favourite in our house. Like ravenous, circling seagulls my family devour it by the plateful. Gorgeous as it is served with a simple salad, today I decided to try something different. Make it the star attraction of a towering fish burger, replete with lettuce, avocado, tomato and lashings of Marie Rose sauce.

The gorgeously hued, intriguingly named Marie Rose sauce was the stalwart of many a 1970’s and 80’s dinner party. A key ingredient in the ubiquitous  prawn cocktail , a then avant-garde but now passe layered creation of shredded iceberg lettuce, prawns served in a cocktail glass. The sauce, itself, is more familiarly referred to simply as cocktail sauce or even thousand island dressing, easily made from just a few pantry staples; mayonnaise and tomato, Worcester and Tabasco sauces.

Urban legend has it that the sauce was named after the famous Tudor warship, The Mary Rose, which sank in  1545. In the 1970’s a plan was hatched to salvage the wreck and in 1982 the ship became a star attraction at The Portsmouth Museum. Urban legend has it that during the salvage operations a naval chef  on hand to feed the army of workers realised he didn’t have enough sauce to accompany the prawns he was planning to serve for dinner. Improvising with the ingredients he had on hand he devised a tangy dressing and named it Marie Rose sauce after the shipwreck.

Fast forward to 2014, this sauce sweet, tangy sauce is the perfect addition to my delicious fish burger.

Flathead Fish Burgers With Marie Rose Sauce
Serves 4-6

500g skinless and boneless flathead fillets
1/2 cup plain flour
sea salt and freshly ground pepper
olive oil, for frying

To Serve
6 hamburger buns halved and toasted
1 head of soft lettuce, leaves washed, dried and separated
2 vine ripened tomatoes, sliced
1 avocado, sliced
1/4 cup Marie Rose sauce (recipe follows)

To Prepare Flathead
TEAR or slice flathead fillets in half lengthways into long strips
TOSS the strips in a little flour, salt and pepper, shaking off any excess.
HEAT a large, heavy  pan over high heat. Once the pan is hot, reduce heat to medium and add enough olive oil  to thoroughly coat the pan.
COOK the fillets in batches for 3-4 minutes or until golden and cooked through. Fillets should sizzle the moment they touch the pan. Add additional oil between batches if necessary.

To Assemble Burgers
SPREAD a generous tablespoon of Marie Rose sauce over the base of toasted hamburger buns.
LAYER over lettuce, flathead fillets, tomato and avocado.
TOP with remaining bun halves. Serve immediately.

Marie Rose Sauce

¼ cup home-made (recipe follows) or good quality organic whole egg mayonnaise
1 heaped tablespoon home-made tomato jam or good quality store-bought tomato sauce
3 drops Tabasco
1 teaspoon Worcestershire sauce
1 teaspoon lemon juice

WHISK together ingredients until smooth and well combined. Season to taste with sea salt and ground black pepper. Store in an airtight container or jar in the refrigerator, for up to three days, until ready to serve.

Mayonnaise
Makes 1¼ cups

1 egg
1/2 tablespoon lemon juice
1/2 tablespoon white wine vinegar
sea salt and ground white pepper
1 cup (250ml) olive  oil

PROCESS or blend the egg, lemon juice, vinegar, salt and pepper in a food processor or blender until well combined.
WITH the motor running, pour the oil in very slowly in a thin stream and process until the mixture is thick and creamy.
STORE in an airtight container or glass jar in the refrigerator for up to a week,until ready to use.

Posted in Seafood, What I Love to Cook | Tagged , , , , | Comments Off on Fish on Fridays. Flathead Burgers With Marie Rose Sauce.

Melting Moment Makeover. Filled With A Blood Orange And Cointreau Buttercream.

Melting Moments With Blood Orange And Cointreau Buttercream

Every so often I google food trends to discover what’s hip and happening across the globe. Sometimes out of pure curiosity, occasionally for inspiration. There’s the wild and whacky suggestions make me laugh out loud, and every now and then a suggestion that piques my imagination. It seems our world wide love affair with the crisp shelled macaron may just be beginning to wane.  What’s more there’s an heir apparent, the classic melting moment, waiting patiently in the wings to take the stage with a much needed make-over.

I’ve always associate melting moments with old fashioned afternoon teas. Stalwarts of many an Australian nana’s  recipe book. Meltingly delicious shortbread discs sandwiched with a lick of strawberry jam and a generous dollop of vanilla buttercream. Come to think of it, last year I must have been accidentally well ahead of trend when I posted a recipe for Passionfruit Melting Moments With A Roasted Coconut Buttercream. It certainly wasn’t by design.

This week I was lucky enough to be gifted a jar of my friend SallyAnn’s gorgeously tangy and sweet, vanilla bean scented home-made Blood Orange Marmalade. What better way to update nana’s humble melting moment than to sandwich it with a blood orange flavoured buttercream? Of course one of my favourite tipples, Cointreau, goes fabulously well with orange, so why not throw a capful of that in as well? So there we have it, my latest melting moment makeover.

Melting Moments With Blood Orange And Cointreau Buttercream Dusted

Melting Moments With Blood Orange And Cointreau Buttercream
Makes 12 Filled Melting Moments

For The Melting Moments

250g butter, softened
1/2 cup icing sugar, sifted
1 teaspoon pure vanilla extract
1 1/2 cups plain flour
1/2 cup corn flour

PREHEAT  oven to 150 C fan-forced and line two trays with baking paper.
IN A LARGE bowl, beat together butter, icing sugar and vanilla extract until light and creamy.
SIFT the flours together and add to the bowl in two batches. Stir with a wooden spoon  until the mixture is smooth.
FLOUR your hands as the dough is soft and sticky. Gently roll the mixture into 24 balls and place them on the prepared trays, spaced at least 3cm apart. I used a heaped teaspoon for each ball.
USE a floured fork to slightly flatten the top of each ball.
BAKE the biscuits for 15 minutes or until they just begin to turn golden. Rotate trays in the oven half way through asking.
LEAVE biscuits  to cool on the trays for 10 minutes and then transfer to a wire rack to cool completely.
SANDWICH biscuits with buttercream. Dust with icing sugar just before serving

For The Blood Orange and Cointreau Buttercream

75g unsalted butter, softened
1 1/2 cups icing sugar
1 1/2 heaped tablespoons blood orange marmalade,
1 tablespoon Cointreau

PURÉE the marmalade in a small food processor until smooth.
USE an electric mixer to beat the butter and icing sugar until light and fluffy.
ADD  the puréed marmalade and Cointreau  to the buttercream mixture and continue to beat until well combined.

Posted in Baked, Sweet Treats, What I Love to Cook | Tagged , , , , , , , | Comments Off on Melting Moment Makeover. Filled With A Blood Orange And Cointreau Buttercream.

Eat, Fast and Live Longer. A 5-2 Fast Diet Recipe Idea Under 100 Calories. Japanese Hand Rolls “Temaki Zushi”

Japanese Sushi Hand Rolls Temaki Zushi

We adore sushi in our house. It’s fresh, healthy and quite easy to prepare. Previously I have shied away from the idea of making sushi for a fast day meal, chastened by the thought of the massive 540 calorie count attributed to just one cup of uncooked rice. As all the best sushi rolls are generously plump with a thick layer of vinegared rice, they are generally off my fast day radar due to  my lack of self control and inability to stop at just one.

Fortunately, I have recently remembered these; Temaki Zushi. Sushi rolled by hand. The standby dinner table staple of many a busy Japanese household. Self assembly sushi. No bamboo rolling mat required.  A stack of nori sheets, a bowl of steamed rice and a selection of finely sliced fillings set in the middle of the table. Each diner chooses exactly which filling and how much to include. My fast day version uses just two heaped tablespoons of vinegared rice per roll and a much more generous ratio of salmon sashimi and fresh salad ingredients. Best of all each hand roll comes in at a calorie count of just 98 calories, meaning I don’t have to stop at one.

Japanese Sushi Hand Rolls

Japanese Hand Rolls “Temaki Zushi”
Makes a dozen medium sized rolls (98 calories per hand roll including condiments)

For The Sushi Rice
60 ml (1/4 cup) unseasoned rice wine vinegar (10 calories)
1 tablespoon caster sugar (48 calories)
1 teaspoon sea salt (1 calorie)
1 cup short-grain Japanese rice, koshihikari is best (540 calories)
1 1/4 cups cold water
a generous pinch of sea salt

For The Fillings
200g sashimi-grade salmon (292 calories)
1/2 small Hass avocado (140 calories)
1 lebanese cucumber (24 calories)
1 carrot (25 calories)
4 soft lettuce leaves (8 calories)
6 large sheets nori, toasted seaweed (60 calories)

To Serve
2 teaspoons wasabi (4 calories)
2 tablespoons pickled ginger (10 calories)
2 tablespoons shoyu, soy sauce (18 calories)

To Prepare Sushi Rice
PLACE vinegar, caster sugar and salt in a saucepan and stir over low heat until the sugar and salt are dissolved. Cool to room temperature.
MEANWHILE place rice in a large sieve and wash under running water to remove any excess starch, until the water runs clear, about 2 minutes.
TRANSFER washed grains to a heavy based saucepan. Add 1 1/4 cups cold water and a good pinch of salt, bring to the boil on high heat, stirring occasionally.
REDUCE heat to very low, cover with a tight fitting lid and cook for 10-12 minutes undisturbed, until all the water has been absorbed and grains are plump.
REMOVE from heat. Set aside, covered, for 10 minutes. Rice will continue to steam.
TURN OUT cooked rice into a large, shallow bowl. Fan the rice to remove any excess moisture, then gently cut through the rice with a spatula to remove any lumps and separate the grains, gradually drizzling over the seasoned vinegar mixture as you cut the rice. Once all the vinegar has been incorporated, continue fanning until rice is cool.
COVER with a tea towel until ready to assemble your hand rolls.

To Assemble Hand Rolls
SLICE sashimi, avocado and cucumber into 12 long thin batons.
TEAR each lettuce leaf into thirds.
USING a spiral grater or julienne peeler, shred carrot into long thin strands.
CUT each nori sheet in half into two rectangles, and place in a stack.
TAKE a piece of nori in your hand, shiny side of the sheet facing down. Place two heaped teaspoons of rice to one edge of the rough side of the nori. Add a little of each filling and roll into a cone. Place onto a platter as you prepare the remainder of the hand rolls or allow your guests to assemble their own at the table.
SERVE immediately with little condiment dishes of wasabi, pickled ginger and soy sauce on the side.

Posted in Rice, Small Bites, What I Love to Cook | Tagged , , , , , , , , , , | 6 Comments

For The Weekend. Finger Licking Good. Oven Fried Buttermilk Chicken Drumsticks.

Oven Fried Buttermilk Chicken Drumsticks With Coleslaw

The title of this post should really read a guaranteed sure fire way to win undying favour and gratitude from a horde of hungry teenagers. It should come as no surprise that the way to their heart is through their ravenous stomachs, this time with golden platters of finger licking good oven fried buttermilk chicken drumsticks. Usually when we’re craving fried chicken I take the Japanese route and reward my family with crunchy tender morsels of karaage chicken marinated in soy, garlic and ginger, and dredged in cornflour before being shallow fried to golden perfection.

Today, however, I rose to the challenge and attempted a somewhat healthier version of the offerings of a very popular, well known fried chicken chain, favoured by my son.  I’ll admit I did not  use anywhere near 11 secret herbs and spices, choosing to marinate my chicken drumsticks overnight  in a simple garlic, sea salt  and white pepper infused buttermilk, and seasoning my flour with just two spices; sweet paprika and cayenne pepper. Of course you can play around to your heart’s desire with any combination of seasonings for both the buttermilk marinade and flour. There are no hard and fast rules; half the fun is in the experimentation.

This is one of those recipes that is ridiculously easy to prepare but needs to be started the day before so that the buttermilk has the opportunity to weave its magic and tenderise the drumsticks. My preference is for a crisp light coating so I quickly dredge my drumsticks in the flour just once. Preferences for a thicker crust?  Double dip into the buttermilk and flour after the initial dredging. It’s actually a really good way to use up every last skerrick of the buttermilk marinade so I do double dip and dredge my very last batch of drumsticks. Much to the delight of the lucky eagle eyed  teenagers who manage to score them.

I will confess  I’ve never been a fan of the deep fryer. There’s always an unholy mess created in my kitchen from hot oil spatters, not to mention the additional  headache of making sure that a large volume of leftover oil is disposed of in an eco-friendly manner. Hence when a recipe calls for  deep frying I usually opt for  a quick shallow pan fry instead to give my food a gloriously golden burnished glow before transferring to a tray for a  final cook through in the oven.

For just a little effort, we achieved finger licking good fried chicken nirvana. Satisfyingly crisp and crunchy on the outside but deliciously moist and flavoursome on the inside. So much so, the requests have already been coming in for an encore performance this weekend.

Oven Fried Buttermilk Chicken Drumsticks

Oven Fried Buttermilk Chicken Drumsticks
Serves 4
Recipe suitable to double or quadruple 

12 chicken drumsticks
1 1/2 cups buttermilk
2 large garlic cloves, minced
1 teaspoon ground white pepper
1 teaspoon sea salt flakes
2 cups plain flour
1/2 teaspoon cayenne pepper
1/2 teaspoon sweet paprika
75g butter, for frying
1/2 cup vegetable oil, for frying

WHISK together buttermilk, garlic, white pepper and salt.
SLASH each chicken drumstick two or three times through the skin and flesh to allow the marinade to permeate.
PLACE drumsticks into a large shallow baking dish. Pour over the buttermilk, cover with plastic wrap and refrigerate for at least eight hours or overnight.
PREHEAT oven to 200 C and arrange a rack over a baking paper or foil lined oven tray.
COMBINE flour, cayenne pepper and paprika in a large bowl.
HEAT oil and butter in a large wok over medium high heat.
WORKING in batches, remove chicken drumsticks from the marinade, three at a time,  dredge with seasoned flour and fry until lightly golden all over, about 5 minutes. Transfer to a kitchen paper lined plate and keep warm whilst frying the remaining drumsticks
WHEN all twelve drumsticks have been fried, place them onto the prepared baking rack. Bake for 30 minutes until nicely browned and cooked through, turning once after 20 minutes.
SERVE with a side of coleslaw. Recipes here and here.

Posted in Marinades, Poultry | Tagged , , , , , | 3 Comments