Another Offering From The Japanese Izakaya. Butabara. Grilled Pork Belly Skewers With Green Spring Onion.

Grilled Pork Belly Skewers Marinade

It’s Spring, and the weather has been unseasonably warm. The perfect excuse to fire up the barbecue. My family has a penchant for anything marinated, skewered and grilled. No doubt a consequence of many a visit to the Japanese izakaya both here and abroad.

More often than not I prepare chicken yakitori. A guaranteed crowd pleaser. This time I’m determined to recreate another of my favourite izakaya offerings.  Butabara.  Grilled pork belly. Thinly sliced.  Marinated in tare, a very special sweet soy, sake and mirin sauce. Threaded onto skewers with spring onions. Lightly charred over a searing hot grill. All the work is in the initial preparation. This deceptively simple recipe produces meltingly rich, mouthwateringly delicious pork belly. So good I think I might even prefer it over chicken yakitori.

Grilled Pork Belly Skewers Japanese Style

Grilled Pork Belly Skewers With Green Spring Onion

I like to use a whole piece of pork belly for this dish. Once the skin is removed I bake it in a hot oven so I can serve beautifully crisp pork crackle on the side. Tips for achieving great pork crackle can be found in this post. If I am baking crackle on its own I still like to blanch it first with boiling hot water. I then dry it with paper towels and leave it on the kitchen bench for an hour to air dry thoroughly before baking.

If you would like to try chicken yakitori, the process is very similar, just substitute chicken thigh fillets for the pork belly. Original recipe post here.

Makes approximately 20 skewers

1/2 cup Japanese soy sauce
1/4 cup dashi or chicken stock
1/4 cup mirin
4 tablespoons sake
1/4 cup caster sugar
1/2 teaspoon white pepper
1 kg slab pork belly
8 long green spring  onions, trimmed, cut into 4cm lengths
20 bamboo skewers

SOAK skewers in cold water for 15 minutes. Drain.
REMOVE skin from the pork belly and slice thinly into 1.5cm – 2cm  thick rashers. Then slice each rasher into 4 cm wide strips.
MEANWHILE, combine soy sauce, stock, mirin, sake, sugar and pepper in a small saucepan over medium-high heat. Bring to the boil. Reduce heat to medium. Simmer for 5 minutes or until sauce has reduced and thickened slightly. Allow to cool completely.
PLACE sliced pork in a glass or ceramic bowl. Coat with half the cooled sauce. Cover and leave to marinate in the refrigerator for at least an hour.
THREAD pork and spring onions onto skewers. Place onto a paper lined tray. Brush with some of the reserved sauce.
PREHEAT bbq or grill on medium-high heat until hot. Grill skewers, basting with sauce, for 6 to 8 minutes or until cooked through.
SERVE with ice cold beer.

Posted in Pork, Small Bites, To Serve with Drinks, What I Love to Cook | Tagged , , , , , , , , | 11 Comments

For The App Junkie. The Paddington Foodie Is Now On Instagram.

Adriano Zumbo Blueberry Cronut

A couple of weeks ago my gorgeous cousin Cate convinced me to expand my blog to Instagram. She kindly and very patiently gave me a crash course on the ins and outs of  using the app. No mean feat considering I truly am a social media luddite. The good news is I was able to master the basics very easily. Thank you Cate. Now that I have had a few weeks grace to familiarise myself with the app, I’ve come to appreciate just how awesome it can be.

So far I have mostly posted snapshots of what I have been cooking in my kitchen and by default posting on my blog but plan to expand my repertoire to capture images of  anything interesting that catches  my eye. All food related of course. It might be a  new food fad or trend, the sourcing of an elusive ingredient, or  a fabulous dish that tickles my fancy at a restaurant, bar or cafe.  I love the potential quirkiness of the app. The ability to take a picture and paint a story in just a few words. The possibilities are endless. No doubt it will be an ever changing chronicle of my love of food.

Here’s a little teaser. Adriano Zumbo’s magnificent Blueberry Zonut. His answer to Manhattan’s cronut. Croissant or doughnut? You be the judge. Snapped at Adriano Zumbo’s bakery and cafe in Rozelle. If you would like to taste one for yourself, check out the details, complete with location map, on my instagram account.

Accessing instagram is  easy. It’s just a matter of installing the instagram app on your phone and typing in the keyword “thepaddingtonfoodie”. This one’s truly for the app junkie.

Posted in What I Love to Cook, Where I Love to Eat | Tagged , , | 3 Comments

The 5-2 Challenge. Nasu Dengaku. Roasted Eggplant With A Sweet Miso Glaze.

Roasted Eggplant  With A Sweet Miso

Another of my favourite Japanese dishes that lends itself wonderfully to the 5-2 fasting diet. Nasu Dengaku. An incredibly delicious combination of soft silky baked eggplant and sweet miso. Umami at its very best.

Traditionally prepared over a charcoal grill using smaller Japanese finger eggplant, I have taken the liberty to adapt the recipe to use much larger eggplant which are more regularly available in Australian supermarkets. To ensure they are cooked to unctuous perfection I like to roast scored eggplant halves in the oven rather than char them on the grill. To complete the meal, serve with a  35 calorie bowl of miso soup (recipe here)

Roasted Eggplant With A Sweet Miso Glaze
Serves 2 (278 calories per serve)

2 medium eggplants (180 calories)
1 tablespoon sesame oil (120 calories)
3 tablespoons  mirin (sweet rice wine) (120 calories)
2 tablespoons shiro (white) miso (80 calories)
1 tablespoon toasted sesame seeds (52 calories)
1 long green spring onion, finely sliced (4 calories)

PREHEAT oven to 180C.
SLICE each eggplant in half.
LIGHTLY  score the surface of the eggplant with the point of a sharp knife in a diamond pattern and then brush the surface very lightly with sesame oil.
PLACE cut side down on a paper lined baking dish. Cover with foil and bake for 30 minutes until eggplant is very soft.
MEANWHILE stir together the mirin and miso paste in a small saucepan over very low heat until combined, about 3 minutes.
REMOVE the eggplant from the oven, turn over and brush the scored roasted flesh with miso glaze. Return to the oven and continue roasting until the glaze is golden and begins to caramelise, about 5 more minutes.
SCATTER  over toasted sesame seeds and sliced spring onion. Serve with a bowl of miso soup.

Posted in Vegetables, Vegetarian, What I Love to Cook | Tagged , , , , , , , | 10 Comments

More Baking With Bundt Tins. Large And Small. Old-Fashioned Chocolate Vanilla Marble Cake.

Chocolate Vanilla Marble Cake

One of my enduring childhood kitchen memories? Old-fashioned marble cake. More often than not a two tone chocolate and vanilla version and very occasionally a very special three tone, neapolitan treat with the addition of a third flavour, strawberry. Reminiscing over the simple joys of marble cake with a friend I realised that I have never baked one for my children.  This oversight was easily rectified this weekend. An easy option for my regular Sunday night baking routine.

In essence marble cake is nothing more than a very simple butter cake. Thrown together with the most basic of pantry ingredients.  Butter, sugar, eggs, flour and milk. Just before baking the batter is divided into two or three portions, flavoured appropriately and dolloped in alternate spoonfuls into a tin. To my childish eyes the magic was created at the very end when a wooden skewer was artistically dragged through the batter to create a swirled and marbled effect. Of course there was always the interminable wait for the baking, cooling and icing of the cake to be completed before we could slice it open to reveal its gorgeousness.

Tonight I made up a double batch of batter and baked my marble cakes in my newly rediscovered bundt tins. Both large and small. They looked so elegant and delicious finished with a generous drizzle of melted chocolate.  In the style of Ottolenghi. I really must bake his divine teacakes. My family’s appreciation was expressed in a chorus of ” I can’t believe you haven’t you baked this for us before.”

Chocolate Vanilla Marble Bundt Cake


Old-Fashioned Chocolate Vanilla Marble Cake
Makes 1 large or 16 mini bundt cakes.

150g butter, softened
1 cup (220g) caster sugar
2 eggs
1 teaspoon pure vanilla extract
2 1/2 cups (375g) self-raising flour
1 cup (250ml) milk
1/4 cup cocoa powder
200g dark chocolate
1 teaspoon olive oil

PREHEAT oven to 180 C. Grease and flour a 22cm fluted ring bundt tin
BEAT butter and caster sugar until pale and creamy. Add eggs and vanilla, beating until just incorporated.
FOLD in self-raising flour and milk in two batches until smooth.  Divide cake batter into two portions.
DISSOLVE cocoa powder in a tablespoon of boiling water and stir into one portion of the cake batter.
USING two tablespoons alternately dollop the chocolate and vanilla batters into the prepared tin. When all the batter has been used gently tap the bottom of the tin against your bench top to disperse any air bubbles. Drag a skewer through the cake batter a few times to create a marbled effect.
BAKE for 40-45 minutes. Set aside for 15 minutes before inverting the cake onto a wire rack to cool. If using a mini bundt tray the cakes will be baked in 20 minutes.
WHEN the cake has cooled melt chocolate and olive oil in a heatproof jug in the microwave, medium – low power for 2 minutes, stirring every 30 seconds.
POUR the melted chocolate over the cake. Serve when set.

Posted in Baked, Chocolate, Sweet Treats, What I Love to Cook | Tagged , , , , , , , | 10 Comments

Weekend Baking. Iconically Australian. Chocolate Lamington and Raspberry Jelly Patty Cakes.

Vanilla Patty Cakes Lamington and Jelly Style

Nothing beats biting into a freshly baked lamington.Vanilla sponge coated  in a layer of chocolate icing and then rolled in dessicated coconut. Simple, elegant and decidedly delicious. Iconically Australian. Most times a great lamington is hard to come by.

Here is a simple variation on the well loved lamington. Two ways. Vanilla patty cakes replace the classic squares of sponge.  Dipped in chocolate icing or for a very retro vibe –  partially set raspberry jelly. Before being rolled in shredded coconut. And there you have it chocolate lamington and raspberry jelly cakes. The staple of many a children’s party, school cake stall and fete in my childhood years.

Chocolate Lamington and Raspberry Jelly Patty Cakes

For The Vanilla Patty Cakes
Makes 24 cakes

125 g  butter
1/2 cup caster sugar
1 egg
1 1/4 cups self-raising flour, sifted
1/2 cup milk
1/2 teaspoon pure vanilla extract

PREHEAT oven to 180C (160C fan-forced). Grease and flour two 12-hole, flat-based patty pans, shaking out any excess flour.
CREAM together butter and sugar with an electric mixer until light and fluffy.
ADD egg and beat until just combined.
ADD flour, milk and vanilla and mix until smooth.
SPOON tablespoons of the mixture into the prepared tins.
BAKE for about 10 minutes, or until lightly browned. They’re ready when a skewer inserted in the centre comes out clean. Remove cakes from pans and transfer to a wire rack to cool.

To Make Chocolate Lamingtons

300g (2 cups) icing sugar mixture
35g (1/3 cup) cocoa powder
60ml (1/4 cup) milk
60ml (1/4 cup) boiling water
2 1/2 cups desiccated coconut

SIFT the icing sugar and cocoa powder into a medium bowl. Add the milk and water and stir until smooth.
DIP each patty cake into the warm icing to evenly coat. Allow any excess icing to drip off.
ROLL in coconut until evenly coated.Place on a wire rack and set aside until icing sets, about an hour.

To Make  Raspberry Jelly Cakes

250 ml (1 cup) boiling water
1 x 85 g (3 oz) packet strawberry or raspberry jelly crystals
200ml ( a little over 34 cup) cold water
2 1/2 cups desiccated coconut

POUR boiling water into a large heatproof jug. Sprinkle jelly crystals into jug, stir until crystals are dissolved, then stir in cold water.
COVER and refrigerate for 2 hours, or until jelly is just starting to set. It should be a thick and syrupy consistency, similar to that of egg whites. If it is too firm it will not stick to the cakes. If it is too thin it will soak right through the cakes causing them to disintegrate.
REMOVE jelly from refrigerator and quickly roll each cake in the jelly, coating it evenly.
TOSS the jelly-covered cake in coconut until it’s coated all over. Refrigerate for an hour or until firm.

Posted in Baked, Sweet Treats, What I Love to Cook | Tagged , , , , , , , , , , | 9 Comments

The 5-2 Challenge. A Feast For Your Eyes. Deconstructed and Stacked Waldorf Salad with A Lemon and Honey Yoghurt Dressing.

Deconstructed and Stacked Waldorf Salad With A Yoghurt, Lemon And Honey Dressing

Since locating the safety guard for my mandolin I’ve been slicing with a vengeance. Sweet and savoury oven baked crisps, coleslaws and potato bakes. Here is a gorgeous and fresh 5-2 challenge fast day idea using my mandolin and two of my favourite ingredients apples and fennel. Minimal cooking required, all the effort is in the assembly.

A deconstructed and stacked waldorf salad. Drizzled with a lemon and honey yoghurt dressing to dramatically reduce the calorie count. All the traditional elements are on the plate: apple, celery, grapes, walnuts and blue cheese . I’ve added a little lamb’s lettuce for its sweet, nutty flavour and vibrant green colour.  The idea to stack the apples was inspired by a post in The British Larder.  Visually appealing, a fast day feast for your eyes. A pretty plate of salad for just 208 calories a serve.

Deconstructed and Stacked Waldorf Salad with A Lemon and Honey Yoghurt Dressing
Inspired by The British Larder
Serves 4 (208 calories per serve)

2 small green Granny Smith apples (110 calories)
2 small red Pink Lady apples (110 calories)
1 small bulb fennel (38 calories)
2 medium celery stalks(12 calories)
1 small bunch (100g) red seedless grapes (70 calories)
50g (1/2 packet) mâche rosettes or lambs lettuce (14 calories)
25g walnuts (164 calories)
50g Castello Blue cheese (215 calories)

For The Dressing
1/2 cup Greek yoghurt (65 calories)
juice and finely grated zest of 1 lemon (12 calories)
1 teaspoon honey (21 calories)

MAKE the dressing by combining the yoghurt, honey lemon zest and juice in a small bowl. Whisk to combine and set aside for the flavours to develop as you prepare the salad ingredients. Season to taste.
LIGHTLY toast the walnuts in a dry heavy based pan over a medium flame. Cool completely.
WASH and peel the celery, slice finely and keep covered with damp kitchen paper until needed.
PEEL and quarter the fennel bulb. Discard the core and slice finely on a mandolin into a bowl of acidulated water. Remove from bowl and dry thoroughly on paper towels just before slicing the apples
WASH the lettuce, apples and grapes. Dry thoroughly.
Slice the grapes in half. Set aside.

When Ready to Assemble the Salad
REMOVE the cores of the apples with an apple corer. Use a mandolin to slice the apples into fine slices.
ARRANGE the fennel and red and green apples in an alternating stack in the centre of each plate, lightly drizzling each layer with dressing.
SCATTER the lambs lettuce, celery, toasted walnuts and grapes  around the apple and fennel stack.
CRUMBLE the blue cheese and divide between the plates. Drizzle over a little more of the dressing and serve immediately.

Posted in Fruit, Salads, What I Love to Cook | Tagged , , , , , , , , , | 10 Comments

Toffee Apples For Grown Ups. Sweet, Crisp and Crunchy. Oven Baked Apple Chips With A Toffee Drizzle.

Oven Baked Apple Chips With Toffee Drizzle

Here is my take on toffee apples. For grown ups. Intensely sweet, crisp and crunchy apple chips. Slow baked in the oven. Drizzled with toffee. So very easy to prepare. I’d almost say it’s child’s play except for  a few little points. First, there’s the mandolin which makes short work of  the slicing  but can be a hazard  if you don’t pay close attention to fingers. Note to self  always remember to use the slicer guard even if it does involve hunting through the kitchen cupboards. Then there’s the toffee. So very easy to burn yourself if you’re not careful. Always remember toffee is hot and liquid. Place a small drop of cooked toffee on a saucer of cold water to test if it is ready. Then taste to see if it is ready. If it cracks between your teeth its done. A very valuable lesson remembered and  learned, the hard way, from my childhood.

But please don’t let these cautionary words of wisdom deter you. These are well worth making. The dried apples are brilliant on their own even without the toffee drizzle. So far removed from anything that can be purchased commercially. In my humble opinion the toffee just elevates them to a whole new level. Reminiscent of toffee apples. A large bowl didn’t last long in our house. Demolished in an instant by a very appreciative trio of taste testers.

Oven Baked Apple Chips With A Toffee Drizzle

Apple Chips
3 small apples (Pink Lady, Royal Gala or Granny Smith Apples work well for this recipe)
1/2 cup sugar
1 cup water
juice of 1 lemon

Toffee Drizzle
1 cup caster sugar
1/4 cup water

PREHEAT oven to 110C fan forced. Line 3 large oven trays with baking paper.
MAKE a simple sugar syrup. Combine the sugar, water and lemon juice in a shallow pan and bring to a gentle simmer.
SLICE unpeeled apples very thinly on a mandolin. I like to use small apples no wider than the mandolin to achieve perfect slices. Remove pips from the apples once sliced.
PLACE the apple slices, in batches,  into the simmering sugar syrup  for about a minute to soften a little. Remove with a slotted spoon onto a plate lined with paper towel.
PAT dry and arrange apple slices in a single layer on the prepared oven trays. A rule of thumb is one small apple thinly  sliced should roughly cover one tray.
BAKE for  an hour in a slow preheated oven. Flip the apple slices, rotate the trays, then bake for another hour or until apple slices are dry and lightly coloured. The apple slices will cook from the outside in and continue to crisp up once removed from the oven. To test if the chips are ready remove one from the oven and leave to cool for a few minutes. Test for crispness.
REMOVE trays from oven and leave to cool.
MEANWHILE make the toffee. Stir water and sugar in a small saucepan over low heat until the sugar has dissolved.
INCREASE heat to high and bring to the boil without stirring. Use a wet pastry brush dipped in water to brush down and dissolve any sugar crystals which form on the side of the saucepan.
COOK until the mixture is a light golden colour. Remove the pan form the heat. To test if toffee is ready drop a little of the mixture onto a saucer of cold water. If it “cracks” it is ready. The toffee will continue to cook a little once it is taken off the heat so be careful not to burn the mixture. If toffee is not quite ready return the saucepan to the heat and watch it like a hawk. Remove the pan from the heat each time you test the mixture.
DRIZZLE the toffee over the baked apple slices. It’s easiest to do this while the slices are still on the baking paper lined trays. I find it easiest to use a teaspoon for drizzling.
ALLOW to cool and store in an airtight container.

Posted in Baked, Fruit, Sweet Treats, What I Love to Cook | Tagged , , , , , , , , | 5 Comments

The 5-2 Challenge. The Perfect Fast Day Meal. Baked Eggs Wrapped In Prosciutto

Baked Eggs Wrapped In Prosciutto

This might just  be the perfect fast day meal. Here’s why. It’s nutritious and very quick and easy to prepare using just a few simple ingredients. These baked eggs truly are delicious. What’s more they look great on a plate, served on their own or with a side of salad or roasted cherry tomatoes.

One prosciutto baked egg accounts for just a little over 100 calories. Keeping a tight rein over the day’s eating might even allow room for toast soldiers to dip into the gorgeously oozy egg yolks. A dish my whole family will happily eat. For breakfast, brunch, lunch or dinner. For a more substantial meal allow two eggs per person. Bake a whole tray to feed a crowd. Or just one or two for a quick bite. Eminently versatile, it doesn’t get better or easier than this.

Baked Eggs Wrapped In Prosciutto

Makes 4 portions (102 calories per baked egg)

4 slices prosciutto (40g), very finely sliced (76 calories)
4 free range eggs (300 calories)
1 tablespoon finely chopped parsley (2 calories)
1 tablespoon finely chopped long green spring onions (10 calories)
a generous pinch of dried chilli flakes (1 calorie)
1/2 teaspoon olive oil, to grease ramekins or muffin tin (20 calories)
sea salt and black pepper to taste

PREHEAT oven to 180C
GREASE 4 ceramic ramekins or 4 holes of a metal muffin tray with olive oil
WRAP each slice of prosciutto around the inside of the ramekin to create a ring. Gently press the bottom edges of the prosciutto ring into the base of  the ramekin. It doesn’t matter if the base is not completely covered with prosciutto.
CAREFULLY crack one egg into each bacon lined cup. Sprinkle each egg with spring onions, parsley, chilli, sea salt and pepper.
BAKE the egg cups for 15-20 minutes until the centers have set. You can adjust the cooking time based on how you prefer the consistency of your egg yolks. Cooking times may vary depending on the vagaries of your oven.
CAREFULLY remove the baked eggs to a plate. Sprinkle the tops with a little more parsley and serve immediately.

Posted in Breakfast, Eggs, What I Love to Cook | Tagged , , , , , , , , | 25 Comments

A Lazy Sunday Afternoon Tea. Ottolenghi Style. Little Apple and Olive Oil Tea Cakes

Apple and Olive Oil Teacakes

I have been meaning to make Ottolenghi’s stylish little tea cakes for over a year now. I even have a barely used mini bundt tray languishing in my kitchen cupboard, originally purchased in anticipation of the event. Today was finally going to be the day to bake them.  I retrieved my copy of Ottolenghi The Cookbook from the bookshelf, flipped it open and realised I didn’t quite  have all the necessary ingredients in my pantry.

No matter. There is a recipe in the same book for a gorgeous Apple and Olive Cake. The original recipe calls for its assembly as a layer cake. Complete with a maple cream cheese frosting. Absolutely divine. Here is my reinterpretation of that cake. Baked in a mini bundt tray. Sans maple cream cheese frosting. Simply dusted with a little icing sugar. Perfect for a lazy Sunday afternoon tea.

Little Apple and Olive Oil Tea Cakes
Adapted from Ottolenghi The Cookbook

Makes 12 Teacakes

80g sultanas
2 tablespoons brandy
2 tablespoons water
280g (1 5/6 cups) plain flour
1/2 tsp ground cinnamon
1/4 tsp salt
1/2 tsp baking powder
1 1/4 tsp bicarbonate of soda
120ml olive oil
160g (2/3 cup) caster sugar
1 teaspoon pure vanilla extract
2 eggs
3 small granny smith apples, cut into 1cm dice
grated zest of 1 lemon
2 egg whites

PLACE the sultanas, brandy and water in a saucepan and simmer over a low heat until the water has been absorbed. Cool.
GENEROUSLY grease and flour a 12 hole mini bundt tin, tapping out excess flour.
PREHEAT oven to 170 C
SIFT together the flour, cinnamon, salt, baking powder and bicarbonate of soda.
IN A SEPARATE  bowl, whisk together the oil, sugar and vanilla.
ONCE  smooth and thick add the diced apples, sultanas and zest. Fold the sifted ingredients into the oil mixture.
WHISK the egg whites in a clean bowl until they are a soft meringue texture. Fold them gently into the mixture.
POUR the batter evenly into the prepared mini bundt tin. It will be very dense with a large volume of apples. When filled tap the tin gently on the kitchen bench to distribute the batter and smooth the top with a palette knife. Any excess batter left over after filling the bundt tin (this will depend on the size of your tin) can be poured into a lined muffin tin.
BAKE  for 25 minutes, middle oven rack position, or until a skewer inserted into the cakes comes out clean.
REMOVE from the oven, allow to cool in the tin a little before transferring onto wire rack to cool completely.  Give each of the teacakes a little twist to help release them from from the mini bundt tin.
DUST with a little icing sugar to  serve.

Posted in Baked, Sweet Treats, What I Love to Cook | Tagged , , , , , , , , , | 10 Comments

The 5-2 Challenge. A Taste of Mexico. Homemade Corn Tortilla. Served With Grilled Chicken In An Achiote Citrus Marinade And A Roasted Corn and Grape Tomato Salsa.

Corn Tortillas With Grilled Achiote Chicken And A Roasted Corn and Grape Tomato Salsa

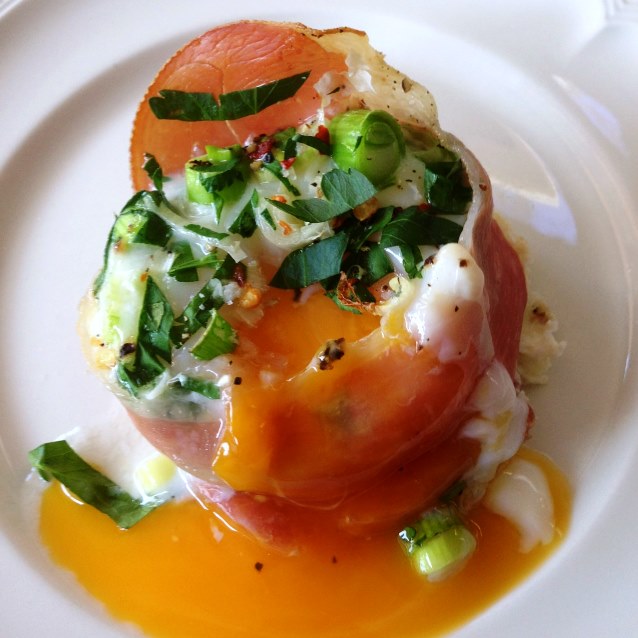
Before I know it  another fast day rolls by. If truth be known today I found the prospect of fasting  rather inconvenient. Today I had my heart set on making corn tortillas. From scratch. I’ve just spent the better part of a fortnight hunting down masa harina, the traditional flour used to make tortillas, tamales and other Mexican dishes.  Yesterday on a whim I stopped by The Essential Ingredient in Rozelle and literally stumbled upon this most elusive ingredient. There sitting on the shelf were three different varieties of the flour – white, yellow and blue. So here you have it today’s fast day offering. A taste of Mexico. For under 400 calories  A homemade corn tortilla (55 calories) served with  grilled chicken in an achiote citrus marinade (256 calories) and a roasted corn and grape tomato salsa (65 calories).  A meal worth fasting for.

Corn tortillas are surprisingly easy to make. Contrary to popular opinion you do not need a fancy tortilla press. The dough is so soft and pliable. So much so that all that really is required is something flat and heavy.  A book or skillet will do the trick. For the record I pressed my tortillas with  the bottom of my crepe pan.

It’s another recipe that requires just two ingredients – flour and water. But not just any flour it has to be masa harina, a flour made from specially treated corn. Unfortunately substituting cornmeal, polenta or  ordinary cornflour for the masa harina  simply does not work. It will not produce the same results. To make masa harina corn kernels are removed from their cobs, dried, then soaked in lime water or lye until the skins of the kernels can be easily removed. Once this process has been completed the kernels are mashed, dried and ground into flour. Equipped with a packet of masa harina and downloaded instructions from Simply Recipes making corn tortillas was a snap. Such a pity this being a fast day I had to limit myself to just one.

At The Essential Ingredient I was also fortunate to find a brick of achiote paste; a traditional Mexican spice mix ground from bright red annatto seeds, oregano, cumin, cloves, cinnamon, allspice and garlic. Thinned with citrus juice it makes  the most wonderful marinade for chicken, pork or fish. Usually when I grill chicken on a barbeque I prefer to use chicken thigh fillets over breast. I find they are much juicier and plumper. Another fast day compromise was to use breast fillet for the lower calorie count.  I am very happy to report that the citrus marinade kept the chicken breast very tender and succulent despite its hot sear on the grill plate. Homemade tortillas and grilled chicken deserve a salsa. This time around I settled on a roasted corn and grape tomato version with a little rocket. Fresh seasonal ingredients the perfect accompaniment to my Mexican feast.

Corn Tortillas
Adapted from www.simplyrecipes.com/recipes/how_to_make_corn_tortillas/
Makes about 16 small tortillas (55 calories per tortilla)

2 cups masa harina (880 calories)
1 1/2 to 2 cups water

Make the Masa Dough
PLACE 2 cups of masa harina in a large bowl. Stir in water and let sit for 5 minutes or so.
BEGIN working the masa with your hands to make the dough. Work the dough for several minutes. Press the dough with your fingers and the palms of your hands as if you were kneading bread dough. If at any point through the tortilla making process the dough seems too dry or too wet, add a little more water or masa to the dough.
TWO cups of flour will make approximately 16 tortillas. To keep them all  the same size divide the dough into two balls. Divide each ball into quarters, and divide each quarter into half again.
ROLL each of the 16 portions of dough into a golf sized ball.

Press the Tortillas
MAKE one tortilla at a time, pressing the next while one is cooking.
TAKE two A4 sheets of baking paper. Place a ball of dough in the centre of one sheet of baking paper and top with the second. Using a heavy book or skillet (I used my crepe pan) press down to flatten until  the dough has spread to a diameter of 10 – 12cm.

Cook the Tortillas
HEAT a dry skillet or griddle over high heat.
WORKING  one at a time, hold a tortilla in your hand, carefully removing the paper on each side. Allow the tortilla to rest half on your hand, and half hanging down, and gently lay the tortilla down on to the skillet.
START pressing the next tortilla.
COOK the tortilla in the hot pan for 30 seconds to a minute on each side. The tortilla should be lightly toasted with little air pockets forming on the surface.
WRAP cooked tortillas in a dish towel to keep them warm. Serve immediately or refrigerate and reheat.

Achiote Marinade With Citrus

Grilled Chicken With An Achiote Citrus Marinade
Serves 6 (256 calories per serve)

750g chicken breast, sliced into bite sized pieces (1237 calories)
1/2 brick (50g) achiote paste (75 calories)
1 clove garlic, finely grated (4 calories)
1 tablespoon olive oil (120 calories)
2 teaspoons sea salt
several grinds black pepper
juice and finely grated zest from one lemon (12 calories)
juice and finely grated zest of two oranges (82 calories)
juice and finely grated zest of one lime (8 calories)

MIX achiote paste with olive oil, using a fork to make a smooth paste, then add the garlic and citrus juices. Stir well to combine, ensuring no lumps remain. Season with salt and pepper.
PLACE chicken into a ceramic or glass bowl. Add marinade turning to coat. Cover with cling wrap and refrigerate for 2 to 4 hours.
REMOVE the chicken from the marinade and barbecue on a hot grill for 8-10 minutes until nicely charred.

Roasted Corn and Grape Tomato Salsa With Rocket
Serves 6 (65 calories per serve)

4 small ears of corn (252 calories)
1 punnet (2 cups) grape tomatoes (60 calories)
2 long green spring onions (20 calories)
3 handfuls wild rocket, shredded (12 calories)
1 tablespoon lime juice (2 calories)
1 tablespoon lemon juice (2 calories)
drizzle of olive oil (40 calories)
sea salt and freshly ground pepper

PREHEAT barbecue to medium hot. Grill corn with husk on until charred. Allow to cool a little then remove the husk and silk.
PLACE the corn cobs back on the grill to gain a little color, rolling over the hot grill for 2 or 3 minutes.
ONCE charred, slice the corn kernels off the cob and place in a medium sized bowl.
PLACE a sheet of baking paper on the flat plate of the barbecue. Lightly grill the grape tomatoes until their skins are just about to burst. Add to the bowl of corn kernels.
FINELY slice the spring onions and also add to the bowl, along with the shredded rocket.
Dress with olive oil, lime and lemon juice. Season with sea salt and freshly ground pepper. Serve immediately.

Posted in Poultry, Small Bites, What I Love to Cook | Tagged , , , , , , , , , , | 3 Comments