Pasta Pronto. Penne with Little Italian Sausage Meatballs and a Home-made Tomato Sauce.

sausagemeatballpasta

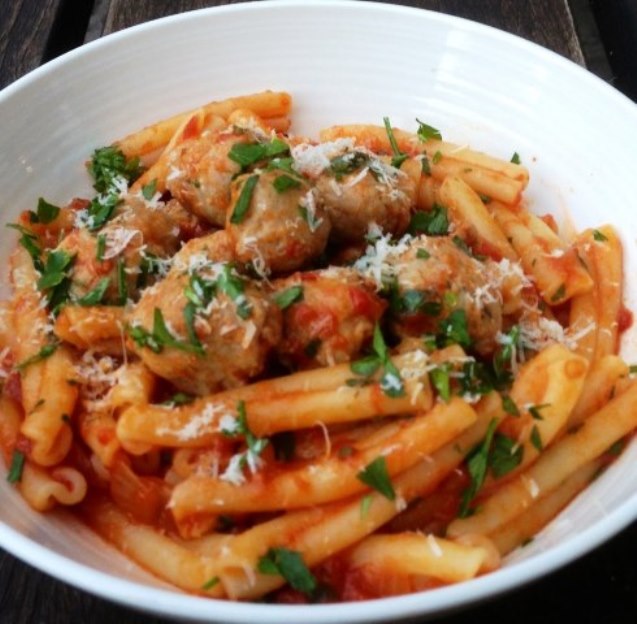
Meatballs are a perennial favourite in this house. Team them with pasta and a rich tomato sauce and I’m everybody’s best friend. The reality is that making meatballs from scratch can be quite time-consuming. Not exactly practical for a quick dinner during a busy week. Here is my fabulous  cheat. Buy the best quality Italian pork and fennel sausages you can find. And simply squeeze little walnut sized balls of sausage meat out of the casings and into a home-made tomato sauce. I’m pretty sure I borrowed the idea from one of Jamie Oliver’s cooking shows when my children were very young. I cook this a lot and have never had a single complaint. So it must be good. You could brown the meatballs first but that’s just another step that is easily eliminated when the clock is ticking and I need to get dinner on the table. Pronto.

Penne with Little Italian Sausage Meatballs and a Home-made Tomato Sauce.

Serves 4

400 gm box of dried pasta, I like to use penne, rigatoni or casarecce
500 grams good quality Italian pork and fennel sausages
4 tablespoons olive oil
1 large brown onion, finely diced
3 cloves of garlic, crushed
2-3 teaspoons crushed chilli flakes
2 x 400g tins of chopped tomatoes
2 tablespoons finely chopped herbs, I like to use a combination of parsley, oregano and basil
A good pinch of sugar
A dash of balsamic vinegar
sea salt flakes and freshly ground pepper to season
chopped herbs, to garnish
1/4 cup grated Parmesan to serve

IN A large shallow frying pan over medium heat, sauté onion in olive oil with a pinch of salt until translucent. About 5 minutes
ADD garlic and crushed chilli flakes. Sauté until fragrant.
STIR in the canned tomatoes and cook until the sauce begins to thicken a little. Break down the tomatoes with the back of your wooden spoon as you stir.
ADD herbs,balsamic vinegar and sugar. Stir well to combine. Turn the heat down to low and simmer until  the sauce is rich and thick. Season to taste with salt and pepper.
MEANWHILE cook pasta in a large saucepan of salted boiling water according to the instructions on the back of the box until al dente.
SQUEEZE walnut sized balls of sausage meat out of their casings directly into the pan of simmering sauce. Cook for a further 5-10 minutes until meatballs are cooked through. If the sauce becomes a little too thick, loosen with a few tablespoons of the pasta cooking water.
DRAIN the cooked pasta and toss through the meatballs and sauce. Sprinkle with chopped fresh herbs and grated Parmesan cheese to serve.

Posted in Pasta, Pork, What I Love to Cook | Tagged , , , , , | 2 Comments

Pure Nostalgia. Old Fashioned Slice and Bake Biscuits. Two Ways.

SliceandBakeBiscuits

Slice and Bake biscuits. Pure nostalgia. A trip back to my childhood. A good old-fashioned stalwart from The Australian Women’s Weekly. Infinitely adaptable. Incredibly easy to make. Beat together butter and icing sugar. Add your choice of flavouring, nuts, chocolate or dried fruit. Flour and a little milk. Knead. Shape into logs. Refrigerate. Slice and bake.

Sunday night baking. After a busy weekend I want to get in and out of the kitchen fast. So tonight I’m making Slice and Bake Biscuits. One recipe. Two ways. A traditional melt in your mouth lemon version filled with currants.  And a  modern twist on the ever popular chocolate chip cookie. Vanilla filled with caramel bits.  Absolutely delicious. Even though it’s Sunday night and I’m pushed for time I double the quantities provided in the recipe. The method in my madness?  Containers filled with biscuits on the kitchen bench and  logs of  dough wrapped and stored in the freezer. Ready to be sliced and baked at a moment’s notice. Is everybody happy? You bet we are!

Old Fashioned Slice and Bake Biscuits. With Vanilla and Caramel Bits
Adapted from The Australian Women’s Weekly.

Makes 48 Biscuits

250g butter
1¼ cups (200g) icing sugar mixture
2 teaspoons vanilla essence
2 cups (300g) plain flour
½ cup (75g) rice flour
1/3 cup (50g) cornflour
1 packet (230 g) caramel bits
2 tablespoons milk

BEAT the butter, icing sugar mixture and vanilla in a large bowl with an electric mixer until pale and fluffy. Stir through a packet of caramel bits with the combined sifted flours.combined in 2 batches, then the milk; mix well.

DIVIDE the mixture in half. Knead each half on a lightly floured surface until smooth, then roll each half into a 25 cm log. Wrap each log in baking paper and refrigerate for 1 hour or until firm. If you are not intending to bake biscuits within 2 days, wrap them in foil and freeze.

PREHEAT oven to moderately slow (160°C). Cut the logs into 1 cm slices and place 3 cm apart on greased oven trays. Bake the biscuits in a moderately slow oven for about 20 minutes or until a pale golden colour.

For the Lemon and Currant Variation

Omit vanilla essence and beat the finely grated zest of 1 lemon with butter and icing sugar, then stir through ¾ cup of currants with combined sifted flours. Once baked and while the biscuits are still hot out of the oven sprinkle with a tablespoon of caster sugar.

Posted in Baked, Sweet Treats, What I Love to Cook | Tagged , , , , , , , , , | 5 Comments

Organising The Recipes On My Blog. WordPress. A Left Brain Nightmare For My Right Brain Creativity.

RecipeIndex

I began the task of organising my posts into a recipe index over a month ago.  Easy peasy. Or so I thought. After all there were less than one hundred recipes to sort through.  All I had to do was  organise those recipes by category.  Create a new page for each category. Link each recipe to an image and  each image to its original post. My aim? A recipe index that is easy to navigate and visually appealing. Suffice to say the best laid plans of mice and (wo)men. Often go awry.

Wind the clock back to late September 2012.  On a whim I decide I to start a blog, unphased  by the fact that I have had no prior exposure to  blogs at all. My first port of call? My teenage son. Naturally. It’s not that I’m a luddite. I’ve been using computers for decades. I cant live without my i-technology. The problem is  my brain just can’t seem to navigate the technical aspects of WordPress.  After much pleading, and a little bargaining, my incredulous  son set up my account for me. Much mirth followed when he and his sisters realised  it took me three more days to figure out how to publish my first post. But that’s ancient history now.

Five months on.  I’m on a roll. WordPress is my friend. I’m cooking, photographing, writing and publishing recipe posts. I’ve discovered a vibrant on-line community, and even managed to redesign my blog a little. I’m feeling pretty confident about my new found skills. They say pride comes before a fall. How true. No matter how hard I try I can’t seem to organise and link my recipes, blog posts and images into anything but a bland and uninspiring screed.

And then it hits me.  It’s all about left brain logic versus right brain creativity,  Writing posts requires lateral thinking, right brain flair. Navigating the at times labyrinthine Wordpress technospeak  is most definitely a left brain exercise.  Requiring attention to detail and analytical logic.  Research shows that most people prefer one style of thinking over another.  Given my mounting frustration with my recipe index project  I  surmise I probably favour the right side of my brain. So to satisfy my curiosity, and procrastinate even further,  I complete one of those fun internet pop quizzes – Are You Right Or Left Brained? The results are in.

You Are 35% Left Brained, 65% Right Brained

The left side of your brain controls verbal ability, attention to detail, and reasoning.
Left brained people are good at communication and persuading others.
If you’re left brained, you are likely good at math and logic.
Your left brain prefers dogs, reading, and quiet.

The right side of your brain is all about creativity and flexibility.
Daring and intuitive, right brained people see the world in their unique way.
If you’re right brained, you likely have a talent for creative writing and art.
Your right brain prefers day dreaming, philosophy, and sports.

http://www.blogthings.com/areyourightorleftbrainedquiz/.

Perhaps that funny little pop quiz was just the impetus I needed to sit down and figure out the vagaries of WordPress and its image galleries once and for all.  I revisited my Recipe Index pages and cleaned them up. With a lot of trial and error, and a more disciplined approach I have managed to figure out how to use the gallery features effectively. I’ve set up an image carousel that links images of the recipes back to their original posts. And there is also a separate alphabetic  listing of posts  for each page. Navigating  Wordpress is now proving to be a little less of a left brain nightmare for my right brain creativity. While the task is still far from complete there is a light at the end of the tunnel, I hope you find my recipe index pages  useful and easy to use.

Posted in Musings & Inspiration | Tagged , , , , , | 12 Comments

Tuna Dip. Courtesy of How It All Started In The Kitchen.

I have been on the look out for a great tuna dip recipe for years. Our local deli makes a fabulous tuna dip I buy by the bucket load. My husband jokes we’re keeping the store in business. Earlier this week I stumbled upon Ana’s Tuna Dip recipe over at How It All Started in The Kitchen. In keeping with my Fish on Friday theme I have reblogged it here. If you love tuna dip this one’s for you. In a word? Divine!

That was last year. Ana has since taken the recipe down and launched her own gourmet food label Delicious by Ana. Her first product? Tuna Dip. Read all about it in her post  Dipping Into Something New.

Posted in Seafood, What I Love to Cook | Tagged , , | Comments Off on Tuna Dip. Courtesy of How It All Started In The Kitchen.

Delving Deep Into My Kitchen Drawer. A Recipe for The World’s Oldest Cake. Linzertorte.

Linzertorte

I have an almost empty jar of my mother’s home-made plum jam in the refrigerator. Word associations. Plum jam. Jam tart. Hazelnuts and jam. Linzertorte. A delicious tart made with a crumbly crust of flour, butter, egg yolks, and ground hazelnuts. Topped with preserves and a distinctive pastry lattice.

Torte is  the German  word for cake. Linz is a  picturesque city located on the banks of the Danube River in Austria. Touted as the oldest cake recipe in the world, Linzertorte has a romantic history dating back to the old Austro-Hungarian empire.  Legend has it that Austrians have been making and eating this cake for over 350 years.  The oldest written recipe dates back to 1653  and was recently located in the archives of the library at  Admont Abbey, a Benedictine monastery  in Austria. The torte gained wider popularity in 1823 when a local Linz baker Johann Konrad Vogel started selling it commercially.

Mulling over the long history of Linzertorte I suddenly recall a long forgotten recipe for Linzertorte. Masquerading as a delectable slice. A former firm family favourite. No doubt baked one too many times in quick succession.  Then discarded and abandoned.  To the depths of my kitchen recipe drawer. In my mind’s eye I  can picture the recipe. A page torn from Australian Gourmet Traveller many years ago.  Time to empty that drawer and begin my search.  A trip down memory lane.  I’m diverted by so many wonderful, half-forgotten recipes I haven’t cooked in years. Ready to be resurrected again. Several pleasant hours later there it is.  Towards the bottom of the pile. A crumpled page torn from Australian Gourmet Traveller dated March 2002.

Here is my latest rendition of the world’s oldest cake. Using the last of my mother’s plum jam. Linzertorte. Truly delectable with its crisp, nutty pastry base and luscious fruit topping. So delicious I’m sure it will survive another 350 years in one form or another.

Linzertorte Slice With Plum Jam
Adapted from Australian Gourmet Traveller, March 2002

1 cup caster sugar
125 g ground hazelnuts
1 1/4 cups plain flour
1/2 teaspoon ground cinnamon
120 g cold unsalted butter
1 large egg lightly beaten
3/4 cup raspberry or plum jam

PREHEAT oven to 180 C.
PROCESS sugar, hazelnuts, flour and cinnamon in a food processor until combined.
ADD butter and pulse until mixture resembles fine breadcrumbs.
ADD egg and process until mixture just comes together. You may need to add a teaspoon or so of water  to the mixture at this point- it all depends on the size of the egg.
SHAPE the pastry into a ball and cover in cling wrap. Refrigerate for an hour.
CUT off one third of the pastry and roll  between two sheets of baking paper to  the size of your baking tin. I use an 18 x 28 cm rectangular slice tin. Freeze between the baking paper sheets on a flat tray for 15 minutes.This pastry will be used for the lattice top of the slice.
MEANWHILE roll out the remaining pastry between  two sheets of baking paper to line the base of your baking tin.
PLACE pastry over the base of the tin. Trim excess and spread evenly with jam.
REMOVE rolled pastry from the freezer and using a sharp knife cut the pastry rectangle into 1 1/2 – 2 cm wide strips.
PLACE the strips diagonally over the jam to form a lattice.
BAKE at 180 C, middle rack position, for about 25 minutes or until golden.
COOL in tin and then cut into squares.

Posted in Baked, Sweet Treats, What I Love to Cook | Tagged , , , , , , , , , | 8 Comments

Quick and Easy. An Itallian Classic. Chicken Scaloppine With Lemon and Sage.

chickenscaloppineScaloppine. An Italian classic . Deliciously moist and tender. Thin, pounded slices of meat. Dredged in flour, sautéed and served with a wine, lemon, or tomato sauce. Traditionally prepared with chicken or veal. Although pork is often a popular substitute.

Another perfect recipe for a quick and tasty mid week meal. I pound the scaloppine in the morning and leave it to marinate in the refrigerator until I’m ready to prepare dinner. By this time the chicken is incredibly tender and imbued with a wonderfully fragrant lemony flavour. All that’s left to do is to quickly pan fry the chicken and de-glaze the pan with lemon juice, white wine and butter. I like to serve this dish with a creamy cauliflower mash. Prepared in advance and heated through. And a side salad of beans and cherry tomatoes with a balsamic dressing. Quick. Easy. Classic Italian.

Chicken Scaloppine With Lemon and Sage.

Serves 4

For the Marinade
1/4 cup extra virgin olive oil
the juice and finely grated zest of one lemon
1 tablespoon fresh sage leaves, chopped
2 cloves garlic, crushed
a generous pinch of sea salt and freshly ground pepper

For the Chicken Scallopine
4 chicken breasts, free range, boneless and skinless
½ cup plain flour seasoned with salt and pepper for dredging
2 tablespoons olive oil
3 tablespoons butter, preferably unsalted, divided
1/2 cup dry white wine
juice of 1 large lemon
fresh sage leaves, to garnish

SLICE each chicken breast fillet in two, horizontally, through centre. One at a time, place each half on a board, cover with plastic wrap and pat out using a meat mallet or rolling pin to about 3/4 cm thick.
WHISK together  the olive oil, lemon juice, lemon zest, sage, garlic, salt, and pepper in a glass jug until well combined.
PLACE the chicken in a large glass baking dish. Pour over the marinade. Turn each scaloppine once to coat well with the marinade. Cover the dish and refrigerate for at least 1 hour.
REMOVE the chicken from the marinade. Pat dry with paper towels.  Dust with flour; shaking off  any excess. Discard the marinade.
HEAT the oil and 1 tablespoon of butter in a large frying pan over high heat. Add the chicken, in batches and sauté until lightly browned, about 2 minutes per side.  Remove cooked chicken to a plate and keep warm.
REDUCE heat to medium-high. Melt an additional tablespoon of butter in the pan. Add wine and reduce for about 1 minute, scraping up any brown bits off the bottom of the pan.
ADD the lemon juice and cook another 2 minutes.
RETURN chicken to the pan and simmer just until hot, about 2 minutes.  Remove the chicken from the pan onto a serving platter.
STIR the remaining tablespoon of butter into the sauce until just melted. Season to taste with sea salt and freshly ground pepper. Spoon the sauce over the chicken, garnish with sage leaves and serve immediately.

Posted in Poultry, What I Love to Cook | Tagged , , , , , , , | 2 Comments

Autumn Flavours. Spiced Red Lentil Soup with Lemon and Fresh Herbs.

Red Lentil Soup

Last weekend marked the start of Autumn. Cold, dreary and wet. Perfect weather for a warming bowl of soup. This spiced lentil soup is a cooler weather favourite in our house. Lovely and  fresh. Inspired by the big, bold flavours of Moroccan cuisine. We haven’t eaten this soup in months. That’s what I love about this time of year. Changing seasons. Changing menus. What’s old is suddenly interesting and new.

The most flavourful tomatoes are in abundant supply at this time of year. For a gorgeous textural effect I like to cook the lentils until they disintegrate into a thick, gloopy mess. To finish?  I simply stir through the ripest and juiciest  tomatoes I can find. Peeled and roughly diced. Until just warmed through. Topped with a tangle of fresh herbs and greens, a generous dollop of thick Greek yoghurt and sprinkling of za’atar. Delicious  Autumn flavours. In a bowl of soup.

Spiced Red Lentil Soup with Lemon and Fresh Herbs.

Serves 4

100 ml Olive oil
2 small sticks celery
2 carrots
1 leek, white part only
3 cloves garlic, peeled
1 birds eye chilli
1 tablespoon curry powder
1 tablespoon ground cumin
1 teaspoon paprika
1 cup split red lentils
2 litres stock, chicken or vegetable
1 lemon and rind
6  fresh tomatoes
½ bunch mint, washed and roughly chopped
2 large handfuls spinach leaves, washed and roughly chopped
½ bunch basil, washed and roughly chopped
thick Greek style yoghurt
za’atar

PULSE leek, celery, carrots, chilli and garlic in a food processor until finely chopped.
HEAT a large heavy based saucepan on medium-high. Add olive oil and sauté processed vegetables with a generous pinch of sea salt for five or so minutes until soft and translucent.
ADD curry powder, cumin, paprika  and a good grinding of pepper. Sauté for another three or so minutes until fragrant.
ADD lentils. Turn down heat to medium and sweat for about 5 minutes until  lentils have softened a little.
ADD stock and the peeled rind of one lemon. Bring to a slow boil. Turn down heat to low and simmer for about 30 mins until lentils are tender and beginning to disintegrate.
MEANWHILE place tomatoes into a large bowl and pour in enough boiling water from a kettle to cover. After 5 minutes, drain and peel the tomatoes. The skin should come away easily. Chop the tomatoes into a rough dice.
REMOVE the lemon rind and add the diced tomatoes to the soup.  Bring to a bare simmer.
SEASON with lemon juice, sea salt and freshly ground pepper.
LADLE soup into bowls and top with  herbs and spinach leaves. Serve with a generous dollop of yoghurt and a sprinkling of za’atar.

Posted in Soup, Vegetables, Vegetarian, What I Love to Cook | Tagged , , , , , , , , , , | 3 Comments

Sunday Brunch. Hot Cross Easter Muffins. No Yeast Required.

Hotcrossmuffinplatte

Rocky road eggs one day. Hot cross muffins the next. Easter is definitely around the corner. This clever twist on the traditional hot cross bun came to me via my very generous friend Grace. Courtesy of Delicious magazine. Circa March or April 2010. A beautiful recipe. Incorporating the fruity spicy flavours of an Easter bun in a muffin. Quick and easy to whip up on a lazy Sunday morning. Two bowls. One jug. One wooden spoon. 

Don’t these little beauties look wonderful with their shiny sugar syrup glaze and lemon icing cross? I’m certainly no pastry chef. And yes the recipe is as straight forward and uncomplicated as it looks. No yeast required. I substituted mixed spice for the nutmeg and cinnamon in the original recipe. Simply because that’s what I had in my pantry this weekend. And added a tablespoon of rum to the buttermilk for good measure. Next time I’m considering adding a little glace citron to the mix. This one’s a keeper. Guess what we’re having for brunch on Easter Sunday morning.

Hot Cross Muffins
Adapted from a recipe in Delicious Magazine

Makes 12

2/3 cup dried cranberries
1 cup currants
2 ½ cups self-raising flour
½ teaspoon bicarbonate of soda
2 ½ teaspoons mixed spice
2/3 cup sunflower oil
1 cup buttermilk
1 tablespoon rum
2 eggs
1 cup caster sugar, plus extra 2 tablespoons
2/3 cup icing sugar
1 teaspoon lemon juice

PREHEAT oven to 200°C. Grease a 12-hole muffin tray and line with paper cases.
SOAK dried fruit in just enough boiling water to cover for 10 minutes. Drain well, then pat dry with paper towel.
SIFT flour, soda and spice into a large bowl. In a separate bowl, whisk together the oil, buttermilk, rum, eggs and sugar until combined. Add to the dry ingredients and stir to combine. Gently stir in the fruit. Divide the mixture among muffin cases, then bake for 20-25 minutes until lightly browned and a skewer inserted into the centre comes out clean. Cool completely on a wire rack.
MEANWHILE, place the extra 2 tablespoons sugar in a pan with 2 tablespoons water and simmer over low heat, stirring, until sugar dissolves. Brush the glaze over the muffins.
SIFT icing sugar into a bowl. Add lemon juice and just enough hot water to make a thick icing. Use a piping bag or drizzle from a spoon to draw a cross on each muffin, Serve.

Posted in Baked, Breakfast, Sweet Treats, What I Love to Cook | Tagged , , , , , , , , , | 2 Comments

Minimum Effort. Maximum Effect. Store Bought Chocolate Easter Eggs Filled With Home-made Rocky Road.

RockyRoad EasterEgg

The supermarkets are awash with chocolate eggs.  It’s hard to believe that Easter is only a few weeks away. Every year I make rocky road for Easter.  Our  favourite rubble. Turkish delight, marshmallow, pistachio and shredded coconut. Smothered in dark chocolate. 70% Cacao of course.

This year I briefly flirted with the idea of making chocolate Easter eggs. I even purchased a mould. The grand plan was to make beautifully tempered chocolate half shells and fill them with home-made rocky road. Alas it’s not to be. Whilst I may be very adept at melting chocolate to ice cupcakes or make rocky road I have never, ever attempted to temper chocolate. In truth it all sounds so complicated. And time-consuming.

Enter Plan B. Buy some chocolate half shells and fill with rocky road. A great plan thwarted by one small point. I couldn’t source unfilled, chocolate half shells anywhere.  Fortunately I’m a lateral thinker, My light bulb moment? A whole is made of two parts. Why not simply cut an Easter egg in half ? Easier said than done? Perhaps.

One carton of brightly foiled eggs later I found my solution. It is easier to slice the top off an Easter egg than attempt to cut it in half. Easter eggs are fragile. They shatter easily. A hot serrated knife slices through the top of an egg quickly and beautifully. Like butter. No hacking required.

So here are my store-bought chocolate Easter eggs filled with my home-made rocky road. Minimum effort. Maximum effect.

Store Bought Easter Eggs Filled With Home Made Rocky Road

Makes 1 dozen

a  carton of a dozen hollow chocolate Easter eggs purchased  from the supermarket

For the Rocky Road
200 g Turkish delight
200 g marshmallows
1/2 cup pistachio kernels, coarsely chopped
1/4 cup desiccated coconut
200g  dark chocolate, coarsely chopped

STAND a serrated knife in a jug of hot water. When heated through, remove the knife from the jug and wipe dry with  a paper towel. Working quickly carefully remove the top of the chocolate Easter egg. For a clean edge I like to wipe the knife clean and reheat for each egg. The hot knife should cut through the chocolate egg like butter. Return the prepared egg shells to the carton. Save the tops of eggs to melt with the dark chocolate.
MELT the chocolate and Easter egg tops in a heatproof bowl over a saucepan half-filled with simmering water (make sure the bowl doesn’t touch the water). Use a metal spoon to stir occasionally until the chocolate is smooth.
CUT up the Turkish delight and marshmallows quite finely with kitchen scissors dipped in cornflour. Place into a large mixing bowl. Add pistachios and shredded coconut. Stir well to combine.
ADD to the melted chocolate a spoonful at a time . Stir well to combine.  Once completely coated in chocolate carefully spoon into the prepared chocolate Easter egg shells. Decorate the tops of the eggs with small pieces of marshmallow or Turkish delight coated in a little icing sugar and rolled by hand into mini eggs.
CHILL in the refrigerator until set. About 20 minutes.

Post script. After filling the eggs I had some rocky road left over. I spooned it into my Easter egg mould. Hopefully it will release easily. Que sera sera. Whatever happens I do know it will taste divine.

Posted in Chocolate, Sweet Treats, What I Love to Cook | Tagged , , , , , , , , | 7 Comments

More Fish on Friday.Tray Baked Blue Eye Cod Wrapped in Prosciutto With Sun Dried Tomatoes and Basil.

blueeyecod

This must be the tastiest and easiest fish dish ever. Thinly sliced prosciutto. Smeared with a sun dried tomato and basil paste. Wrapped around firm, fleshy Blue Eye Cod fillets. Roasted in a hot oven for twenty minutes. Another fabulous recipe from Jamie Oliver that has withstood the test of time in our house. Quick and easy. Robust Mediterranean flavours. What’s not to love about this dish?

There aren’t too many ingredients in this dish. The key to success is to use the freshest ingredients you can find. I’ve substituted Blue Eye Cod for the Monkfish in Jamie’s original recipe. Simply because Monkfish is not native to our waters. A good short cut in preparing this meal?  Visit a good delicatessen. Select a mild and sweet prosciutto and ask that it be sliced directly onto sheets of plastic film.  I usually also ask that slices be cut from the centre of the leg so they are long enough to  be wrapped  easily around the fish without too much fiddling around. Once home all that’s left to do is blitz the basil and sun-dried tomatoes in the food processor. Assemble and bake. The perfect meal for two or perhaps a crowd. Ready in minutes. Just halve or double the quantities as required.

Tray Baked Blue Eye Cod Wrapped in Prosciutto With Sun Dried Tomatoes and Basil.

Adapted from the recipe for Magnificent Roasted Monkfish  in Jamie Oliver’s Happy Days

Serves 4

1 jar of sun-dried tomatoes in oil
2 large handfuls of fresh basil
Olive oil
16 to 20 thin slices of prosciutto
4  200 g Blue Eye Cod fillets trimmed
sea salt and freshly ground black pepper
rocket and balsamic vinegar to serve

PREHEAT the oven to 200 C.
PLACE sun-dried tomatoes and half their flavoured preserving oil in a food processor with the basil, and blend until smooth. While blending add the remaining preserving oil and a dash of balsamic vinegar to the paste until it’s nice and spreadable.
TAKE four large sheets of baking paper. Rub some olive oil over each sheet and lay four overlapping slices of  prosciutto on each of the sheets.
DIVIDE the sun dried tomato paste into four, smearing each part evenly over the prosciutto.
PLACE the fish fillets at one end, season, and, using the paper, fold and roll up.
WHEN ready to bake remove the paper and carefully move the prepared fish fillets to an oiled baking tray.
ROAST in a preheated oven for 15-20 minutes.
SERVE sliced on the diagonal with mashed potatoes, rocket and balsamic vinegar.

Posted in Seafood, What I Love to Cook | Tagged , , , , , , , , | 3 Comments