Eat, Fast And Live Longer. A 5-2 Fast Day Recipe Idea Under 200 Calories. Hummus With Roasted Red Capsicum

Hummus With Roasted Red Capsicum

I’ve always adored hummus. On feast days I love to pile it high on baked pita crisps. More recently, with just a few adjustments to the original recipe, it’s been doing double duty as a simple and delicious  fast day meal. Served as a dip with whatever fresh vegetable crudites I have on hand. Sometimes just a simple platter of  thin wedges of lettuce and green beans, but in the spring and summer months a more substantial wide ranging spread. Think asparagus, cherry tomatoes, celery, cucumber, carrot, radish, fennel, capsicum, zucchini and sugar snap peas.

This fast day hummus is packed full of healthy, appetite suppressing chickpeas and lightened up with the addition of roasted red capsicum in place of some of the olive oil. Out of habit I use tinned chickpeas, but like to roast the capsicums myself. I simply place them whole into a hot oven until the skin begins to shrivel and blacken, about 20 – 30 minutes, then pop them into a plastic bag to sweat  for 10 minutes before peeling and deseeding. Of course you can always use char grilled capsicum from the deli  instead. My fast day version comes in at a relatively low energy count of 118 calories per quarter cup serve. Teamed with a cup of fresh vegetable crudites it makes a very satisfying meal. Add anywhere between 25 and 60 calories per cup serve depending on the mix of vegetables used.

Hummus With Roasted Red Capsicum 
Makes about 2 cups (118 calories per 1/4 cup serve or 28 calories per tablespoon)

1 x 400g tin chickpeas, drained weight 240g (394 calories)
1 red capsicum, roasted, peeled, seeded and sliced into chunks (38 calories)
3 tablespoons extra virgin olive oil (360 calories)
1 lemon, juiced and zest finely grated (12 calories)
1 tablespoon tahini (90 calories)
1 large garlic clove, peeled and bruised (4 calories)
1/4 teaspoon sweet paprika (2 calories)
sea salt and freshly ground pepper

PLACE chickpeas, capsicum, garlic, tahini, paprika, olive oil, lemon zest and juice into a blender or small food processor.
BLEND until smooth. If the hummus is too thick, add a little water to thin it out to desired consistency. Season to taste with sea salt and freshly ground pepper.
TRANSFER to a bowl and chill until ready to serve. Sprinkle with a little more sweet paprika.

Posted in Vegetarian, What I Love to Cook | Tagged , , , , , , , , , , , | 2 Comments

Sweet And Simple. Oven Dried Strawberries.

Oven Dried Strawberries

Oven dried strawberries are something I’ve been wanting to try for ages.  This week, almost serendipitously,  the ideal opportunity presented itself with enormous kilo punnets of fragrant, perfectly ripe and  juicy strawberries available at the markets from our Victorian growers. I’ve successfully  dabbled in using my oven to make crisps before. My first foray was into oven baked beetroot crisps, followed by toffee drizzled apple slices, and more recently mandarin which although gorgeous on their own were pounded to a fine dust and incorporated into a spicy salt and sweet citrus sugar. Initially, I will confess, I was a little dubious as to how I would fare oven drying sweet, delicate strawberries. Would they disintegrate into a pulpy, jammy mess or worse lose their lovely vibrancy and crisp to an unappetising muddy colour?

Oven Dried Strawberries Preparation

Sometimes it’s best to not over think and complicate things. The best and most efficient course of action is to just give it a go. With that in mind, I preheated my oven to 100 C fan-forced, lined a couple of oven trays with non stick baking paper, and then cut 500g of washed, scrupulously dried and hulled strawberries into four or five slices each, depending on their size. I didn’t want my strawberry slices to be too thin as I wanted to be able to peel them easily from the paper when dried. I also didn’t want them to be too thick, as it would take much longer to dry them, and I reasoned, perhaps more likely to discolour. Like Goldilocks I wanted them to be just right. Some recipes advocate the soaking of the fruit in an acidulated water bath to prevent discolouration, but I felt immersing the berries into water just before drying was a little counter-intuitive so skipped this step.

Oven Dried Strawberries After 1 Hour

Instead, I simply arranged my sliced berries in a single layer on my trays, sprinkled them with a little sea salt to enhance their natural flavour and popped them in my preheated oven for just over 2 hours. To assist with air circulation, I propped my oven slightly ajar for the entirety of the process, the proven and old-fashioned Nana way with a wooden spoon placed just inside the base of the door, and checked them every hour or so. After one hour they were just beginning to shrivel around the edges and were ready to be carefully flipped over.

Oven Dried Strawberries After 2 Hours

After a little over two hours they were almost perfect. I simply switched off the oven and once again leaving the door ajar with my trusty spoon, left the trays in the oven to slowly cool and went about my day. After another couple of hours when I returned home, my berries were perfectly crisp and dry. Those plump, juicy strawberries had dehydrated to about a third of their original size and delivered an intense flavour hit. So sweet and simple to make, and voted a resounding success by my taste testers. So much so I had to prise away the bowl from their greedy little hands to save some for my morning granola. Sadly, I haven’t had the opportunity to incorporate them into my baking yet. I’m thinking they would make a wonderful addition to a crumble topping or folded through a morning muffin batter.

Oven Dried Strawberries
Makes approx 200g

500g fresh strawberries
1 teaspoon sea salt

PREHEAT oven to 100 C fan forced. Line two oven trays with baking paper.
WASH and dry strawberries, hull to remove leaves and stem, then using a sharp paring knife cut each strawberry into 4 or 5 even slices, depending on the size of your fruit.
ARRANGE slices in a single layer on the oven trays. Sprinkle with sea salt.
PLACE trays into the preheated oven and dry for two to two and a half hours, leaving the oven door slightly ajar to assist with air circulation.
CHECK after about one hour and carefully flip over the strawberry slices.
AFTER two hours, strawberries should be almost dry. Turn off oven and leaving the door slightly ajar, allow the strawberries to continue to dry in the cooling oven for another hour or so.
REMOVE from trays and store in an air tight container or jar.

Posted in Fruit, Sweet Treats | Tagged , , , , , , | 13 Comments

A Classic Combination. Chocolate And Orange Jaffa Brownie.

Jaffa Brownie

We can never go past a good brownie recipe in our house. So, not unsurprisingly,  perusing the weekend  paper last Sunday morning Frank Camorra’s recipe for Jaffa Brownie jumped out at me. My attention caught by the intriguing addition of a little coconut oil to the mix, imparting a fantastic but subtle tropical flavour to the brownie. What to do on a cold and wet Monday afternoon with the girls home for mid semester break? Bake. Of course.

As usual I couldn’t resist tweaking  Frank’s original recipe to reflect the contents of my pantry. So, in my rendition, it was out with the raisins and in with a little more roasted hazelnuts than originally suggested. One variation always leads to another, and as I zested my oranges I also decided to stir a little of my favourite orange flavoured liqueur, Cointreau, into my chocolate mix.

Luckily, I always have a jar of coconut oil on hand. Sadly, I must confess, not due to its recent elevation to superfood status but more pragmatically because it is a key ingredient in making Ice Magic. The stuff of retro childhood dreams. Chocolate ice cream crackle topping that sets hard in seconds. Like magic. But I digress. Those two tablespoons of coconut oil boosted the citrus flavour of the brownie to a whole new level. It’s an idea that I know I will be borrowing for my future bakes.

What can I say? The brownie was fabulous. Fudgy and delicious. Rich and decadent with an intense orange hit. Our latest new favourite recipe. As Frank points out in his original recipe the brownie batter  is just a base. You can swap nuts and fruit for whatever combination you wish. I will definitely be adding this show stopping version to my repertoire. And just in case you are curious, my girls devoured their squares of  brownie with a scoop of ice magic topped vanilla ice cream. Most definitely a little slice of dessert heaven.

Chocolate and Orange Jaffa Brownie
Adapted from Slice Of Heaven, a recipe by Frank Camorra in The Sydney Morning Herald Spectrum Lift-Out August 9-10 2014
Makes 16 squares

180g butter
2 tablespoons coconut oil
200g dark chocolate, roughly chopped
1 orange
1 tablespoon Cointreau (optional)
125g castor sugar
2 tablespoons  cocoa powder, plus a little extra for dusting
100g plain flour
1 teaspoon baking powder
4 eggs, lightly beaten
110g hazelnuts, roasted and skinned

PREHEAT  oven to 170C. Line a 20 centimetre-square baking tin with baking paper.
MELT butter, coconut oil and three-quarters of the chocolate in a bowl set over a pot of simmering water, making sure the bottom of the bowl does not touch the water.
ZEST orange into the butter and chocolate mixture so any orange oil that sprays off goes into the chocolate; this adds as much flavour as the zest. Stir a tablespoon of Cointreau (if using) into the butter and chocolate mix.
PLACE sugar, cocoa powder, flour and baking powder in a bowl. Stir to combine.
BEAT eggs one at a time into the cooled butter-and-chocolate mix, then stir into the dry flour ingredients, until just combined.
FOLD through the hazelnuts and remaining chopped chocolate.
POUR batter into the prepared tin and bake for 30 minutes. Leave to cool slightly in the tin, then turn out onto a wire rack. When cool, dust with cocoa powder and cut into squares to serve.

Posted in Baked, Chocolate, Sweet Treats, What I Love to Cook | Tagged , , , , , , , , , | 5 Comments

Eat, Fast and Live Longer. A 5-2 Fast Diet Recipe Idea Under 300 Calories. Melanie’s Barley Wrap Pizza.

Melanie's Barley Wrap Pizza

We’ve been enjoying more than our fair share of pizza at our house courtesy of our red bench-top pizza oven. Even on 5-2 fast days, thanks to Melanie, one of my very generous followers, who has shared her recipes for  fast day pizza. Using a simple barley wrap  for a pizza base and  perfect, as she puts it, “… for desperate fasting days when you really really want something that feels comforting and filling and are at risk of breaking the fast too early.” You can access Melanie’s original recipe ideas by scrolling to the comments section of my original post extolling the virtues of my shiny new toy; Pizzeria At Home. Benchtop Pizza Oven Pizza With Prosciutto, Rocket and Cherry Bocconcini.

Naturally, I thought that using delicious and nutritious barley wraps as a pizza base was such a good idea, it deserved a post all of its very own. Each barley wrap consists of just 104 calories, and crisps up beautifully in the oven. Here’s my version. A whole pizza for just 290 calories. Loaded with a variety of toppings, including ham and cheese. Thanks Melanie for a quick and easy but utterly delicious fast day fix.

Melanie’s Barley Wrap Pizza
One 20cm round pizza 290 calories

1 barley wrap (104 calories)
1 tablespoon passata sauce (6 calories)
1 small brown mushroom cap, sliced (5 calories)
1/8 capsicum, sliced (8 calories)
2 thin slices (45g) ham (68 calories)
1/2 small tomato, sliced (22 calories)
3 x 10g cherry bocconcini balls, halved (76 calories)
1 tablespoon chopped parsley (1 calorie)

PREHEAT stone pizza oven to 300C, about 3 -5 minutes.
MEANWHILE assemble your pizza.
SPREAD the passata sauce over the barley wrap. This is the base of your pizza.
SCATTER over  mushroom, capsicum, ham, tomato and bocconcini cheese, making sure they are nice and evenly distributed.
SLIDE pizza paddles under the base, lift the lid of the oven  and carefully slide the pizza onto the hot stone.
CLOSE the lid, adjust the heat setting according to the manufacturer’s instructions and bake the pizza until edges are lightly browned and cheese is bubbly and browned in spots. This will take about 5 minutes.
SLIDE metal paddles under the pizza to remove from the oven.
SCATTER fresh parsley over the cooked pizza. Slice and serve.

Posted in Pizza, What I Love to Cook | Tagged , , , , , , , | 9 Comments

Lazy Entertaining. Hot Smoked Trout Dip With Seeded Baguette Toasts.

Smoked Trout Dip With Seeded Sourdough Baguette Toasts

This has to be one of my favourite stand by recipes. Maximum flavour for very little effort. So much so that I have taken to keeping vacuum packed hot smoked trout in my fridge for last minute emergency entertaining.  It truly is a magnificent and extremely versatile fridge staple.

I originally made hot smoked trout dip to serve as a simple hors d’oeuvre with a glass of sparkling champagne or dry white wine. Piled high on crisp little sour-dough baguette toasts it’s perfect idea lazy entertaining. There’s no actually cooking involved.  A one bowl wonder that can be prepared ahead and stored in a glass jar in the refrigerator for up to three days.

These days I’ve taken to always making a bigger batch than I need. A perfect busy weekend standby. The dip makes an amazing sandwich filling, particularly when paired with crisp lettuce and slivers of radish. It’s also wonderful folded through a potato salad and I will confess, when I am feeling particularly decadent,  I have been known to fold a whole batch through hot tagliatelle with a generous splash or two of vodka. Lazy but delicious.

Hot Smoked Trout Dip With Seeded Baguette Toasts

350 g whole hot smoked trout or 300 g hot smoked trout fillets
3 tablespoons crème fraîche or plain Greek yoghurt
1 lemon, finely zested and juiced
2 tablespoons dill, finely chopped
sea salt and freshly  ground pepper

1 seeded sour-dough baguette
olive oil, to brush
dill fronds, to garnish

IF USING a whole trout,  fillet the fish by peeling  back the skin and removing the top fillet. Lift the head up and away from the body to remove the spine. Use tweezers to  remove finer bones.
FLAKE the trout fillets into a medium bowl. Mash lightly with a fork.
ADD crème fraîche, dill, lemon zest and juice. Mix well to combine and season to taste with sea salt and freshly ground pepper. If the mixture is too dry add a little more crème fraîche  or yoghurt.
SPOON into a glass jar or covered bowl. Refrigerate for at least an hour before using.  The dip will keep in an airtight container for up to 3 days.
PREHEAT oven to 180C. Thinly slice baguette into approximately 40 rounds
SPREAD in a single layer on a baking tray, brush with olive oil.
BAKE for 5-10minutes until golden, then leave to cool. Baking time will depend on your oven and the thickness of your slices. The thinner the round, the faster it bakes. The toasts will also keep in an airtight container for up to 3 days.
TO SERVE place a teaspoon of smoked trout dip on each toast and garnish dill. Alternatively, spoon the dip into a bowl and scatter with dill fronds.  Place on a serving platter with toasts for guests to help themselves.

Posted in Seafood, Small Bites, What I Love to Cook | Tagged , , , , , , | 4 Comments

Pretty Baking. Ottolenghi Style. Little Rhubarb And Hazelnut Tea Cakes.

Little Rhubarb And Hazelnut Tea Cakes

These stylish little tea cakes are inspired by Ottolenghi The Cookbook.  Craving something sweet with mini bundt trays at the ready, I retrieved my well-thumbed copy from the  bookshelf, flipped it open and yet again realised I didn’t quite have all the necessary ingredients for either of Yotam’s three recipes  in my pantry. The story of my life in the kitchen.

I always shop without a pre-ordained plan, allowing my senses to choose what is fresh and bountiful according to the seasons. I’ve also always been a firm believer that necessity in the mother of invention. What I did have spilling over my kitchen bench was an abundance of peak season rhubarb, hazelnuts and strawberries procured that very morning from the markets. Originally intended for a rhubarb and strawberry compote and caramelised hazelnut praline, as a delicious topping for our healthy winter breakfast staple of  creamy steel cut oats.

The beauty of cooking, at home in your kitchen for your family, is that you are master of your own destiny and can improvise at will.  I borrowed just a  little of that fabulously fresh produce and incorporated it into a very simple cake batter. Once spooned into a mini bundt tin tray and baked in a moderate oven, I was rewarded with these very pretty Ottolenghi style tea cakes. While they baked I made a rhubarb strawberry compote, and borrowed  just two tablespoons of its fragrant ruby red syrup for my glaze. Vibrantly hued and intensely flavoured, it was a joy to drizzle over my little beauties. Decorated with slivers of fresh strawberry and a final flourish of a dusting of icing sugar, they were begging to be eaten. My pretty little baking.

Little Rhubarb And Hazelnut Tea Cakes
Inspired by Peach and Raspberry Tea Cakes in  Ottolenghi The Cookbook
Makes 12 Tea Cakes

350g rhubarb, washed, trimmed and sliced into a small dice
100g hazelnuts, roasted and coarsely ground
3/4 cup caster sugar
1 teaspoon ground cinnamon
125g unsalted butter, softened
2 eggs
2 cups self raising flour
2/3 cup pouring cream, lightly soured with 1 tablespoon lemon juice stirred through

For The Glaze
1 cup icing sugar
2 tablespoons cooled syrup from strawberry and rhubarb compote (recipe here) or juice of ½ a lemon
3 large strawberries, washed, hulled and quartered, for decoration

PREHEAT oven to 170 C fan-forced. Grease and flour a 12 hole mini bundt tin, tapping out any excess flour.
COMBINE rhubarb, hazelnuts, cinnamon and 2 tablespoons of caster sugar in a medium bowl. Mix gently until rhubarb is well coated. Set aside.
BEAT butter and remaining caster sugar until pale and creamy. Add eggs, one at a time. Beat until just incorporated.
FOLD in self-raising flour, rhubarb-hazelnut mixture and cream  in three batches.
SPOON batter evenly into the mini bundt tin. It will be quite dense with a large volume of rhubarb and hazelnuts.
WHEN filled tap the tin gently on the kitchen bench to distribute the batter and smooth the top with a palette knife. Any excess batter left over after filling the bundt tin (this will depend on the size of your tin) can be poured into a lined muffin tin.
BAKE  for 20 –  25 minutes, middle oven rack position, or until a skewer inserted into the cakes comes out clean.
REMOVE from the oven, allow to cool in the tin a little before transferring onto wire rack to cool completely.  Give each of the teacakes a little twist to help release them from from the mini bundt tin.
WHISK  strawberry rhubarb syrup or lemon juice with icing sugar until smooth and white, add a little more icing sugar if needed. If using lemon juice feel free to add a drop of food colouring for a vibrant pink hue.
MAKE sure your tea cakes are completely cool before drizzling with the glaze. Decorate with slivers of fresh strawberry and a light dusting of icing sugar.

Posted in Baked, Fruit, Sweet Treats, What I Love to Cook | Tagged , , , , , , , | 11 Comments

Eat, Fast and Live Longer. A 5-2 Fast Diet Recipe Idea Under 300 Calories. Egg Salad With Dijon Mustard Vinaigrette.

Egg Salad With Dijon Mustard Vinaigrette

For a quick and easy fast day meal I always turn to eggs. High in protein they are enormously satisfying. Even better, they can be prepared in a wide variety of delicious ways. Lately I’ve been craving egg salad. Freshly boiled free range eggs, mashed with a little finely chopped green spring onion and parsley. Bound not with mayonnaise but a lighter dijon mustard vinaigrette. Delicious piled high into a lettuce wrap or spread onto an open faced sandwich. A very simple meal.

Egg Salad With Dijon Mustard Vinaigrette
Serves 2 (240 calories per serve) (Add 69 calories per each regular slice multi-grain bread)

4 free range eggs (300 calories)
1 tablespoon olive oil (120 calories)
1 tablespoon white wine vinegar (4 calories)
1 teaspoon Dijon mustard (5 calories)
2 long green spring onions, thinly sliced (10 calories)
1 tablespoon parsley, finely sliced (1 calorie)
sea salt and freshly ground black pepper
1/2 small mignonette lettuce, to serve, leaves separated (40 calories)

PLACE eggs in a saucepan; add enough water to cover them by a couple of centimetres.
BRING water to a steady simmer; remove saucepan from heat. Cover and let stand for 12 minutes. The eggs will be hard boiled, to check remove one egg from the pan, peel and slice open.
DRAIN, then rinse eggs under cold water and peel.
MEANWHILE in a small bowl, whisk together a dressing with the olive oil, vinegar and dijon mustard; set aside.
SLICE peeled eggs into a large bowl and mash finely with a fork. Add the vinaigrette, spring onions and parsley. Stir well until to combine.
SEASON to taste and serve wrap style with lettuce leaves.
ALTERNATIVELY serve the egg salad as an open sandwich. Place mignonette lettuce leaves on thin slices of multi-grain bread (each slice of bread will add 69 calories to the meal). Spoon over 2 -3 generous tablespoons of the egg salad and garnish with a little of the chopped parsley and spring onion.

Posted in Breakfast, Eggs, What I Love to Cook | Tagged , , , , , , , , , | 4 Comments

Pizzeria At Home. Benchtop Pizza Oven Pizza With Prosciutto, Rocket and Cherry Bocconcini

Benchtop Pizza Oven Pizza With Prosciutto, Rocket and Cherry Bocconcini

I’m in love with a new toy. A shiny red bench top pizza oven that makes perfectly crisp, lightly charred  pizza in under 10 minutes. Strictly speaking it’s not my toy but my husband’s latest birthday present. Carefully selected to match last Christmas’ Secret Santa present; a red metal SodaStream, which I will hasten to add must be one of the most successfully selected and frequently used gifts of all time. I just love a gift that keeps on giving, and in this instance also brings the whole family together to the table. Here is my latest object of desire, in it’s burnished glory.

Benchtop Pizza Oven

Last Sunday we enjoyed a long, leisurely lunch, alfresco in the sunshine as the birthday boy treated us to steady stream of perfectly baked pizzas.  Aussie blokes have always been proprietorial about their barbecue and I’ll happily wager that it won’t  be long before this pizza oven is elevated to those hallowed ranks, entering the realm of not so secret men’s business, and perhaps a little difficult for a mere mortal (like me) to access and use.

All jokes aside,  I decorously waited until mid week to get my itchy little hands on this little beauty, and have a go at making a pizza myself. Suffice to say I wasn’t disappointed. In fact I was delighted. I teamed my deliciously crispy sugo smothered pizza with fresh salty prosciutto, peppery rocket and creamy baby bocconcini. In a word? Divine. I thought I’d died and gone to heaven.

Benchtop Pizza Oven Pizza

Benchtop Pizza Oven Pizza With Prosciutto, Rocket and Cherry Bocconcini
Makes one 30cm pizza

1 ball pizza dough, homemade (recipe follows) or store bought, or use pita, Lebanese bread or even wraps as bases
1 tablespoon olive oil
4 generous tablespoons tomato sugo, homemade (recipe follows) or store bought
6 slices prosciutto
6 balls fresh cherry bocconcini cheese, sliced in half
a couple of handfuls wild baby rocket

PREHEAT stone pizza oven to 300C, about 3 to 5 minutes.
MEANWHILE roll or stretch the pizza dough into a 28cm circle. Brush the edges of the dough with olive oil.
SPREAD the tomato sugo over the base and scatter over half the sliced bocconcini balls, making sure they are nice and evenly spread over the base.
SLIDE pizza paddles under the base, lift the lid of the oven  and carefully slide the pizza onto the hot stone.
CLOSE the lid, adjust the heat setting according to the manufacturer’s instructions and bake the pizza until edges are lightly browned and cheese is bubbly and browned in spots, about 5 – 7 minutes depending on the thickness of the base.
SLIDE metal paddles under the pizza to remove from the oven.
SCATTER rocket evenly over the base, drape with thinly sliced prosciutto and stud with the remainder of the sliced bocconcini cheese. Slice and serve.

Pizza Dough

Homemade Pizza Dough
Makes 8 medium or 6 large pizza bases

If this recipe looks familiar I’ve posted it before here but thought I would include it again for easy reference. You will need to start making the dough at least 2 hours before you need it. You can make it the day before or even earlier if you like. Uncooked balls of dough can be frozen. I like to make a large batch using a whole packet of flour, and freeze what I don’t need for another time.

1kg  Tipo ‘00’ flour
1 level tablespoon fine sea salt
4 ½  teaspoons dried yeast
1 tablespoon sugar
4 tablespoons extra virgin olive oil
650ml lukewarm water
½ cup finely ground semolina flour, for kneading

COMBINE flour and salt in a large mixing bowl
IN A SEPARATE bowl combine the yeast, sugar, olive oil and lukewarm water.  Leave to stand  for a few minutes to activate the yeast.  When the yeast is activated the mixture will begin to froth. A useful rule of thumb for tepid water is one part freshly boiled water to two parts cold, i.e.  use 220 ml boiling water to 430ml cold.
ADD wet ingredients to dry and mix to a soft dough.
DUST a work bench with semolina flour. Turn the dough out onto the bench and knead for 5-10 minutes or until the dough is smooth and springy. Use the heel of your hand to push and stretch the dough. Lift and fold it towards you, making a quarter turn. Continue kneading, turning the dough a quarter turn each time, for 10 minutes or until the dough is smooth. For good measure I like to intermittently throw the dough against the bench top as I am kneading it to further develop the gluten.
PLACE the ball of dough into a clean oiled bowl and cover with a tea towel. Leave it in a warm place to rest and relax for about an hour or until it has nearly doubled in size.
WHEN the dough has risen, punch the dough with your hands to knock the air out of the dough. Lightly knead for a minute or two on a bench top that has been freshly dusted with semolina flour.
DIVIDE the dough up into as many little balls as you want to make pizzas – this amount of dough is enough to make six large or eight medium pizzas. Give each ball of dough a quick knead and let them rest for about 15 minutes. These are your pizza bases, ready to be cooked or frozen in zip lock bags for future use.

Home Made Tomato Sugo
Recipe originally posted here
Makes enough to top 4-6  pizzas

1 tablespoon olive oil
1/2 small onion, finely diced
1/2 small garlic clove, minced
1 400 gm can of crushed tomatoes
sea salt and pepper

HEAT the olive oil in a heavy based saucepan over medium heat. Add onion and garlic and a generous pinch of salt. Cook for 3-5 minutes until onion is translucent.
ADD tomatoes. Reduce heat to low and simmer gently for 15 – 20 minutes until tomato mixture is reduced by half.
STORE in refrigerator in an air tight container until ready to use. Suitable to freeze.


Posted in Baked, Pizza, What I Love to Cook | Tagged , , , , | 5 Comments

Crisp, Puffed And Golden. Strawberry Choux Pastry Crown With Creme Patissiere.

Strawberry Choux Pastry Crown With Creme Patissiere

With a veritable mountain of creme patissiere beckoning from the refrigerator I decided to resurrect my tried and true choux puff pastry recipe.  And so it was I spent a pleasant afternoon playing around with pastry in the kitchen. The end result?  A deceptively elaborate looking Strawberry Choux Pastry Crown. What started off as a classic Paris Brest somehow morphed along the way into an unconventional hybrid of  a Gateau St Honore.

Crisp, puffed and golden, my crown was constructed from an almond encrusted choux pastry ring, filled with fresh strawberries and luscious creme patissiere, and topped with toffee dipped profiteroles. It really did look fit for a king and almost, but not quite, eclipsed my husband’s birthday pavlova. Light as a puff of air, it was inhaled in mere moments. A sticky, empty platter a testament to its short lived existence.

Drawing many oohs and aahs, it’s definitely a dessert I will make again. All the major elements can easily be made ahead, a poster child concoction for the magic of mise en place and an unhurried stress-free assembly.  The creme patissiere can be stored in the fridge for up to three days, and baked choux pastry  in an air tight container or freezer requiring just a quick crisp up in a hot oven before use. Replace the toffee with a drizzle of chocolate, if you prefer, or even easier a light dusting of icing sugar.

Strawberry Choux Pastry Crown

Strawberry Choux Pastry Crown With Creme Patissiere
Makes one 20cm ring and a dozen puffs

For The Choux Pastry
100 g butter, chopped
1 cup (250 ml) water
1 cup plain flour, sifted
1/4 teaspoon salt
4 large eggs
3 tablespoons sliced almonds
an additional egg, lightly beaten with 1 tablespoon water, for egg wash

For The Filling
2 1/2 cups Creme Patissiere
1 punnet strawberries, 1/2 punnet washed, hulled and sliced and remainder left whole

For The Toffee Glaze
1/2 cup caster sugar

Prepare The Choux Pastry
PREHEAT oven to 200 C. Line two large baking trays with baking paper. Draw a 20cm-diameter disc on one sheet of paper. Turn paper over (circle will be visible), use this sheet to pipe the choux pastry base and the other for the puffs.
COMBINE butter and water in saucepan, bring to the boil. When butter has melted and water boiling rapidly, add sifted flour  and salt all at once.
STIR vigorously until the mixture is  glossy and pulls away from the side of the saucepan to form a smooth ball.
TRANSFER to a bowl. Cool slightly and  beat in eggs a little at a time.  The pastry dough should be smooth and stretchy and fall easily off a wooden spoon. If it reaches this stage before you’ve added all the eggs don’t add the rest. You are aiming for a good dropping consistency that holds its shape well. If the mixture is too stiff (not enough egg) then the choux pastry will be too heavy. If the mixture is too wet (too much egg), it will not hold its shape when spooned onto baking paper.

Pipe And Bake The Choux Pastry Crown And Puffs
TRANSFER the choux pastry into a large piping bag fitted with a plain nozzle.
PIPE two rings of choux pastry next to each other over the traced circle on the paper lined baking tray.
PIPE a third ring between the top of the two bottom rings to cover the join  between them. This should use about 2/3 of the pastry dough and will form the crown.
BRUSH the top of the pastry crown with egg wash, and scatter over flaked almonds.
PIPE 12 choux puffs  onto the second prepared tray, spaced well apart to allow for expansion. Brush tops with egg wash.
TRANSFER the baking trays to the oven, middle rack position for the crown and lower rack position for the puffs.
BAKE in hot 200C oven for 15 minutes. Reduce heat to 180C and bake puffs for a further 10-15 minutes and the larger crown for 25-30 minutes, until puffed, golden and crisp.
REMOVE trays from oven when each is ready. It is important to bake the pastry until well browned and firm. If removed from the oven too soon, the choux will collapse as it cools and have a dense, tough texture.
ONCE removed from the oven, make a small slit in the bottom of the puffs with the tip of a sharp knife to allow steam to escape. Likewise, make 8 small slits at evenly spaced intervals in the sides of the choux pastry crown.
TRANSFER the puffs and crown to a wire rack and leave to cool completely, at least 30 minutes.

Assemble Strawberry Choux Pastry Crown
HALVE the pastry crown horizontally with a serrated knife and carefully place the almond encrusted top half to a wire rack.
SPOON 2 cups of the creme patissiere into a piping bag fitted with a large nozzle over the cut side of the pastry base.
COVER the creme patissiere layer with sliced strawberries. Replace the top half.
SPOON  the remainder of the creme patissiere into a piping bag fitted with a 5mm nozzle. Push nozzle into the base of each of the 12 puffs and fill with creme patissiere.
PLACE a large heavy based non stick pan or wok over medium heat.
ADD the sugar in an even layer.
HEAT without stirring  until the mixture caramelises, swirling the pan every now and then until all the sugar crystals have dissolved and the mixture is a light golden colour. The mixture will caramelise very quickly in a matter of minutes. Remove the pan from heat.
CAREFULLY dip each of the 12 filled puffs into the hot toffee and immediately place on top of the filled choux pastry crown.
TRANSFER the filled and decorated crown to a serving platter. Fill its centre with remaining strawberries.

Posted in Baked, Sweet Treats, What I Love to Cook | Tagged , , , , , , , | 8 Comments

Eat, Fast And Live Longer. It’s All About The Chicken. 5-2 Fast Day Hainanese Chicken With Broccolini And Steamed Rice.

Poached Hainanese Chicken With Broccolini

One of our favourite family meals is Bill Granger’s Silky Hainanese Chicken.  Soft, delicate, fragrant poached chicken. Served with onion rice,  ginger relish and a generous drizzle of broth. Warming and comforting. Simple and satisfying. For a long time I have been curious as to whether this dish would successfully convert into a 5-2 fast day meal. It certainly ticks a lot of the boxes. A healthy, delicious and vibrant plate of food that’s very easy to prepare. The potential stumbling block? The associated calorie count of using a whole chicken, crucial to achieving it’s signature deeply flavoured broth.

To be honest, I use poached chicken in many of my 5-2 fast day recipes but generally only lean skinless and boneless breast fillet which I know is low in calories and perfectly adaptable to many fast day meals. To be honest, I have consciously shied away from using a whole bird. My reluctance most definitely stemming from a gap in my understanding of exactly how many calories there are in a whole bird and its component parts. And so it was last week I bit the bullet, put on my sleuth hat and delved into the world wide web. With the assistance of google and the enormously enlightening site National Chicken Council. Org, I managed to compile this very useful table.

Nutritional Value of Chicken

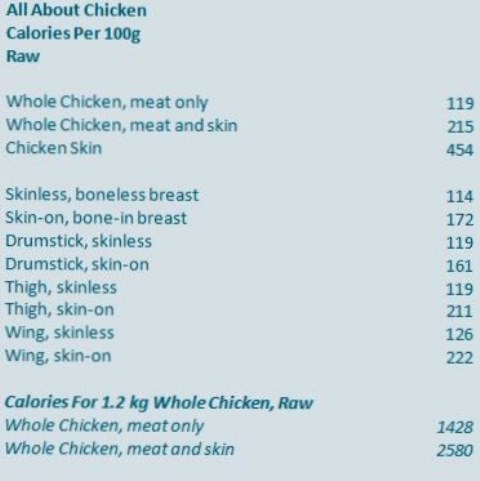
Looking at the numbers, there’s definitely a lot of food for thought. As expected skinless, boneless white breast meat has the lowest energy count of just 114 calories per 100 grams. By merely leaving skin on and bone in, the energy count of that same piece of chicken increases a whopping 50% to 172 calories.  Skinless dark thigh meat with its higher fat content accounts for a marginally higher 119 calories per each 100g, but leaving the skin on that particular cut increases the count by an even greater 77% to 211 calories. Our grandmothers were right. Chicken skin is incredibly high in fat and calories. No wonder it tastes so good.

Here’s a little more perspective; 100 grams of pure chicken skin accounts for 454 calories. That’s  equivalent to consuming 4 portions of lean skinless breast meat. Moreover, when you consider the calorie count of an average bird, leaving the skin on accounts for about 45% of the calorie count of a whole chicken on a gram for gram basis. Fortunately, simply removing the skin will eliminate all those unnecessary calories, particularly important on a fast day. In case you were curious, the most calorific portion part of any chicken? The humble wing. An uncooked wing carries 222 calories per 100g and apparently just 126 calories if you were to strip away the skin. Try as hard as I might I can never recall ever having come across a wing stripped bare. Coincidentally, with this information on board, delicious as they are, I think I will never again look at a buffalo wing in  quite the same light.

For me the most useful information gleaned from this exercise is the relative calorie count of a whole bird by each 100g. This allows me to calculate the energy value of any sized chicken.  If a whole chicken carries an average 215 calories per 100g, by simple multiplication there’s 2,580 calories in a small 1.2 kg bird. Eliminate the skin, the average value per 100g drops 45% to 119 calories per 100g or or 1,428 per chicken.

Poached Hainanese Chicken With Broccolini And Steamed Rice

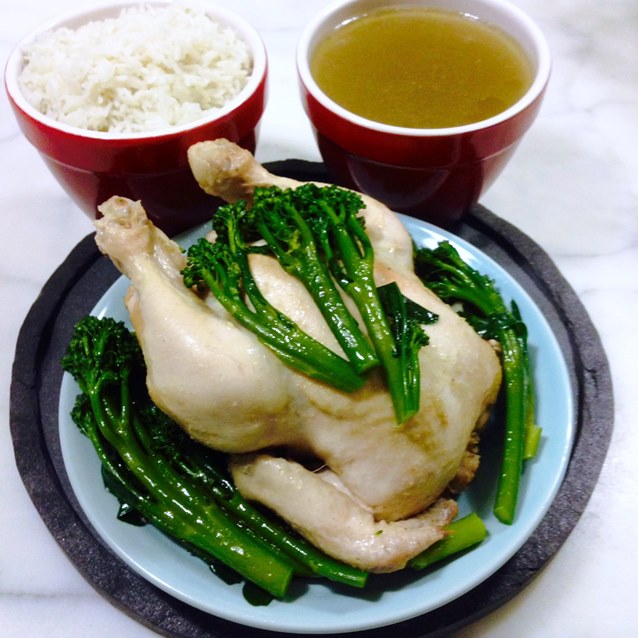
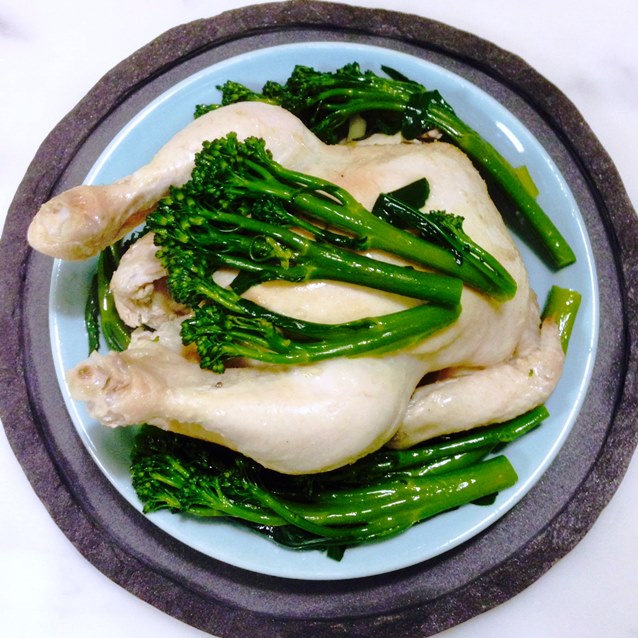
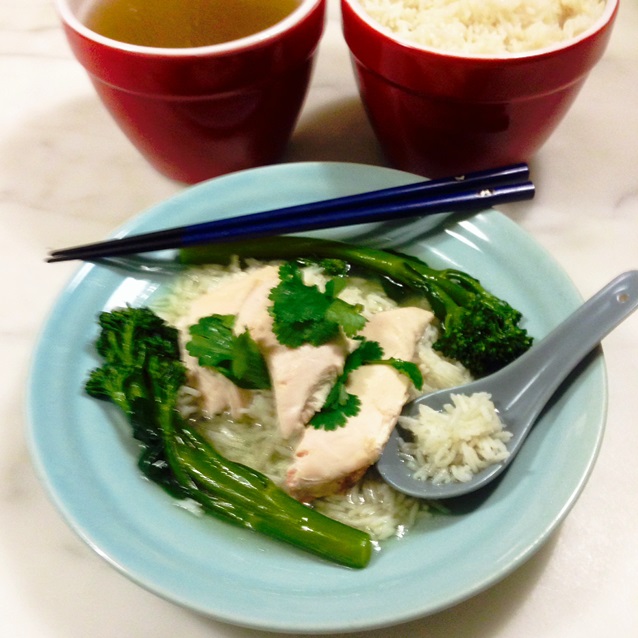
This brings me back full circle to my recent fast day modification of Bill Granger’s deliciously silky Hainanese chicken recipe. In the end I used a smaller bird, removing all the skin before plating. Sadly the stringent calorie restrictions meant the  ginger relish had to be replaced with broccolini and the onion rice fell by the wayside in favour of a simple steamed rice, albeit made with fragrant poaching stock. The poached Hainanese Chicken and Broccolini alone came in at 380 calories per serve, with an extra 118 calories for each half cup serve of steamed rice. A total of 498 calories for the meal which just scrapes in under my 500 calorie daily limit. A very welcome reward at the end of an extremely tedious fast day where I subsisted on little more than bottles of sparkling water and cups of strong black unsweetened tea.


Poached Hainanese Chicken With Broccolini And Steamed Rice Fast Day

Whole Poached Hainanese Chicken With Broccolini And Steamed Rice
Serves 4
(498 calories per serve; 380 calories for poached chicken and broccolini plus 118 calories per each 1/2 cup serve steamed chicken rice)

For The Poached Chicken
1 x 1.2 kg chicken, skin removed and not eaten once cooked (1428 calories)
1/2 small bunch coriander (cilantro), including roots (12 calories)
2 long green spring onions (scallions), chopped (10 calories)
8 whole black peppercorns (2 calories)
a generous pinch sea salt
1 bunch broccolini, trimmed (68 calories)

For The Steamed Rice (2 cups cooked)
2/3 cup long-grain rice (456 calories)
1 1/3 cups chicken cooking stock  (16 calories) sea salt

To Prepare The Chicken And Broccolini
PLACE chicken into a 3 litre capacity saucepan and add coriander roots and stems, spring onions, peppercorns, salt and enough water to cover the chicken.
BRING to the boil. Reduce heat to a bare simmer, cover saucepan and continue to simmer for 25 minutes.
REMOVE  saucepan from heat. Add broccolini to the saucepan in an even layer over the chicken and leave to steep for a further 40 minutes, without lifting the lid.

To Prepare Steamed Rice
WASH rice until water runs clear. Drain.
ADD rice and  2 cups of chicken cooking stock to a medium saucepan. Leave uncovered and bring to the boil.
REDUCE heat to a simmer, cover with saucepan with lid and cook for a further 12 minutes.
REMOVE from heat and let stand for 10 minutes without lifting lid.
SEASON to taste with sea salt before serving.

To Serve
REMOVE chicken and broccolini from the saucepan. Discard skin and chop chicken into serving-size pieces.
STRAIN chicken broth from the saucepan into a large jug or bowl.
ARRANGE chicken on a platter, garnish with broccolini and serve with rice and  a little extra chicken broth on the side.

Posted in Poultry, Soup, What I Love to Cook | Tagged , , , , , , , | 2 Comments