Fish on Fridays. Pan-Fried Flathead Fillets By The Plateful. Simply Dressed With Lemon and Parsley.

flathead

The first Friday in Lent. The perfect opportunity to eat fish for dinner. And I intend to proffer up a fish dish for dinner every Friday in the lead up to Easter. Personally I love fish. As does my family.  Unfortunately I never seem to be organised enough to cook it at home as often as I would like. After all if I’m cooking fish I like to pay a visit to the Sydney Seafood Markets to purchase the freshest produce I can.

Growing up in a Catholic household we always had fish on Friday. Rain, hail or shine. Even in later years when the Church relaxed the no meat on Friday rule, it was fish as usual at our house. After calamari fritti, our favourite fish dish was flathead. Sweet scrupulously fresh fillets. The smaller the sweeter. Stripped in half. Dusted in flour and shallow fried. We would devour platefuls of  the fish. Like hungry seagulls. Those fillets were crisp, flaky and sweet. Dressed with nothing more than a squeeze of lemon and a sprinkling of parsley.

Pan-Fried Flathead Fillets By The Plateful. Simply Dressed With Lemon and Parsley.

180 – 200 g skinless and boneless flathead fillets per person
salt
pepper
flour
olive oil, for frying
lemon wedges and a generous sprinkling of chopped parsley, to serve

TEAR or slice flathead fillets in half lengthways into long strips
TOSS the strips in a little flour, salt and pepper, shaking off any excess.
HEAT a large, heavy  pan over high heat. Once the pan is hot, reduce heat to medium and add enough olive oil  to thoroughly coat the pan.
COOK the fillets in batches for 3-4 minutes or until golden and cooked through. Fillets should sizzle the moment they touch the pan. Add additional oil between batches if necessary.
SERVE immediately garnished with fresh lemon wedges and a generous sprinkling of parsley.

Posted in Seafood, What I Love to Cook | Tagged , , , , , | 1 Comment

A Buon Ricordo Favourite. Baked Figs Wrapped in Prosciutto With a Gorgonzola Cream Sauce.

Figs

Today at the local grocer’s I picked up some beautiful early season figs. As a nod to Valentine’s Day I knew exactly what would be on the menu tonight. One of my all time favourite dishes. Baked figs wrapped in prosciutto with a gorgonzola cream sauce. As served at Buon Ricordo. A veritable Sydney institution of fine dining. Italian style. But more importantly the scene of my husband and I’s first date. Almost twenty years ago.

Buon Ricordo  translates as good memories in Italian. How very apt. I well remember that first date. Table eleven. Baked figs to start. Bracciolette Reginaldo for our main. Torta Mascarpone for dessert. We have returned often over the years.  Always when figs are in season. Our old staple favourites are still on the menu. Perhaps a visit is on the cards again soon. After all we really should celebrate the 20th anniversary of that date.

Here is that wonderful starter. A true marriage made in heaven. Crisp and salty prosciutto. Encasing a soft, sweet baked fig. Smothered in a creamy but sharp gorgonzola cream sauce. It was and still is love at first bite.

Baked Figs Wrapped in Prosciutto  With a Gorgonzola Cream Sauce
Adapted from Buon Ricordo by Armando Percuoco.

Serves 4 as a starter

8 fresh figs
8 thin slices prosciutto
½ tablespoon butter
280 ml cream
145 grams gorgonzola dolce

PREHEAT oven to 200°C.
WRAP a slice of prosciutto around each fig. Secure with a toothpick if necessary.
MELT butter, cream and gorgonzola together in a frying pan over medium heat.
PLACE figs in an oven-proof dish. Pour cream sauce over the figs and cover  the dish with foil.
BAKE for 7 minutes. Remove foil and bake for one minute more.
TO SERVE place two figs on each serving plate and pour sauce over.

Posted in Cheese, Fruit, Musings & Inspiration, Pork, What I Love to Cook | Tagged , , , , , , , , | 4 Comments

A Pasta Bake By Any Other Name. Pasticcio di Pasta Al Forno.

pasticcio

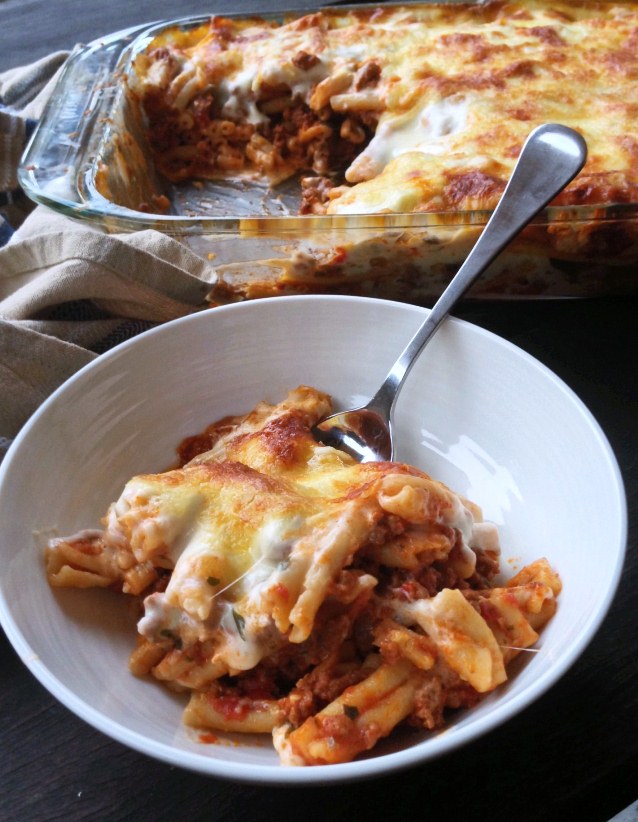
Pasticcio di Pasta Al Forno. Literal translation?  From the Italian. Oven baked pasta pie.  Known quite simply and affectionately as pasta bake in our house.

There are many different variations of this delicious dish. Ingredients vary wildly depending upon regional traditions and approaches. Popular not only in Italy but across the Mediterranean. Italy has its pasticcio, Greece pastitsio and Malta its timpano. In Cyprus its called oven macaroni. And in Egypt macaroni  béchamel.

Oven baked pasta has a long history dating back to the Middle Ages and The Renaissance.  Often served at banquets in the palaces of the nobility. A celebratory dish that allowed the chef an opportunity to show off creativity and inventiveness. Before too long its popularity spread to the masses. In many parts of Italy today it is still considered to be a festive dish and prepared  on Sundays, religious holidays, and special occasions.

The key components of a fabulous pasta bake? Tubular pasta of some description. Think penne, rigatoni and macaroni. Tossed through a  rich, luscious meat sauce. Beef, pork, lamb,or veal works well. Blanketed by a creamy  béchamel  sauce. Sometimes enriched with egg. And perhaps cheese. And there lies the magic of the not so humble pasta bake. It’s infinitely versatile. Limited only by your imagination. Or perhaps the contents of your pantry or fridge. Here’s my latest interpretation.

pasticciowhole

Pasticcio di Pasta Al Forno

Serves 4

1 box (500g) dried  pasta, penne, rigatoni, macaroni or casarecce work best
1 cup parmesan cheese, finely grated

For the Meat Sauce

1 tablespoon olive oil
1 medium brown onion, finely chopped
3 garlic cloves, crushed
2 tablespoons tomato paste
500 g lamb mince
 400 g can diced tomatoes
1 cinnamon stick
2 sprigs rosemary
1/2 cup fresh flat-leaf parsley leaves
sea salt flakes and freshly ground black pepper

For the  Béchamel Sauce

75 g butter
2 heaped tablespoons plain flour
2 cups hot milk
1/2 cup parmesan cheese, finely grated
2 egg yolks
a good grating of nutmeg
sea salt and white pepper to taste

To Make the Meat Sauce

HEAT olive oil in a large, heavy saucepan over medium heat.
ADD onion, garlic and a good pinch of sea salt. Saute for 5  minutes or so until onion is soft and transparent.
ADD tomato paste. Stir to combine and cook for a minute or so.
INCREASE heat to high. Add lamb mince.  Cook for 10 – 15 minutes until meat is well browned, stirring continuously with a wooden spoon to break up mince.
ADD canned tomatoes, rosemary sprigs  and cinnamon. Bring the sauce to the boil.
REDUCE  heat to low. Simmer for 30 minutes or until meat is very tender and sauce has thickened.
REMOVE sauce from heat. Discard rosemary and cinnamon. Stir in parsley. Season generously with sea salt and freshly ground pepper.


To Make the Béchamel Sauce

MELT  butter in a large heavy-based saucepan over medium heat for 2 minutes  until foaming.
ADD  flour and stir with a whisk for 1 minute or so until the mixture bubbles.
REMOVE the pan from the heat and add 1/2 cup of  milk at a time, whisking constantly between each addition to prevent lumps from forming.
RETURN saucepan to the stove on a medium heat and stir with a wooden spoon until the sauce comes to the boil and thickens.
TRANSFER béchamel sauce to a bowl. Whisk in egg yolks and the Parmesan  cheese. Stir vigorously until well combined.
SEASON with sea salt flakes, white  pepper and a good grating of nutmeg.

To Assemble

PREHEAT oven to 200°C.
COOK pasta in a large saucepan of boiling, salted water until tender, according to packet directions. Drain.
ADD pasta to meat sauce. Stir to combine.
SPOON  pasta and meat sauce into an 8 cup-capacity oven proof dish.
TOP  with a generous and even layer of bechamel sauce.
SPRINKLE with parmesan cheese.
BAKE for 30 minutes in a hot oven until golden and bubbling.
SERVE with a green salad.

Posted in Lamb, Pasta, What I Love to Cook | Tagged , , , , , , | 5 Comments

A Summer BBQ. Grilled Chicken Skewers with an Asian Inspired Marinade.

chickenskewers

In my mind a summer BBQ is synonymous with easy and relaxed entertaining. I can’t think of an easier way to feed a crowd than grilled chicken skewers. The secret to a tender, juicy, succulent chicken skewer? Use thigh fillets and prepare them in advance. They take almost no time to cook and will be ready in minutes on a hot grill. Chances are if you are hosting a stereotypical Australian get together, the blokes will congregate around the BBQ anyway. Eager to show off their skills on the grill. All that’s left to do is hand the chicken skewers around on platters. True finger food. Don’t forget the serviettes.

Grilled Chicken Skewers with an Asian Inspired Marinade

Makes 36  

12 skinless chicken thigh fillets, each cut into three strips lengthwise
1 packet wooden skewers

For the marinade
1/3 bunch fresh coriander, stems and stalks roughly chopped
1/4 cup minced lemongrass , fresh or frozen
2 shallots sliced
3 cloves garlic
2 fresh red chilies, sliced,
Grated zest of 2 limes
juice of 1 lime
1 thumb-size piece ginger, thinly sliced
1/2 teaspoon turmeric powder
2 teaspoons cumin powder
3 tablespoons dark soy sauce
4 tablespoons fish sauce
3 tablespoons palm sugar, grated
2 tablespoons vegetable oil

SOAK wooden skewers in water for at least 30 minutes while you prepare the meat. This will prevent them from burning.
PLACE all marinade ingredients into the bowl of a food processor. Pulse until mixture forms a smooth paste.
CHECK the seasoning. The marinade should be sour, sweet, salty and spicy. Adjust as necessary using lime juice, sugar, fish sauce and chilli.
POUR the marinade over the chicken strips and stir well to combine. Allow chicken to marinate in the refrigerator in a ceramic or glass bowl for at least 1 hour. Overnight is best.
WHEN ready to cook, thread each chicken strip  onto a wooden skewer, weaving in and out as if you’re sewing.
GRILL on a hot BBQ in batches until skewers are nicely charred on both sides.
SERVE with fresh wedges of lemon or lime.

Posted in Poultry, What I Love to Cook | Tagged , , , , , , , , , | 1 Comment

Mini Lemon Poppy Seed Pound Cakes. With Lemon Drizzle Icing.

lemonpoppyseedpoundcake

I love the way that old  favourites can sometimes  be reinvented with a little tweaking to become something new and fabulous. For decades I have been baking Poppy Seed and Pound Cake Muffins for Sunday brunch. They are fast and easy to whip up. Delicious to boot. Last year I purchased a mini bundt tray. Ostensibly to bake the fabulous  tea cakes featured in  Ottolenghi The Cookbook. To be honest  another recipe on my must try list  I have never quite managed to find the time to make.

This weekend I decided to bake a double batch of  muffins. Hunting around in the cupboard for another muffin tray I came across my pristine, never used bundt tray. The perfect opportunity to drag it out of the cupboard and into the oven.

The muffins were heavenly. The mini bundt cakes divine. Drizzled with a little lemon icing to make them picture perfect. One recipe. Served two ways. Straight out of the  oven as a simple breakfast muffin.  Iced as a delectable tea time treat.

Mini Lemon Poppy Seed Pound Cakes. With Lemon Drizzle Icing

Makes 12

2 cups self-raising flour
3 teaspoons poppy seeds
1/2 teaspoon salt
1 cup sugar
1/2 cup butter
2 eggs
1 cup plain yoghurt
finely grated zest of 1 lemon

For the Lemon Drizzle Icing
1 cup sifted icing sugar
2 tablespoons fresh lemon juice

PREHEAT oven to 200 C.
IN A SMALL bowl stir together flour, poppy seeds and salt.
IN A LARGE bowl cream together sugar and butter until pale and creamy.
BEAT in eggs, one at a time.
ADD yoghurt and lemon zest. Beat well to combine.
STIR in the flour and poppy seed mixture until thoroughly moistened.
SPOON batter into greased bundt or muffin tins.
BAKE in a hot 200 C oven for 15 – 20 minutes or until a wooden toothpick inserted into the centre comes out clean.
COOL on a wire rack  and then drizzle with lemon icing.

For the Lemon Drizzle Icing

COMBINE the lemon juice and icing in a small bowl. Whisk until smooth. Add a little more icing sugar if mixture appears too runny.

Posted in Baked, Sweet Treats, What I Love to Cook | Tagged , , , , , , , , | 4 Comments

A Rather Arduous Task Has Begun. My Favourite Recipes. An Index for My Blog.


RecipeIndex

I’m in the process of indexing all the recipes in my posts. A task that is just a little more time consuming than I first thought. Hopefully when its done it will provide a useful reference for my site. I constantly find myself referring to my blog for the particular details of my recipes. So much easier than foraging through my kitchen drawer, which these days seems to be a filing cabinet for recipes torn out of newspapers and magazines and the like.

So far I have indexed two categories:

Hopefully, by month’s end this task will be complete!

Posted in What I Love to Cook | Tagged , , , | 4 Comments

Simply Scrumptious. Savoury Crêpes. Buckwheat Galettes With Ham, Gruyere and Brie.


galettes

I adore crêpes. The French version. Lacy and paper-thin. Next Tuesday we celebrate Shrove Tuesday. The last day before Lent. Pancake day in our house.  Traditionally Lent is a time of abstinence and  giving things up. In days gone by  Shrove Tuesday was the last chance to  use up  butter and eggs which were forbidden during Lent.

My family would happily eat crêpes  for breakfast, lunch and dinner on Shrove Tuesday. The possibilities are endless. Filled with jam for breakfast. Decadent chocolate or Nutella creations for dessert. With big scoops of ice-cream on the side. And savoury pancakes in between. Our particular favourites? Salmon, chives and cream fraiche. Smoked ham and cheese.

When we visited Niseko earlier this year, we were blown away by the galettes served at the local crêperie. As in France their savoury crêpes, the galettes, were made with buckwheat flour.  Golden and nutty. Deliciously crisp on the edges enveloping a soft, cheese laden filling. Absolutely divine. Here is the link to that post.

So this year on Shrove Tuesday we will be feasting on galettes. I dutifully purchased the buckwheat flour ( a gluten free flour)  and not having used this ingredient before was curious to have a trial run.  Here is the result. Simply scrumptious.

Buckwheat Galettes With Ham, Gruyère and Brie.

Makes 18 20 cm round galettes

For the Galettes

3 eggs
2 1/2  cups milk
50 g butter, melted and cooled
1 1/4 cups buckwheat flour
generous pinch of sea salt
extra butter for frying

For the Filling

200g  Brie, roughly chopped
200g Gruyère, grated
250 gm  smoked ham, thinly sliced and roughly torn
3 spring onions, finely sliced

To Prepare the Batter

MIX the eggs, milk and butter with a pinch of salt.
GRADUALLY add to the buckwheat flour, stirring until you have a smooth batter.
ALLOW  to stand for at least  an hour in the refrigerator. The batter should be the consistency of pouring cream. Stir in a little extra milk if required.
WHILE the batter is standing in the refrigerator prepare the fillings.

To Make the Galettes

PREHEAT the oven to 150 C.
HEAT a crêpe pan or non-stick frying pan on high until very hot.
ADD a sliver of salted butter. When the butter has melted, but before it browns, use a paper towel to lightly spread the butter evenly over the surface of the pan.
Ladle 2 -3 generous dessertspoons of batter into the pan.
Swirl the pan around so the batter coats the base. This needs to be done quickly, as the galette will start to cook immediately.
Cook for a minute then flip with a spatula and cook the other side for 20 seconds. You will know the galette is ready to be flipped when the edges are brown and it releases easily from the pan.
Repeat the process until all of the batter has been used. Keep the galettes warm in the preheated oven.

To Assemble

RETURN the pre cooked galette to a moderately hot crepe pan or skillet.
PLACE ham, cheeses and spring onions in the centre of the galette.
ONCE the cheese begins to melt, fold in the edges of the galette to form a square and continue cooking for a further minute.
Repeat with the remaining galettes. Serve immediately.


Posted in Breakfast, Cheese, Eggs, Small Bites, To Serve with Drinks, What I Love to Cook | Tagged , , , , , , , , | 8 Comments

Sustaining the Troops. Good Old Fashioned ANZAC Biscuits.

anzacbiscuits

Here in Australia there is nothing more traditional than a good, old-fashioned ANZAC biscuit. Baked by wives and mothers during World War I, they were packed in food parcels and sent to Australian and New Zealand soldiers in the trenches. The ingredients they used were rolled oats, sugar, plain flour, coconut, butter, golden syrup or treacle, bi-carbonate of soda and boiling water. All  items that did not readily spoil and were able to withstand the long voyage to the troops by sea. Originally  known as Soldiers’ Biscuits,  they were renamed ANZAC Biscuits after the landing on Gallipoli.

A staple in our biscuit tin. So very easy to bake. It’s often one of the first recipes a child will attempt. In fact this particular batch was baked by my daughter this afternoon. Fittingly this recipe is very close to the original published in another Australian icon, The Country Women’s Association Cookbook over seventy years ago.

Old Fashioned ANZAC Biscuits

Makes 20 

1 cup plain flour
1 cup dessicated coconut
2/3 cup brown sugar
1 cup rolled oats
125 g butter
2 tablespoons golden syrup
1/2 teaspoon bicarbonate of soda
2 tablespoons boiling water

PREHEAT oven to 160 C. Line two oven trays with baking paper.
COMBINE dry ingredients – flour, coconut, brown sugar and rolled oats in a large bowl.
MELT butter and golden syrup in a saucepan over medium heat.
DISSOLVE bicarbonate of soda in 2 tablespoons of water in a small cup. Add to melted butter and golden syrup mixture. Stir well to combine. The mixture will froth and increase in volume.
POUR the frothy butter mixture into the dry ingredients. Mix well.
ROLL teaspoonfuls of the mixture into balls and place on lined oven trays. Allow room for the biscuits to spread.
SLIGHTLY flatten the balls with the back of a fork.
BAKE for 15 – 20 minutes in a preheated 160 C oven until biscuits are golden brown. Cool slightly before transferring to wire racks. As they cool the biscuits will harden.

Posted in Baked, Musings & Inspiration, Sweet Treats, What I Love to Cook | Tagged , , , , , | 2 Comments

Easy. Healthy. Light. Wok-Seared Chinese Style Fried Rice.

Fried Rice

Monday night dinner is always a simple affair. On Sunday night my son cooked a Thai Green Chicken Curry. There was a veritable mountain of leftover steamed rice. Perfect excuse for fried rice. Wok-seared with ginger, chilli and garlic. Egg, bacon and onion. Peas, corn and mushroom. Incredibly tasty. Easy. Healthy. Light.

Wok-Seared Chinese Style Fried Rice

Serves 4

4 cups steamed white rice
4 free range eggs
1/3 cup oil
1 small brown onion, finely diced
250 g streaky bacon, finely diced
1 long red chilli, finely diced
2 cloves garlic, minced
1 teaspoon fresh ginger, finely diced
1/2 cup fresh sweet corn kernels
1/2 cup fresh garden peas
100 g button or shiitake mushrooms, stems discarded and caps finely sliced
1/2 cup long green spring onions, finely sliced
2 teaspoons white sugar
2 tablespoons shao hsing wine or sherry
2 tablespoons light soy sauce
sea salt and white pepper

WHISK eggs in a bowl with a little salt and white pepper.
HEAT half the oil in a hot wok.  Pour in beaten eggs  and cook for about 1 minute, lightly scrambling them. Rotate wok to ensure even cooking. When almost cooked through, carefully remove the egg from wok  and drain on kitchen paper. Set aside.
WIPE out wok with kitchen paper, add remaining oil and stir-fry chilli, ginger and garlic for 1 minute, or until very aromatic.
ADD onion and stir-fry for 2 minutes, or until lightly browned and tender.
ADD bacon and stir-fry for a further minute, or until lightly browned.
ADD corn, peas and mushrooms and stir- fry for another minute or so.
STIR in sugar and wine or sherry,  stir-fry for 30 seconds.
ADD rice to the wok with spring onions, cooked egg and soy sauce. Stir fry for 3 minutes or until rice is hot and well combined with vegetables, eggs and aromatics.
TRANSFER rice to bowls and serve.

Posted in Rice, What I Love to Cook | Tagged , , , , , , , | 3 Comments

C’est Magnifique! Isabelle’s Flourless Chocolate Hazelnut Brownie.

browniesfrenchhazelnut

Chocolate and hazelnuts. A true marriage made in heaven. This weekend  my husband and I celebrated our wedding anniversary. Co-incidentally one of my very loyal blog readers Isabelle very generously provided me with her favourite French chocolate brownie recipe. After a very long day spent at the swimming pool watching my daughter compete in yet another meet, what did I do? Not collapse on the sofa with a well-deserved glass of wine. I baked this decadent brownie. As Isabelle predicted I would. My excuse? An anniversary present for my husband.  An aficionado of all things chocolate.

I have baked so many different versions of  chocolate brownies in my time. From the dense and fudgy to the light and cake-y. But  I have never come across a flourless brownie before. This one is truly magnificent.

Unbelievably chocolate-y and rich. But so very moist and incredibly light. All at the same time. The secret must be that it is baked in a water bath. Then left to cool completely before being sliced into squares. Another twist? It uses both whole and ground hazelnuts. The whole hazelnuts are caramelised in a little sugar before being folded into the brownie batter.  Providing sweet, nutty, buttery bursts of deliciousness which cut through the intense rich chocolate.

Thank you Isabelle. This recipe is definitely a keeper. A wonderful addition to my repertoire. Here is the original recipe as provided to me in French from Elle magazine. And my English translation underneath. Using my long forgotten school girl French. I hope I’ve done the original recipe justice.

Brownie Chocolat Noisettes Sans Farine

250g de chocolat noir
3 œufs
125g de beurre demi-sel
50g de noisettes entières décortiquées
125g de noisettes en poudre
125g de sucre de canne en poudre

Préchauffez le four sur  160C et préparez un bain-marie: versez de l’eau a mi-hauteur dans un grand plat pouvant contenir le moule du brownie.
Faites fonder le chocolat dans une casserole au bain-marie jusqu’à obtenir une pate lisse.
Faites griller les noisettes entières dans une poêle à sec avec 1 c. à café de sucre, sous haute surveillance pour que le sucre ne brûle pas. Réservez sur une assiette.
Beurrez un moule rectangulaire ou carré et saupoudrez 1 c. à soupe rase de poudre de noisette.
Dans un saladier, fouettez le beurre ramolli avec le sucre restant, ajoutez les œufs, fouettez de nouveau, versez le chocolat et le reste de poudre de noisette. Mélangez bien l’ensemble, incorporez les noisettes entières caramélisées et versez le tout dans le moule.
Enfournez 25 à 30 min au bain-marie, la lame d’un couteau enfoncée au centre du brownie doit ressortir humide.
Laissez refroidir complètement avant de découper le brownie en carrés.

Flourless Chocolate and Hazelnut Brownie

Makes 16 -20 squares

250g dark chocolate
3 eggs
125 g salted butter
125g caster sugar
50 g whole hazelnuts, skins removed
125 g hazelnut meal, (I like to grind the whole hazelnuts myself in the foodprocessor to achieve a coarser texture)

PREHEAT the oven to 160 C.
GREASE a rectangular or square baking dish. Dust with one level tablespoon hazelnut powder.
PREPARE a water bath. Fill a roasting pan that is large enough to hold the baking dish with enough hot water  to come halfway up the sides of the smaller pan.
MELT chocolate in a heat proof bowl over simmering water until smooth.
TOAST the whole, skinned hazelnuts in a dry heavy based frying pan with 1 heaped tablespoon of  sugar. Take care  that the hazelnuts and sugar do not burn as they caramelise.  Set aside on a plate.
IN A mixing bowl, beat softened butter with the remaining sugar. Add eggs, beat again, then add the chocolate and hazelnut meal. Mix well to combine.
FOLD through the whole caramelized hazelnuts and pour the brownie batter into the prepared baking dish.
BAKE for  25 to 30 minutes in a water bath until the brownie is cooked to the point where the blade of a knife inserted into the centre comes out a little moist.
LET the brownie cool completely before into squares.


Posted in Baked, Chocolate, Sweet Treats, What I Love to Cook | Tagged , , , , , , , | 6 Comments