Post Easter Detox With…Ruby Red Pomegranate Juice.

In our house Easter celebrations are unashamedly associated with feasting. Chocolate truffles and brightly wrapped foiled Easter eggs for breakfast, followed by a long, leisurely lunch.  It’s no wonder overindulgence is the order of the day. An inescapable given. This year it didn’t help that Easter coincided with school holidays and was preceded by a week long family getaway to the South Coast with more unrestrained eating. It should come as no surprise, therefore, that this week I’m embarking on a much needed post Easter detox with an emphasis on fresh fruit and vegetables.

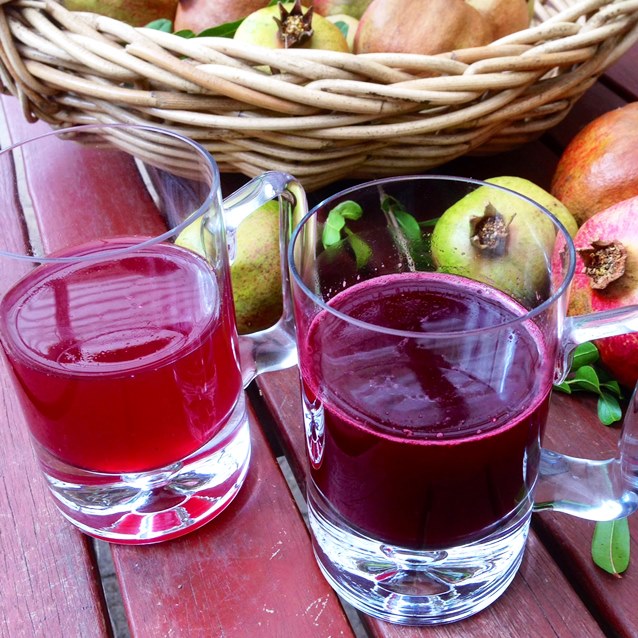
It helped that we returned home from our extended week away to an empty fridge and a carload of the bounty of my father’s Autumn garden. Tucked away amongst the fresh herbs, pumpkins, spinach and silver beet was a box of late harvest pomegranates. An ancient Middle Eastern super food.

Encased in a leathery skin, each pomegranate holds hundreds of juicy, ruby red arils (seeds).  High in Vitamin C, rich in antioxidants and polyphenols, pomegranate arils are very, very good for you and attributed with a wide range of health benefits. From improving immunity and aiding digestion to protecting against cancer and heart disease. Fat free, they also complement a well balanced diet. Half a cup of pomegranate arils contains  72 calories while half a cup of unsweetened, undiluted juice just 68.

Tart but sweet, crunchy yet juicy pomegranate arils are wonderful eaten out of hand and on their own. In the past I have used these glistening little jewels to add sweetness and texture to my salads; Burnt Eggplant with Garlic, Lemon and Pomegranate SeedsAutumn Fig, Pear and Radicchio Salad With Prosciutto and Pomegranate or Lamb Shank, Sweet Potato and Barley Salad With Pomegranate and Fresh Herbs. Or teamed them with dark, bitter chocolate to produce a wonderful dessert Salted Dark Chocolate And Lime Mousse With Blueberries and Pomegranate. This time around with a whole box of ripe pomegranates at my disposal I’ve decided to have a go at making pomegranate juice. It’s a lot easier than I had originally imagined.

Making fresh  pomegranate juice involves a two step process. First the pomegranate needs to be seeded to release the arils from the pith and membrane. Then the arils need to be lightly crushed to release their  juice. Peeling and seeding a fresh ripe  pomegranate is a little messy with all its free flowing juices and best performed over the kitchen sink. But quick and easy when you know how. Just follow the instructions provided below to be rewarded with a tart, sweet and refreshing juice that is delicious on its own or can be used in a large array of cocktails and smoothies. I was pleased with my efforts and can honestly say that the home made version tastes vastly superior to anything that can be purchased commercially off the shelf.

Pomegranate Juice

Pomegranate Juice

Makes approximately 1/2 to 3/4 cup of fresh juice

One  medium-sized pomegranate
sugar and squeeze of fresh lemon juice, to taste

USING a sharp knife, cut the fruit vertically in half. Use your hands to gently break the halves into two or three smaller sections depending on the size of the fruit.
WORKING with one section at a time, simply flex or twist the peel to loosen the arils and use a teaspoon or your fingers to carefully prise them from their pith into a bowl. Discard the pith and peel.
REMOVE any stray pieces of pith from the bowl of arils, before transferring the arils and any residual juice to a blender.
PULSE the arils until they just break apart and release their juice. To avoid a cloudy juice be careful not to over process the arils.
TRANSFER the entire contents of the blender (pulp and juice) to a sieve placed over a clean jug or bowl. Using the back of a large spoon press down on the pulp to extract more juice.
TASTE the juice. It should be sweet and tart.  If the pomegranate is perfectly ripe it should not require any sweetener. Adjust to taste with a little sugar and a squeeze of lemon if necessary


Posted in Fruit, What I Love to Cook, What I Love to Drink | Tagged , , , , , , | 8 Comments

For The Cheese Board. Prune, Pistachio And Hazelnut Log.

Prune, Pistachio and Hazelnut Log

I have long been a fan of Annabel Langbein, The Free Range Cook. Her recipes are fresh, simple and delicious and hit the mark every single time. I’ve always loved cooking with the seasons. Autumn brings organic roasted nuts and dried fruits to the table.  This Prune, Pistachio and Hazelnut Log is classic Annabel  and makes a beautiful addition to a cheese board. It pairs particularly well with soft washed rind cheeses and crisp new season granny smith apples.

Gorgeous and luscious, it’s almost embarrassingly easy to make, requiring just a few ingredients and minimal preparation. I’ve made up a batch for Easter entertaining this long weekend. A welcome respite from all that chocolate. Although truth be known, this log is equally delicious rolled in a little bitter Dutch process cocoa and served thinly sliced as petit fours with a strong espresso coffee. One recipe. Two possibilities. Sweet or savoury.

Prune, Pistachio and Hazelnut Log Paste

Prune, Pistachio And Hazelnut Log
Adapted from a recipe by Annabel Langbein.
Makes 2 logs

1 cup sugar
¼ cup honey
2 teaspoons lemon juice
2 cups pitted prunes, finely chopped
1 cup shelled pistachios
1 cup roasted hazelnuts, skins rubbed off

PLACE sugar, honey, lemon juice and 2 tablespoons water in a pot and bring to the boil. Add prunes, pistachios and hazelnuts. Cook, stirring over heat until mixture has softened and come together, 3-5 minutes. Remove from the heat.
LIGHTLY grease two large sheets of baking paper with vegetable oil. When the mixture is cool enough to handle, divide it in half forming two even shaped logs about 20 cm long.
ROLL  up in the baking paper and refrigerate until set. Unwrap. Slice thinly to serve. It marries beautifully with soft cheese. If serving as a sweet with after dinner coffee dust the log with a little Dutch process cocoa.

Posted in Fruit, Small Bites, Sweet Treats | Tagged , , , , , , , | 13 Comments

Eat, Fast and Live Longer. A 5-2 Fast Day Recipe Idea Under 200 Calories. Som Tam. Thai Green Papaya Salad.

Last week I was lucky enough to visit the Paddington Community Garden. Tucked away behind Trumper Park and The Palms Tennis Centre, it’s a thriving oasis of individual and communal plots producing an enviable array of organic fruits, vegetables and herbs. From the Asian herb garden I came away with an armload of  gorgeous bounty. Just picked green papaya, lime, turmeric, galangal, ginger, lemongrass and curry leaves. I have enjoyed many a refreshing Thai Green Papaya Salad (Som Tam) over the years and here was my opportunity to recreate the dish at home.

Papaya is a staple ingredient of many South East Asian cuisines, used as a vegetable when green and crunchy and as a fruit when the flesh is soft and ripe with a burnished orange hue. My green pear shaped papaya were plucked from a small, thin palm-like tree, but they are readily available from most Asian grocers, usually tucked away with yams, taro and sweet potato. Deliciously crisp and tart, the green papaya shreds combine beautifully with a sweet, salty, spicy and slightly sour dressing to make an incredibly refreshing salad. In Asia this salad is known as ‘Som Tam ‘ which literally translates as “pounded sour’  and perhaps refers to its preparation using a mortar and pestle.

I’m happy to report that this fresh and vibrant salad also fits the bill for perfect 5-2 fast day fare at just 135 calories for a very generous and filling cup serve. A happy and almost accidental discovery given that I did not tally the calories until after I had inhaled a rather large plateful.

Som Tam. Thai Green Papaya Salad
Serves 6 (135 calories per generous cup serve)

2 medium green (unripe) papaya (238 calories)
finely grated zest of one lime (2 calories)
1/2 cup Asian snake beans or substitute green beans (17 calories)
1/2 cup cherry tomatoes (14 calories)
2 large cloves garlic (8 calories)
3-4 red Thai bird’s eye (bullet) chillies (72 calories).
2 tablespoons dried Thai shrimp, optional (108 calories)
2 tablespoons palm sugar, shaved or  substitute brown sugar (90 calories)
freshly squeezed ljuice of two limes (20 calories)
1/4 cup Thai fish sauce, nam pla (24 calories)
1/4 cup coriander leaves, coarsely shredded (4 calories)
1/4 cup mint leaves, coarsely shredded (4 calories)
1/4 cup unsalted peanuts, toasted, one tablespoon reserved for garnish (207 calories)

PEEL the papaya using a standard vegetable peeler, then use a julienne peeler, mandolin or box grater to shred the papaya into long shreds. You should have 6 generous cups of papaya shreds. Place into a large bowl.
FINELY grate the zest of one lime over the papaya shreds. Toss gently to combine. Set aside.
TOP and tail beans, then slice into 2-3 cm lengths. Slice the cherry tomatoes in half. Using a mortar and pestle lightly crush until the beans are just bruised and the tomatoes are beginning to release their juices. Set aside in a separate bowl.
POUND the garlic and chillies in a mortar and pestle until they form a smooth paste. Add dried shrimp and shaved palm sugar, and continue to pound until the sugar has dissolved. THEN ADD peanuts and lightly pound to the point that they are crushed into small pieces but still retain their texture and crunch.
STIR through fish sauce and fresh lime juice. The dressing should be sweet, salty, spicy and sour.  Adjust to taste, as required, using a little more lime juice, sugar and fish sauce.
POUR the dressing over the shredded papaya. Toss until all the shreds are well coated.
THEN ADD the beans, tomatoes and coarsely shredded herbs to the bowl. Toss gently to combine. Set aside for 10 minutes to allow the flavours to develop.
TO SERVE pile the salad into a mound in the centre of a platter. Sprinkle over a tablespoon of crushed peanuts for garnish.

Posted in Salads, What I Love to Cook | Tagged , , , , , , , , , , | 3 Comments

Retro Baking. Classic Lemon Sponge Squares.

Lemon Sponge Squares

With Easter almost upon us I’m feeling a little overwhelmed and jaded with the growing stash of chocolate my teenagers have managed to procure. I once naively thought that the Easter Bunny and Chocolate Easter Egg Hunts were the preserve of the under 10’s. Obviously I was mistaken. These days an invitation to participate in a hunt is gladly embraced under the guise of assisting the younger offspring of family and friends.  Inevitably it degenerates into a loud and enthusiastic rugby scrum-esque dive for treasure. The aim of the game? Collect more eggs than your opponent. He or she with the most treasure wins.  Fortunately at the end of the day there is a fair and equitable divvying up of the spoils, but nevertheless each participant comes away with way too many Easter eggs.

Last year I stealthily raided my children’s hoard of treasure and baked Chocolate Easter Egg Brownies. As described at length in my post  One Way To Use Up Leftover Easter Chocolate. Brownies with Ginger, Turkish Delight and Easter Eggs. This year I am adopting a new tack. Studiously ignoring their stash, and treating my jaded taste buds to something light, citrus-y and tangy to counteract the chocolate overload. I’m resurrecting (no pun intended) an old fashioned but classic recipe for Lemon Sponge Squares. It’s simple and uncomplicated. Retro baking at its best.

Classic Lemon Sponge Squares
Makes 16 squares

Shortbread Base
125g unsalted butter
3/4 cup icing sugar
1 ½ cups plain flour

Lemon Topping
2 lemons, finely zested
1 cup caster sugar
3 eggs
4 tablespoons plain flour
¾ teaspoon baking powder
juice of 1 lemon, strained
sifted icing sugar, for dusting

For The Shortbread Base
PREHEAT oven to 180C.  Line a square 20cm cake tin with baking paper.
CREAM butter in a bowl until soft. Beat in icing sugar until mixture is light and fluffy.
SIFT flour into mixture and use a spatula or knife to form a soft dough.
PRESS shortbread dough evenly into the base of the prepared tin. Cover with plastic wrap and rub with the back of a spoon to smooth the top. Remove plastic, prick with a fork and chill for 30 minutes.
BAKE for 15-20 minutes or until golden, remove from the oven.

For The Lemon Topping
PLACE lemon zest, sugar and eggs in a bowl and whisk until pale and very thick.
SIFT flour with baking powder and fold into mixture with lemon juice. Pour over shortbread base.
BAKE for 20-25 minutes until set and lightly browned. Cool in tin. When cold, cut into squares 4 lengthwise and 4 across.
DUST with sifted icing sugar.

Posted in Baked, Fruit, What I Love to Cook | Tagged , , , , , , | 5 Comments

Fish On Fridays. Simple And Speedy. Sous Vide Salmon In A Snap Lock Sandwich Bag.

A couple of weeks ago I bookmarked an intriguing article from the Good Food lift out of The Sydney Morning Herald titled Simple Sous Vide For The Home, Minus The Fancy Equipment.  Sous vide has taken the culinary world by storm. A trendy gastronomic technique that vacuum seals ingredients in airtight plastic pouches then slowly poaches them  in a temperature controlled water bath.  Scientific and rather formulaic in approach it produces perfectly cooked food every time. Vacuum-packaging seals in flavour and moisture. Temperature control and strict timing ensures even cooking.  The end result is undeniably succulent, tender and delicious.

In the Sydney Morning Herald article chef Nicolas Poelaert demonstrates how the home cook can dispense with fancy and expensive equipment and prepare a sous vide style meal using nothing more sophisticated than a large pot, a snap lock sandwich bag, a food storage clip, a timer and a thermometer. Basic kitchen equipment readily available to most home cooks. The article provides a wonderful recipe for Cheat’s Sous Vide Chicken With Marjoram and Butter Dressing  but as suggested by Poelaert,  if trying this method at home for the first time. it’s probably best to begin with something simple.

And so it was I chose salmon. The processes I followed are photographed in the image  carousel above.  Two 150 gram portions; filleted, pin-boned and skinned by my obliging fishmonger. Seasoned with a little butter, lime zest and salt and pepper, each fillet was dropped into its own snap lock sandwich bag.  When the bags were submerged into a large bowl of  cold water,  the pressure of the water gently forced out any air creating a vacuum seal. Ensconced in their pouches, the fillets were ready for a slow ten minute poach in a 60 C water bath. From beginning to end the entire process took just 15 minutes. Easy peasy. Simple and speedy.

My salmon was moist and tender and flaked easily with a fork. Ready to be incorporated into a salad or pasta dish. Of course the fillet can be eaten whole, as is or perhaps quickly seared in a hot fry pan to achieve a golden hue.

Sous Vide Salmon In A Snap Lock Sandwich Bag
Inspired by an article Simple Sous Vide For The Home, Minus The Fancy Equipment, Sydney Morning Herald, March 2014

Equipment
Food-grade snap-lock sandwich bags (one for each piece of salmon)
Food storage clips (to secure each snap lock bag)
Large bowl filled with cold water
Pot of water (for cooking) heated to 60 C
Cooking thermometer (to ensure water remains at constant temperature)
Timer (to ensure salmon is cooked for exactly 10 minutes)

Ingredients
2 x 150g salmon fillets, pin-boned and skinned
25g butter, softened
finely grated lime zest
sea salt and freshly ground pepper

COMBINE softened butter with a little freshly grated lime zest. Spread evenly over each salmon fillet. Season with sea salt and freshly ground black pepper. Set aside.
PLACE a large bowl of cold water on your kitchen bench.
PLACE each salmon fillet into a separate snap lock sandwich bag, leaving each bag unsealed.
GENTLY and individually submerge each bag into the bowl of water until the water level is just below the snap-lock (make sure no water enters the bag). This will remove most of the air from the bag, similar to a vacuum.
SNAP the bag shut. For added protection, use a food storage clip to make sure the bag is sealed tightly.
HEAT a large pot of water to 60 C. Once the water reached the correct temperature I reduced the flame to its lowest heat setting and placed a simmer mat under the pot.
PLACE the sealed bags of salmon into the pot and cook at a constant 60 C for 10 minutes.
IMMEDIATELY remove the bags from the pot, and then remove the salmon from the bags.
SERVE with a leafy green salad. If you prefer you can quickly sear the fillets in a hot fry pan until nicely coloured, basting with a little butter or olive oil.


Posted in Seafood, What I Love to Cook | Tagged , , , , , | 4 Comments

Eat, Fast And Live Longer. A 5-2 Fast Day Meal Idea Under 300 Calories. Sesame And Shitake Mushroom Soba Noodles With Crispy Kale.

Shitake Mushroom and Sesame Soba Noodles With Crispy Kale

Today’s fast day offering is an amalgam of  some of my favourite super foods; buckwheat, kale, mushrooms and sesame into a simple but tasty noodle dish. Soba is Japanese for buckwheat, so it should come as no surprise that soba noodles are made with buckwheat flour.  Gluten free, fat free, cholesterol free these long thin noodles are high in dietary fibre and loaded with an impressive array of health benefits including the ability to protect against cancer, assist with weight loss and promote a healthy heart.

This recipe combines an ancient  super food with the new.  For centuries long thin soba noodles have been traditionally eaten in Japan on New Year’s Eve as a symbol of longevity and good health. In recent years, our modern society has heralded kale, a  form of wild cabbage that produces stems with large leaves but no compact head,  as the newest super food. Rich in  minerals, vitamins and anti oxidants, it’s renowned for its cancer busting and cholesterol lowering capabilities, and now hailed as the Queen of Greens.

Whichever way you look at it, this dish is very, very good for you. From my perspective it ticks all the fast day boxes.  Low in calories, delicious, full of flavour and looks great on a plate.

Sesame And Shitake Mushroom Soba Noodles With Crispy Kale
Makes 6 generous cups (239 calories per serve)

270g packet soba noodles (960  calories)
1 cup crispy shredded kale, recipe follows (78 calories)
1 tablespoon vegetable oil (120 calories)
250g punnet shiitake mushrooms, thinly sliced (85 calories)
2 cloves of garlic, peeled and coarsely grated (8 calories)
3 cm piece of ginger, peeled and coarsely grated (4 calories)
4 long green spring onions, finely sliced on the diagonal (20 calories)
1/4 cup light soy sauce (32 calories)
1 tablespoon mirin (Japanese sweet rice wine) (40 calories)
2 tablespoons unseasoned rice wine vinegar
2 teaspoons sugar (32 calories)
1 tablespoon sesame seeds, lightly toasted for garnish (52 calories)

HEAT the remaining tablespoon of oil in a wok over medium-high heat until it shimmers. Add  ginger and garlic,, sauté  until fragrant, about 30 seconds.
ADD the shiitake mushrooms. Stir fry until tender and just starting to brown, about 5 minutes or so. Reduce heat to medium, then add spring onions. Continue to cook until the onions just begin to wilt. Remove the wok from the heat. Set aside.
BRING a large saucepan of salted water to the boil. Add the soba noodles and cook for 3 to 4 minutes or until tender. Drain. Transfer to a large bowl.
MEANWHILE place  the soy sauce, mirin, vinegar and sugar in a small jug or bowl. Whisk well to combine. Pour over the noodles.
ADD the shitake mushroom mixture and the  crispy kale. Toss well to combine.
SCATTER over the toasted sesame seeds. Serve.

Crispy Kale

Crispy Shredded Kale
Makes about 2 1/2 cups (78 calories per cup)

4 cups fresh kale, shredded (136 calories)
1/2 tablespoon olive oil (60  calories)
sea salt, for sprinkling

PREHEAT oven to 160 C. Line an oven tray with baking paper.
SHRED the kale by stripping the leaves from their stems.  Stack the leaves on top of one another, roll them up and then cut the roll into thin ribbons.
PLACE shredded leaves in an even layer on the lined oven tray. Toss with a little olive oil and  sea salt.
BAKE until crisp, about 15 minutes turning the leaves halfway through.
SERVE or store in an airtight container until required.

Posted in Pasta, Vegetarian | Tagged , , , , , , , , , , | 4 Comments

Satisfying My Chocolate Cravings. No Bake Dark Chocolate Hedgehog Slice With Hazelnut, Pistachio and Turkish Delight.

Chocolate Hedgehog Slice With Hazelnut, Pistachio and Turkish Delight

With Easter just two weeks away my thoughts are turning to chocolate. It’s a wet, rainy Sunday and I am craving something sweet, rich and decadent but am feeling way too lethargic to whip up a storm in the kitchen, let alone deal with any cleaning up of the aftermath. Enter this rather sophisticated variation on a well loved childhood classic – Chocolate Hedgehog Slice. A simple but delicious no bake confection of crushed biscuits and melted chocolate. Lunchbox staple. Afternoon tea treat. Stalwart of many a school fete cake stall. Recreated with a twist.

This version builds on a very basic old school recipe, throwing  in some interesting add-ins. A dash of coffee flavoured Kahlua to complement the deep, dark chocolate. Freshly toasted pistachios and hazelnuts, my personal favourite. A small long forgotten container of turkish delight,  squirrelled away from the devouring hoardes in the depths of my pantry. I vaguely remember sequestering this particular stash from a huge box purchased at Christmas time, and figure it really does deserve to be used before Easter descends upon us. Has it really been three months? How quickly time has flown this year.

I can think of any number of delicious add-ins that can be freely swapped and changed in this very easy and extremely forgiving recipe. There’s no rhyme or reason to what you can use. Just personal preference and perhaps the available contents of your pantry. Amaretti, sour cherries, shredded coconut, any combination of dried fruits and nuts would work well. Perhaps even crushed meringue for a gluten free alternative. Having assembled the rubble of choice, all that is required is a little melting of the chocolate, butter and golden syrup over a saucepan of boiling water or in the microwave. You choose. The method doesn’t really matter.  There is a little gentle stirring to combine the rubble and chocolate into a sweet and unctuous mess. Then comes the hard part. Patience as you wait for the mixture to set in the refrigerator. To be totally honest, in a perfect world, I would prefer to start this recipe the evening before, leaving it to work its magic overnight. There is something enormously satisfying to waking up the next morning to a perfect slab of chocolate deliciousness  just waiting to be devoured.

No Bake Dark Chocolate Hedgehog Slice With Hazelnut, Pistachio and Turkish Delight.

200 g Scotch Finger biscuits or similar
3/4 cup pistachios, roasted
3/4 cup hazelnuts, roasted and skinned
3/4 cup Turkish delight
150 g unsalted butter
2 tablespoons golden syrup
1 tablespoon Kahlua (optional)
220g good-quality dark chocolate
cocoa powder, to dust

GREASE a loaf sized mould. For the record I used a 6cm-deep, 30cm x 8cm baking tin. Line the base and sides with baking paper, extending paper 5cm over edge at the long side for easy removal of the slice.
BREAK the biscuits into small pieces directly into a large bowl. Slice the squares of  turkish delight into eighths. Add to the bowl along with the hazelnuts and pistachios. Stir to combine.
PLACE the butter, chocolate, golden syrup and Kahlua into a heatproof bowl over a pan of just-simmering water, making sure it’s not touching the base of the bowl. Leave it slowly to melt, stirring once or twice, take off the heat and leave to cool slightly. (Alternatively microwave the chocolate, butter and golden syrup until melted, stirring in the Kahlua when the mixture has cooled.)
POUR the chocolate mixture over the biscuits, nuts and turkish delight. Stir well to combine and spoon carefully  into the prepared tin pressing down gently to compress. I like to also bang the tin against the kitchen bench to remove any air pockets.
COVER with a layer of baking paper and glad wrap. Refrigerate overnight or until set. Stand at room temperature for 10 to 15 minutes before slicing into thick chunks.
SERVE dusted with cocoa.

Posted in Chocolate, Sweet Treats, What I Love to Cook | Tagged , , , , , , , , | 8 Comments

Bright And Fragrant Autumn Flavours. Pot Roasted Lemon Chicken With Rosemary And Chilli.

Pot Roasted Lemon Chicken

As our long Indian Summer segues into Autumn temperatures are finally slowly and hopefully beginning to drop. We’re growing weary of our stir fries, barbecues and salads and looking forward to more substantial comforting fare. Long slow simmered pasta sauces, soups, braises and roasts. It seems like an age since we’ve enjoyed them. New season lemons are beginning to make an appearance at the market. A sure sign that Autumn is on its way. Bright and fragrant they are surely and slowly replacing a summer of sharp tangy limes.

When the seasons are in flux and I simply don’t know what to cook for dinner I inevitably turn to this simple little Pot Roasted Lemon Chicken dish for inspiration. Scented with all of my family’s favourite flavours – lemon, garlic, chilli and rosemary. It’s the perfect seasonal crossover meal. A one pot wonder. Beautifully succulent roast chicken with a gorgeously fragrant lemon twist.

Pot Roasted Lemon Chicken With Mashed Potato

Pot Roasted Lemon Chicken With Rosemary And Chilli
Serves 6

2 x  1.2 kg whole roasting chickens
1 tablespoon butter
1 tablespoon olive oil
3 medium onions, sliced thinly into half-moons
3 garlic cloves
4 sprigs fresh rosemary
3 lemons
1 tablespoon chilli flakes
3 cloves garlic, minced
2 cups chicken stock
sea salt and freshly ground black pepper, to taste

PREHEAT oven to 180 C. Wipe chicken inside and out and then season well, both inside and out with sea salt and freshly ground pepper.
PLACE a large heavy oven proof  le creuset style pot  or similar onto the stove. The pot should be just wide enough to hold both chickens.
HEAT the butter and olive oil together over a medium flame and when the mixture starts to sizzle place the chickens into the pot breast side down. Fry until the skin is crisp and golden brown. Turn the birds over and fry until they are nicely browned all over. Transfer to a plate and set aside.
ADD the onions and garlic to the pot; turn down the heat to medium low and cook, stirring occasionally, until the onions are soft and transparent. About 5 minutes.
MEANWHILE zest and juice two lemons and thinly slice the third lemon, removing any pips.
RETURN the chickens to the pot. Sprinkle over the chilli flakes and lemon zest.  Pour over the lemon juice and stock.
ARRANGE the thinly sliced lemon and rosemary sprigs over the chicken. Cover with a lid and then roast in the heated oven for half an hour.
REMOVE the pot from the oven and baste the chickens with the pan juices. Place back into the oven uncovered and roast for another half an hour, or until the chicken is cooked and skin crisp and golden.  The leg joint juices should run clear when pierced with a fork. Remove from the oven onto a platter. Loosely cover with foil and allow to rest for 15 minutes before carving.
STRAIN the pan juices into a small saucepan, bring to a boil and allow to simmer for 10 minutes.  Skim any fat off the top of the sauce and season to taste. Serve drizzled over the chickens and a side of creamy mashed potatoes.

Posted in Poultry, What I Love to Cook | Tagged , , , , , , , | 3 Comments

Eat, Fast And Live Longer. A 5-2 Fast Day Meal Idea Under 300 Calories. Japanese Inspired French Onion Soup With Oven Baked Parmesan Crisps.

Japanese Inspired French Onion Soup With Miso, Mirin and Soy

At first glance French Onion Soup may seem to be an incongruous choice for a 5-2 fast day meal idea. Visions of deep bowls filled with caramelised  onions simmered in a rich beef broth and thick gratinéed  croutons of bubbling gruyere cheese first spring to mind. Followed by the word associations delicious and ‘calorie laden’. In this version, however, the croutons are replaced with crisp discs of parmesan cheese, and the beef broth with a lighter miso paste infused stock. Cleverly cutting down on the crucial calorie count whilst  adding  “umami’ or an incredible ‘je ne sais quoi’ depth of flavour to the soup. 

I first encountered Japanese style classical French haute cuisine  many years ago at a wonderful kaiseki restaurant tucked away in the narrow cobbled lane ways of Kyoto. Delicious. Understated. Memorable. These days one of my family’s favourite cooler weather meals is a Japanese style Boeuf Bourgignon which replaces some of the more traditional French ingredients with shitake mushrooms, leek,  miso paste, soy and mirin. Today’s fast day version of French Onion Soup, deeply flavoured with a miso enriched broth, borrows key elements from that dish. At just 215 calories per serve one bowl provides an incredibly satisfying fast day meal.

Japanese Inspired French Onion Soup With Oven Baked Parmesan Crisps
Serves 6 (215 calories per serve, 173 calories per bowl of soup plus 42 calories per parmesan crisp) )

2 tablespoons olive oil (240 calories)
1 tablespoon unsalted butter (102 calories)
6 large (1 kg) brown onions, thinly sliced (378 calories)
1 teaspoon salt
3 cloves garlic, finely sliced (12 calories)
4 sprigs thyme (4 calories)
1 tablespoon brown sugar (52 calories)
1 tablespoon flour (28 calories)
2 tablespoons red or white miso paste (60 calories)
6 cups hot chicken or vegetable stock (120 calories)
2 tablespoons mirin (sweet rice wine) (35 calories)
1 tablespoon dark soy sauce (8 calories)
freshly ground black pepper

MELT the butter and oil together in the bottom of a heavy based Le Creuset style pot over moderately low heat.
ADD onions, garlic, thyme and salt. Cook uncovered for 30 minutes, stirring occasionally, until onions are soft and golden.
ADD sugar and cook, stirring, for a further ten minutes until onions are nicely caramelised.
MEANWHILE place the miso paste in a small bowl. Add one ladle of the hot  chicken stock. Whisk until smooth. Set aside.
SPRINKLE the flour over the caramelised onions and cook stirring continuously until all the flour has been incorporated.
ADD the hot chicken stock. Stir well to combine, then add the miso paste mixture in a steady steam stirring continuously.
GENTLY simmer the soup for 15 minutes. Remove the sprigs of thyme.Season with mirin, soy and freshly ground pepper.
LADLE one and a half cups of soup into bowls and garnish each with a parmesan crisp.

Parmesan Crisps

Parmesan Crisps
Makes 6 rounds  (42 calories per round)

50g Parmesan cheese, finely grated (250 calories)

PREHEAT oven to 200C. Line a large oven tray with baking paper.
USING a 6cm food presentation ring or cookie cutter as a guide, place six heaped tablespoons of the grated parmesan on the prepared oven tray. Lightly pat down each round of grated cheese.
BAKE for 3 to 5 minutes in a hot oven until the crisps are light golden brown.
REMOVE from oven and allow to firm up a little before transferring the crisps to a wire rack to cool completely.

Posted in Cheese, Soup, What I Love to Cook | Tagged , , , , , , , , , | 6 Comments

Thai Street Food At Home. Pad See Ew. Soy Sauce Stir Fried Rice Noodles.

Pad See Ew

This simple stir fry is always popular in our house. Soy Sauce Stir Fried Rice Noodles may be ubiquitous Thai street food popularly prepared at road side stalls all over Thailand, but they’re also a staple fixture on Thai restaurant menus; dine in and takeaway at restaurants all over Australia.  Traditionally made with thin slices of pork and served with fresh lime and a vinegared chilli garlic sauce they are delicious and enormously satisfying. Fortunately we have also discovered that they are also quick and easy to prepare at home with just a few ingredients and a simple recipe.

The secret is to use the freshest, widest rice noodles you can find. These are readily available in the chiller section of any good Asian grocer. We like to add mushroom to our Pad See Ew. They are a delicious but perhaps non traditional addition to the dish and complement the Chinese broccoli beautifully. It’s important to use two soy sauces for this dish. Light soy adds depth of flavour while dark soy provides wonderful caramelisation and colour. They are inexpensive and make a wonderful addition to your kitchen pantry. Look for them at the Asian grocer when you pick up your rice noodles. Once all the ingredients have been assembled and prepared the whole meal literally comes together in moments.

Pad See Ew Ingredients

Pad See Ew (Soy Sauce Stir Fried Rice Noodles)
Serves 4

500g  fresh wide rice noodles (not dried)
3 tablespoons peanut oil, divided
350g fillet pork, thinly sliced
3 cloves chopped garlic
4 tablespoons light soy sauce
1 tablespoon dark soy sauce
1 tablespoon shaved palm sugar or brown sugar
1 bunch gai lan (Chinese broccoli) or use regular broccoli or broccolini if not available
250g button mushrooms
2 eggs, lightly whisked

fresh lime, to serve
Thai style chilli garlic sauce ( recipe follows), to serve

COMBINE one tablespoon of oil with garlic, dark and light soy sauces and sugar in a medium bowl. Add the thinly sliced pork and allow to marinate for 15 minutes as you prepare the other ingredients.
SEPARATE the Chinese broccoli (gai lan) leaves and stems. Halve any thick stems lengthwise before slicing into 3cm long pieces. Slice the leaves into thirds. Set aside.
THINLY slice the button mushrooms. Set aside.
BLANCH the rice noodles by placing them in a large heatproof bowl and cover with boiling water. Set aside for 5 minutes or until tender. Drain.
HEAT a wok to high heat. When smoking add the remaining two tablespoons of oil. Remove the sliced pork from the marinade with a slotted spoon, reserving the marinade for the sauce.
STIR FRY the pork in two or three batches until golden brown and just cooked. Transfer to a plate.
ADD mushrooms. Stir fry until golden.
RETURN the pork to the wok. Toss to combine with the mushrooms, then add the blanched rice noodles and reserved marinade.
STIR FRY on high heat until the rice noodles are well coated with the sauce and mushrooms and beef are nicely distributed through the noodles.
PUSH the rice noodle mixture to the sides of the wok, making a well in the centre. Add the whisked eggs and quickly  scramble. When the eggs are just set fold the rice noodle mixture back in over the eggs, tossing gently to combine.
ADD the Chinese broccoli, stems  and leaves to the mixture. Stir fry until the leaves just begin to wilt.
SERVE immediately with fresh lime wedges and Thai style chill garlic sauce.

Thai Style Chilli Garlic Sauce
6 long red chillies
2 cloves garlic
1 teaspoon salt
1/2 cup rice wine vinegar

PEEL garlic and remove stems from the chillies. Place into the bowl of a small food processor with a teaspoon salt. Pulse to a coarse paste.
TRANSFER mixture to a glass jar. Pour over vinegar. It should cover the garlic and chilli mixture.

Posted in Marinades, Pastes and Dressings, Pork, Rice, What I Love to Cook | Tagged , , , , , , , , | 2 Comments