Dominica’s Christmas Pavlova. With a Medley of Fresh Berries

pavlovatopped

Today I rendezvoused at a local cafe quaintly named The Grumpy Baker. With my cousins to discuss our Christmas Day menu. There is one unspoken rule. Everyone pitches in and shares the load. We like to keep it simple. A little bit traditional. A little bit modern. Seafood for starters. Turkey, ham and beef for main. Lots of salad. And much, much later dessert. Christmas Pudding. Pavlova. Nice Cream on a stick. It’s a formula that works. Relaxed and relatively stress free.

Our Christmas Pavlova is especially divine. Baked by our lovely niece Dominica using her grandmother Ma Ma’s recipe. Ma Ma also prepares and serves the Christmas pudding. So between them Ma Ma and Dominica have dessert pretty much covered. A gorgeous tradition. Passing the Christmas dessert baton down through the generations.

Here is Ma Ma’s original recipe scribed by Dominica into a notebook many years ago.

pav dominica

Pavlova. An iconic Australian dessert.  Named after the famous ballerina Anna Pavlova to commemorate her visit to these shores in the late 1920’s.  Light as air. The hallmark of a perfect pavlova is a glossy crisp-shelled meringue base with a soft marshmallow-y centre.

pavlovabase

Topped with fresh cream and berries and a dusting of icing sugar. A decidedly delicious and decadent festive dessert.

pavlova

Dominica’s Christmas Pavlova with a Medley of Fresh Berries.

For a festive pavlova use strawberries, raspberries and blueberries

Dominica uses a pavlova plate but if you don’t have one use a baking tray lined with baking paper. Draw an 18 – 20 cm circle on the paper, turning the paper over so that the circle is on the reverse side.

4 egg whites
A pinch of salt
250 grams caster sugar (a little more than 1 cup)
1 teaspoon white wine vinegar
1/4  teaspoon vanilla essence
1 level dessert spoon gluten free corn flour

Topping Suggestions
Cream
Strawberries
Blueberries
Raspberries
Kiwi fruit
Passion fruit
Banana

PREHEAT oven to 210 C.
BEAT whites of 4 eggs with a pinch of salt for 5-6 minutes, gradually adding caster sugar. ADD 1 teaspoon of white wine vinegar and 1/4 of a teaspoon of vanilla essence. Beat until stiff and very thick.
SIFT 1 level dessert spoon of cornflour into the mixture and fold in lightly, NOT TOO MUCH otherwise it will flatten.
PILE meringue high onto a plate lined with foil or wet with water. Place in hot oven. Turn oven down to 115 C IMMEDIATELY.
BAKE undisturbed for 1 1/2 hours and no longer.
LEAVE in oven to cool with door ajar to make sure air circulates into the oven.
WHEN ready to serve, top with whipped cream and fresh fruit.
ENJOY.

Posted in Baked, Sweet Treats, What I Love to Cook | Tagged , , , , , , , , | 6 Comments

Fresh From My Father’s Summer Garden. Battered Zucchini Blossoms with Ricotta, Herbs and Lemon.

zucchini flowers battered

Such a  busy, busy time of year.  As we are celebrating Christmas in Sydney this year, we have just returned from a pre Christmas visit to Canberra to see family and friends.

One of the joys of each of our trips to Canberra is discovering what is in season in my father’s garden. This time we drove away with a car laden with cherries, beetroot, shallots, daikon, onions, chives, cucumbers, lettuce, rocket and new potatoes. And for good measure a pot of fresh thyme to be planted in our herb garden.

On this particular visit the zucchini plants were in flower. Those big, bold, beautiful, buttery blossoms were just begging to be plucked from their stems.

zucchini flowers garden

And here is our bounteous harvest. The fragile petals ready to be gently prised open. Filled with ricotta, herbs and lemon. Dredged in a crisp and airy batter. Fried and eaten.

zucchini flowers picked

These were incredibly delicious picked directly from the garden. The true taste of summer. Fortunately for city slickers like ourselves without regular access to a garden, zucchini blossoms are widely available at all good providore and farmer’s markets.

Battered Zucchini Blossoms With Ricotta, Herbs and Lemon.

Serves 4 as an appetiser

Use either the male blossom, with just the stem attached or the female, with a baby zucchini attached.

8 zucchini flowers
100 g ricotta
20 g parmesan, grated (optional)
3 anchovies, minced (optional)
half a bunch of chives, finely chopped
1 handful flat leaf parsley, finely chopped
2 sprigs thyme, leaves stripped
lemon zest from 1/2 a lemon, finely grated
good grating of nutmeg
sea salt and freshly ground pepper to taste

For the batter

250g plain flour
450 ml sparkling mineral water, very cold

COMBINE cheese, herbs, lemon zest, anchovies (if using) and a little nutmeg in a bowl. Taste and check seasoning.

PREPARE the zucchini flowers by carefully cleaning the dirt and any insects out of them. Remove the stamen from the centre of the flower.

SPOON about 2 teaspoons of the mixture into the blossoms. Close the blossoms and gently twist the petals to secure. Set aside.

IN a large heavy based frying pan, pour enough oil to fill  about a third of the way. Heat  the oil over a medium flame until it is nice and hot. You can test the oil for readiness by dropping a little batter into the pan. If it sizzles around the edges, its ready to use.

WHILE the oil is heating place flour in a bowl and then whisk in the cold mineral water. Don’t get too pedantic about small lumps.

DREDGE the stuffed zucchini blossoms into the batter. Give them a little twirl  as you remove them to allow any excess batter to drip off before placing them in the frying pan.

CAREFULLY lay the blossoms in the hot oil in batches so as not to crowd the pan.  Fry for about 3 minutes, turning occasionally  until golden.

TRANSFER to a plate lined with paper towels.

SCATTER with a little extra grated parmesan or sea salt and serve.

Posted in To Serve with Drinks, Vegetables, Vegetarian, What I Love to Cook | Tagged , , , , , , , | 2 Comments

My French Heaven. A Festive Christmas Starter. Salmon Tartare a la Stéphane.

salmontrtareplatedChristmas is just twelve days away. Time to seriously think about what will be on the menu for Christmas lunch. Here is our starter. A very sophisticated but deceptively simple Salmon Tartare. Courtesy of Stéphane at My French Heaven.

I could look at Stéphane’s blog all day. Its bilingual. Written in French and English. With French taking precedence naturellement.  A perfect opportunity to brush up on my rusty school girl French. The photography is gorgeous. The vignettes humorous and self deprecating. The recipes are to die for. And what’s more they work!

I was cruising through this captivating blog. Thinking about Christmas lunch. Or more specifically the starter. Traditionally its seafood. Followed by turkey and ham. Perhaps some beef. Lots of interesting salads.  Much, much later in the day there’s dessert. Of course. A proper plum pudding with creme anglais and hard sauce. And for good measure a quintessentially Australian pavlova laden with summer fruits. I needed something light and refreshing. The opening act for a very long lunch. And there it was. Stéphane’s signature dish. Salmon Tartare.

This week I had a trial run. I visited the Sydney Fish Markets and dutifully picked up wild sashimi grade salmon, smoked salmon and a tub of wild sea trout eggs.  All locally sourced from Tasmania of course. I was a little dubious about all the delicate slicing and dicing involved. As it so happened this was the perfect opportunity to use my razor sharp sashimi knife purchased at Tokyo’s Tsukiji fish markets a few years ago. To be honest I have been so in awe of that knife that I rarely use it. They say a craftsman is only as good as his or her tools. After dutifully chopping up the ingredients into uniform little dice. I can certainly vouch for that.

salmontartare

Once the slicing and dicing is done its just a matter of thoroughly mixing the ingredients and allowing a little time for the flavours to meld and work their magic. I used a little lemon and vodka in my tartare. Superb! And served with witlof for a very pretty and Christmas-y starter. The verdict? Absolutely delicious.

salmontartaremix

Salmon Tartare a la Stéphane

http://myfrenchheaven.com/2011/12/29/5/
 

1 red onion
3 big table spoons of heavy cream
6 medium slices of smoked salmon
2 salmon steaks (sushi fresh!)
1 fist full of chopped chives
1 teaspoon Tabasco (My friends in New Orleans can get as creative as they want with their own choice of hot sauce:0)
2 big table spoons of trout eggs (NOT SALMON. THEY BREAK TOO EASY)

Salt and pepper to taste

CHOP both types of salmon in quarter inch cubes
CHOP-UP every other ingredients
MIX everything up with the cream (reserve eggs)
ADD trout eggs at the end and mix carefully one more time (they are supposed to pop in people’s mouth not in the bowl!!!) – Save some for presentation. ET VOILA!

Stéphane’s tips:

  • Do not use caviar either. If the eggs pop in the mix it will give an awful grey colour to the dish. You may use Beluga as decoration if you really want to spend extra money for nothing:0)
  • If you can keep the preparation in the fridge overnight, the flavors will really come out more
  • I have eaten this up to 3 days after I made the original batch. Just keep it cool.
  • You can add a shot of vodka to the mix. It brings out all the other flavours even more.
  • 1 teaspoon of lemon or lime juice is also an option.
  • Once again, salmon eggs are too fat, to fragile and 2 to 3 times more expensive that trout eggs.
Posted in Seafood, To Serve with Drinks, What I Love to Cook | Tagged , , , , , , , , , , | 7 Comments

Dinner in a Flash. Orecchiette with Sautéed Prawns, Lemon, Chilli and Garlic.

Image

Orecchiette. Little ears of pasta. A speciality of the Puglia region of Southern Italy. Small and circular. Their little indentations perfectly suited to capturing a chunky sauce.

Having just returned from the fish markets with some beautifully fresh prawns I’m craving seafood pasta. Something quick, easy and delicious. Simple and straightforward. I’m in no mood to muck about. I slice my prawns into bite size chunks. To complement the orecchiette. Sauté in a smoking hot pan. Then dress generously with  lemon, olive oil, chilli, garlic and parsley. Dinner in a flash.

Orecchiette with Sautéed Prawns, Lemon, Chilli and Garlic

Serves 4

400 g orecchiette pasta
24 raw king prawns, peeled, cleaned and chopped
2 large red chillies, finely chopped
4 cloves garlic, finely chopped
zest of 2 lemons, finely grated
150 ml olive oil
juice of 2 lemons
1 bunch flat leaf parsley, finely chopped
sea salt flakes and freshly ground pepper

COOK orecchiette pasta in plenty of salted, boiling water according to the instructions on the packet.
HEAT a heavy based pan until smoking. Add 50 ml of the olive oil.
ADD prawns and quickly sauté until golden. Season with salt and pepper.
ADD lemon zest, chilli and garlic. Sauté for a minute or so until fragrant.
DEGLAZE pan with lemon juice and the remaining oil.
STIR through chopped parsley.
TOSS with cooked orecchiette pasta

Posted in Pasta, Seafood, What I Love to Cook | Tagged , , , , , , , | 2 Comments

Roast Capsicum with Grape Tomatoes and Pangrattato

roastcapsicumbaked

In keeping with my quest to embrace a new, healthier me in what remains of the lead up to Christmas here’s a very festive, Mediterranean inspired roasted capsicum dish. Using seasonal vegetables its absolutely delicious. Big, bold Mediterranean flavours with my holy trilogy of lemon zest, chilli and garlic. I like to use sour-dough bread for my pangrattato but any rustic bread works equally well.

Please don’t be squeamish about the anchovies. They pack an amazing flavour punch. Disguise them in the pangrattato  if you must. Vegetarians may omit the anchovies and substitute  some capers or kalamata olives. Pitted of course. On second thoughts capers and kalamata olives marry beautifully with the anchovies too. Why didn’t I think of that earlier?

roastcapsicum

Roast Capsicum with Grape Tomatoes and Pangrattato
Serves 4

4 red capsicums
1 punnet grape tomatoes
8 anchovy fillets drained of oil
3 tablespoons olive oil, plus 1 tablespoon extra for drizzling
1 tablespoon balsamic vinegar
3 cloves garlic, bruised
1/2 long red chili
zest of 1 lemon, finely grated
2 tablespoons fresh basil
2 tablespoons fresh parsley
1/3 cup pine nuts, toasted
cracked black pepper
4 generous slices sour dough bread
sea salt flakes and freshly ground pepper

PREHEAT oven to 180 degrees Celsius.
PLACE bread on an oven tray and bake until golden, about 10 minutes
MAKE the pangrattato. Break the toasted bread into shards and place into bowl of food processor with garlic, chilli, lemon zest, pine nuts, basil, parsley and olive oil. Pulse to combine until the mixture forms coarse crumbs.
CUT the tops off the capsicums and remove all the seeds. Lay them out on a baking sheet lined with paper.
PLACE grape tomatoes in a bowl with the pangrattato. Toss to combine.
SPOON evenly into prepared capsicums.
CUT anchovies into pieces and scatter over capsicums.
DRIZZLE with olive oil and balsamic vinegar. Season with sea salt and a good grinding of pepper.
BAKE for 40 – 45 minutes until capsicums soften and tomatoes begin to burst.

Posted in Vegetables, What I Love to Cook | Tagged , , , , , , , , , | 2 Comments

Strawberry Santas With a Cautionary Tale. Of Christmas Excesses. Past, Present and Future.

Strawberry Santas

Tis the season to be jolly. Fa la la la la, la la la la. I’ve lost count of all the pre Christmas catch-ups, get togethers and cocktail parties I have attended over the past few weeks. Don’t get me wrong I’ve enjoyed  myself immensely. The conviviality and festive cheer. Each bite of canapé.  Every drop of champagne. Perhaps a little too much.

This morning I had a reality check. One great big slap in my face wake up call. For the first time in months I stepped onto the scales. The catalyst? A looming appointment to calibrate the bindings on my skis for a post Christmas holiday to Japan. Mon Dieu. The scales were not kind this morning. I need to lose a few kilos to avoid moving up into a heavier calibration category.

Here is an interesting statistic that had me choking on my morning cappuccino. On average Australians gain 0.8- 1.5 kg over the Christmas period. One to two kilograms might not sound like much but researchers have identified that weight gained over the holiday period is rarely lost. What’s more the holiday season doesn’t represent one day of overeating. More like six whole weeks from late November to early January. Considering we’re only half way through the festive period I have a problem and have obviously overindulged. Time to step up the exercise regime and make smarter  choices.

I’ve seen these adorable Strawberry Santas all over Pinterest. As a nod to a moderately healthier festive treat here’s my take on  them. I love the way each Santa is a little different. How he comes in all shapes and sizes.  I’m aiming to lose a couple of kilos over the next two weeks so that I more resemble the Santa to the left of the photo rather than the right.

Strawberry Santas
Adapted from the Sunday Brunch Column Channel 4 website

Makes 16

16 large strawberries
100g Philadelphia cream cheese
100g fresh ricotta
2 tablespoons sieved icing sugar
grated zest of 1/2 lemon
1 tablespoon of freshly squeezed lemon juice
currants, cut into thin slivers for eyes

PLACE ricotta and cream cheeses, icing sugar, and lemon zest and juice into a mixing bowl and beat until creamy. Spoon mixture into a piping bag.
THOROUGHLY rinse the strawberries.  Cut off the stems and leaves or each strawberry, ensuring you have a flat, level  base. This will be Santa’s bottom upon which he sits.  Then cut around the top of each strawberry, about 1/3 of the way down. This will be Santa’s hat
SEPARATE the tops and bottoms of  the strawberries. Dig out the inside of each strawberry bottom with a paring knife.  Pipe the cream cheese mixture into the belly of the hollowed out strawberry.
TO MAKE Santa’s head and face pipe a little more of the mixture to the top of the strawberry base. Pipe one or two buttons to the front.
PLACE the tops of the strawberries carefully on top of Santa’s head.
PIPE a pompom for Santa’s hat. Add two currant slivers for eyes.

Posted in Breakfast, Musings & Inspiration, Sweet Treats, To Serve with Drinks, What I Love to Cook | Tagged , , , , , , | 6 Comments

Any Fool Can Cook. Modern Fruit Mince Tarts.

Fruit Mince Pie

My husband loves fruit mince tarts. When we were first married I always used to buy them for him from the Queen St Deli. Hand-made by a little old lady at Christmas time.

Then one day I found this recipe by Matthew Evans. Courtesy of his Any Fool Can Cook column in the local paper. Decrying commercially bought fruit mince as unsalvageable, his recipe uses boiled lemon peel in place of the more traditional suet and a generous lug of extra virgin olive oil to finish. Its a clever, quick cheat.

Come to think of it I have probably been using this recipe for over a decade. Its a gem. Definitely fuss free. Make up the fruit mince and use within the day. Or store in glass jars in the fridge. I like to mix up a big batch of pastry and freeze it ready rolled between sheets of baking paper. Whenever we need a mince tart fix, or unexpected visitors drop by, I take the pastry out of the freezer, the fruit mince out of the fridge, assemble and bake. Or even easier. Stir the fruit mince through a good vanilla ice-cream for an instant dessert.

Modern Fruit Mince

Adapted from a recipe by Matthew Evans

Makes 2 cups or 500 g fruit mince

1 lemon, scrubbed
1 apple, peeled and cored
1/2 cup (100 g) currants
1/2 cup (100 g) sultanas
1/2 cup (100 g) firmly packed brown sugar
3 tablespoons brandy
3/4 cup (100 g) walnuts or pecans, finely chopped
1-2 teaspoons mixed spice
a generous lug of extra virgin olive oil

SQUEEZE the lemon and reserve the juice.
PLACE the lemon peel in cold water, bring to the boil and simmer until soft enough to puree, about 45 – 60 minutes, changing water twice. Drain well and puree in blender/food processor.
GRATE the apple coarsely into a bowl then add the strained lemon juice.
TOSS the currants, sultanas and sugar in the brandy then warm gently in a low oven to plump up the fruit.
COMBINE the apple and dried fruit mixtures together in a large bowl.
ADD the nuts and mixed spice. Stir and allow to sit overnight, if possible in a fridge.
STIR through a generous lug of extra virgin olive oil just before spooning into the pastry cases, or glass jars if storing.

Modern Fruit Mince Tarts

Makes about 12

160 g butter, softened
1 cup (125 g) icing sugar
1 teaspoon pure vanilla extract
2 cups (250 g) plain flour
2 eggs
250 grams good quality fruit mince (1/2 recipe provided)
1 egg yolk, mixed with 1 teaspoon water
Whipped cream flavoured with whiskey, to serve

To make the pastry

BLEND  butter with  icing sugar and  vanilla essence in a food processor.
PULSE in  plain flour until crumbly then add 2 eggs. Pulse until combined.
TIP out paste and lightly knead just until it forms a dough. Refrigerate for at least 30 minutes.

To assemble the tarts

ROLL the pastry in two batches between sheets of baking paper, until 3 – 5 mm thick.
STAMP out 12 rounds to line the bases of a 12 hole rounded patty tin and 12 stars to form the lids.
PLACE the bases into the greased tins and press gently into place. Top with a small spoonful of fruit mince, press the lids on top and brush with egg yolk.
BAKE towards the bottom of a 180 C oven for 15 minutes or until the pastry is cooked and coloured slightly at the edges and the bottom.
COOL and serve with whiskey scented whipped cream.

Posted in Baked, Sweet Treats, What I Love to Cook | Tagged , , , , , , , , | 4 Comments

Construction Zone. Building Lemon Scented Gingerbread Houses. With All The Trimmings.

gingerbreadhouses

My girls love decorating gingerbread houses. Its something of an early December, start of school holidays ritual. A celebration of the festive season with friends. The problem is that here in the Southern hemisphere Christmas coincides with summer. Hand in hand with hot, humid weather and if you’re not careful armies of ants!

I remember the year we first started making gingerbread houses. The girls must have been about four. I dutifully made a traditional sticky soft gingerbread. Assembled it ready for decorating. Left it out to dry. Two hours later it was covered. Not by lollies and icing. Something else entirely. A colony of swarming ants. Needless to say that early attempt at a gingerbread house was consigned to the bin. I whipped up a batch of shortbread to decorate instead.

These days I use a  lemon scented gingerbread cookie dough to make our houses. Perhaps not so traditional. But it works in our climate.  Time poor I don’t want to feel like I’m building the house from hell. So I like to create my houses from a very simple template. Four panels  all up. Two 20 cm squares for a chalet style roof. Two 20 cm equilateral triangles for the walls. Cut from cookie dough rolled to a  7 cm thickness for sturdiness. Glued together on a cake board with royal icing. Works every time. This year we added stained glass windows by stamping shapes into the triangular panels just before they went into the oven and filling those shapes with crushed boiled lollies. In a word. Awesome.

And this year there was an extra special surprise.  Before positioning the roof  I placed a Christmas tree cookie baked from  leftover scraps of dough inside the house. Standing proud on a liquorice all sort stand. Surrounded by rock candy presents. This was a nod to last year’s not so glamorous “surprise”.  A forgotten plastic measuring cup that had been supporting a non co-operative collapsing wall in the assembly stage.

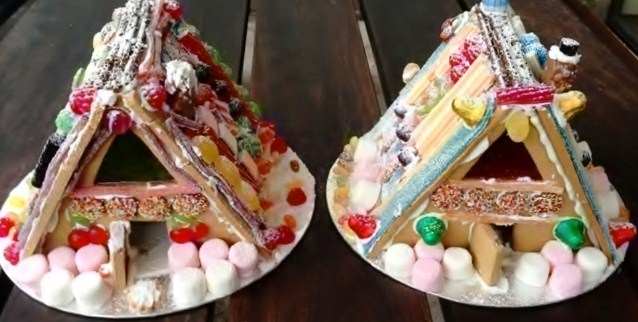
The girls spent a whole afternoon decorating these houses with their friends. I swear there are three layers of lollies on some of those panels. Here is Lexi and Cam’s house. All dressed up for Christmas.

gingerbreadhousewrapped

Lemon Scented Gingerbread House With All the Trimmings

For One House With Stained Glass Windows

  • cardboard gingerbread house templates
  • one quantity of Lemon Scented Gingerbread Cookie dough
  • two quantities of  icing –  for construction of the house and decoration
  • one 30 cm round cake board
  • selection of assorted lollies for decoration. We used liquorice all sorts, sour straps, candy canes, chocolate freckles, jubes, orange sticks, yoghurt covered pretzels, musk sticks, jelly bellies, boiled lollies and marshmallows.
  • chocolate bar for the chimney. We used a Picnic bar.
  • cellophane and ribbon to wrap

 Gingerbread House Templates

Take one  sheet of cardboard and cut into one 20 cm square and one 20 cm equilateral triangle. These are the templates that will be used to cut the house panels from the  cookie dough.  Two squares will form the chalet style roof and two triangles the supporting walls.

The square was a snap. But I had to brush up on my geometry for the triangle.  For an equilateral triangle all three sides are of equal length, as are the degrees of all the angles. Cutting a 20 cm square in half on the diagonal does not work. I know. I tried it.

Here is a very basic method to draw any sized equilateral triangle with only a pencil, ruler and one sheet of paper. It really works.  Thank you Year 7 maths.   I was so impressed with the easy logic I’ve summarised it below.  After all know I will be referring back to this next year.

For a 20 cm equilateral triangle. 

  • Draw a 20 cm base line using a ruler.  Divide the length by two.  The mid-point of the base line is 10 cm.
  • At the 10 cm mid-point, draw a line at least 25 cm long perpendicular to the base. This is the perpendicular bisector.
  • Align the zero mark on the ruler with one end of the 20 cm base line
  • Rotate the ruler until a line measuring 20 cm touches the perpendicular bisector.
  • Draw the line, and then repeat this process to draw the third line. You now have a triangle with three equal sides and three equal angles, or an equilateral triangle.

Lemon Scented Gingerbread Cookie Dough

175 g butter
1 cup (175 g) soft dark brown sugar
3 tablespoons of  treacle
4 2/3 cups (700 g) plain flour, plus extra for dusting
1½ tsp bicarbonate of soda
2 tsp ground ginger
2 tsp mixed spice
1 tsp cardamom
1 tsp ground cinnamon
zest and juice (about 50 ml) of 1 lemon
2 medium free-range eggs
1 packet of boiled sugar lollies  for the stained glass centres, I used Lifesaver Five Flavours

PREHEAT the oven to 180 C. Line four baking trays with baking paper.
REMOVE lolly wrappers and separate lollies by colour. Use a mallet to lightly  crush into pieces.
PLACE butter, brown sugar and treacle into a pan over a very low heat, stirring until the butter and sugar have melted. Set aside to cool.
MIX the flour, bicarbonate of soda, spices and lemon zest in a big bowl.
BEAT eggs in a separate bowl.
ADD the butter mixture, eggs and lemon juice to the flour. Mix well, then use your hands to bring the dough together.
SPRINKLE a little flour over a clean work surface and knead the dough for a few minutes until smooth.
DIVIDE the dough into 4 discs. Each disc will be used to cut out one of the four house panels – two 20 cm squares for the roof and two 20 cm equilateral triangles for the sides,
For each disc repeat the following:
PLACE disc  between two large sheets of baking paper and roll to 7 mm thickness.
CUT out one of the four house panels.
TRANSFER the panel to a lined baking tray.
FOR the equilateral triangle panels only. After transferring the panel to the tray, use a small cookie cutter to cut a shape into the centre of the upper half of the triangle. Fill with crushed boiled lollies. This will form the stained glass window of your house. Also cut out a door from one of the triangles only.
BAKE the 4 panels and 1 door for about 20 minutes. The lolly centres should be melted and bubbling and the panels just barely beginning to brown.
REMOVE the baking trays from the oven and place on wire racks to cool. Allow the panels to cool completely on the trays to allow them to harden and lolly centres to set.
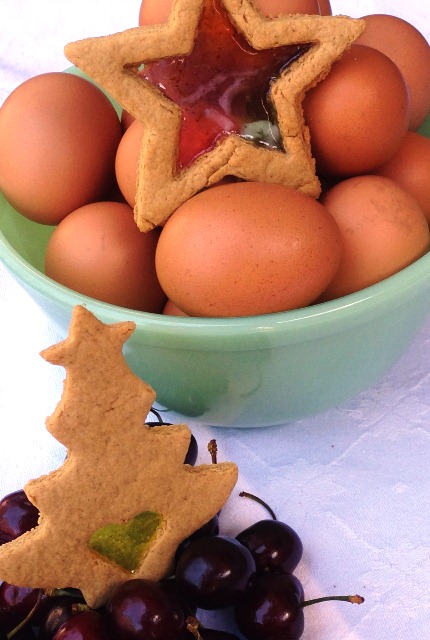
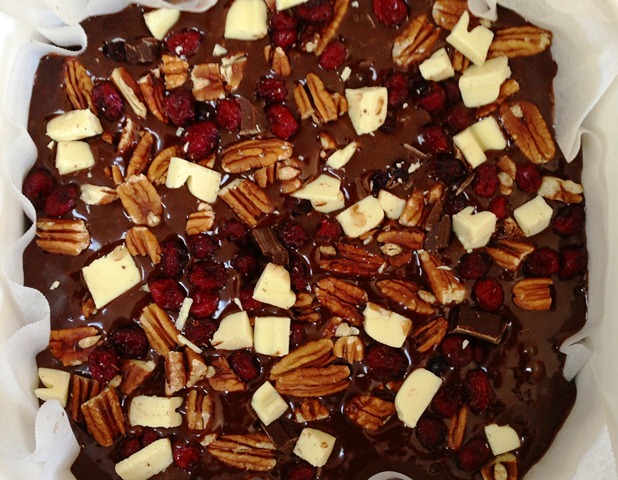
KNEAD together any leftover cookie dough scraps and use to make cookies. Once rolled and stamped out the cookies will  require baking for 8 – 10 minutes.

 Icing

2 egg whites
3¼ cups pure icing sugar, sifted
½ teaspoon lemon juice

BEAT the egg whites in a small bowl with an electric mixer until just frothy, gradually beat in enough sifted icing sugar until the mixture forms stiff peaks, stir in juice.
KEEP icing covered with plastic on the surface to prevent drying.

Assembly of the Gingerbread House

SPREAD a thin layer of icing on the board as a non-slip base.
SPOON icing into a piping bag.
ASSEMBLE the gingerbread house on the board, using the icing to secure pieces together. Start with the triangular walls. When secure, pipe along all joins, then add the square roof panels.
POSITION the door in place with icing.
CUT the base of a chocolate bar (we used  a Picnic bar) at an angle to represent a chimney. Join the chimney to house with icing.
DECORATE the house with lollies, attaching with icing.
DUST all over with sifted icing sugar to represent snow.
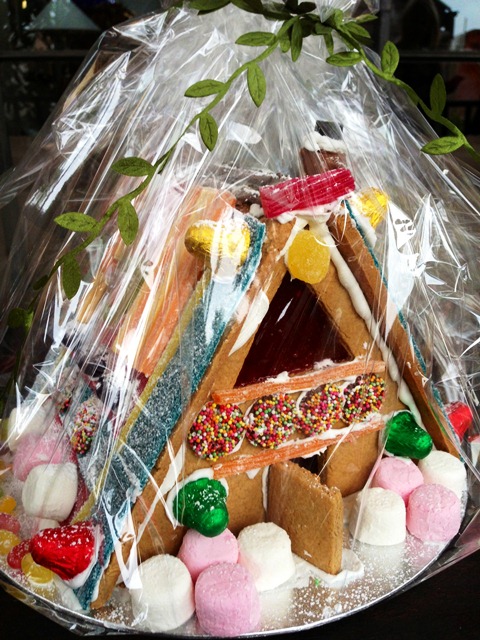
WRAP in cellophane when dry and tie with festive ribbon.

Posted in Baked, Confectionery, Sweet Treats, What I Love to Cook | Tagged , , , , , , | 6 Comments

The Simplicity of Christmas. Fresh from the Farmgate. Cherries and a Bowl of Eggs

Cherriesandeggs

Its always the simplest gestures that  bring a smile to my face. Amidst the frenetic madness of this past week I came home to a wonderful surprise. More fabulous farm fresh eggs from Pat’s chooks and a box of just picked plump, sweet, juicy, ruby red cherries.

Christmas is synonymous with cherries here in Australia. The season may be short but the cherries very sweet. Pat and Gil hail from Young. The cherry capital of Australia. These cherries were freshly picked from the tree. The eggs? Fantastic as always. Laid by very happy girls.

From the farm gate to the city in less than twenty four hours. Freshly poached eggs and a bowl of cherries for breakfast. It doesn’t get simpler than that.

Posted in Musings & Inspiration | Tagged , , , | 2 Comments

It’s Beginning to Taste a Lot Like Christmas. Brownies with Ginger, Cranberry, Pecan and White Chocolate Chunks

brownie squares

Here I am baking again. For my son.  Last day of school.  Last day of exams. He’s off to rowing camp for a week at 6 am in the morning.  I won’t get to see him tonight as it’s Speech Night at my daughters’ school. A guaranteed late night. My husband and I brokered a deal. I’d go with the girls and he’d take our son out to dinner. It’s an impossibly busy time of year. My peace offering?  His favourite. A batch of brownies.

In our house we make two different versions of brownies. A  fudgy dessert brownie studded with raspberries. And a more conventional brownie with enough structure to be included in a lunch box without disintegrating into an unholy but still delicious mess.

I like to top this brownie with whatever dried fruits and nuts are available in the pantry. With Christmas fast approaching I was spoilt for choice. Cranberries, ginger, pecans and chocolate. Dusted with a soft blanket of icing sugar. It’s beginning to taste a lot like Christmas.

 Brownie unbaked

Brownies with Ginger, Cranberry, Pecan and White Chocolate Chunks

Makes 20 squares

250g butter, chopped
200g dark chocolate
1 teaspoon vanilla essence
2 tablespoons chopped crystallised ginger
1 3/4 cups dark brown sugar
4 eggs
1/3 cup cocoa powder, sifted
1 1/4 cups plain flour, sifted
1/3 teaspoon baking powder
50 g white chocolate, roughly chopped
50 g dried cranberries

50 g pecans, chopped

PREHEAT oven to 160 C. Grease and line a 20 cm square baking tin.
MELT chocolate and butter in a bowl over a saucepan of simmering water. Stir until smooth. Add vanilla and ginger. Remove from heat and allow to cool slightly.
PLACE sugar, eggs, cocoa, flour and baking powder in a bowl. Add the chocolate mixture and stir until combined.
POUR batter into prepared tin. Scatter white chocolate chunks, cranberries and pecans over the top of the brownie mixture.
BAKE for 40 – 50 minutes or until an inserted skewer comes out clean. If top appears to be browning too quickly cover with a sheet of foil. Allow to cool slightly in the tin before slicing into squares. Dust with icing sugar.

Posted in Baked, Chocolate, Sweet Treats, What I Love to Cook | Tagged , , , , , , , | 5 Comments