Eat, Fast and Live Longer. A 5-2 Fast Diet Recipe Idea Under 200 Calories. Overnight Yoghurt Chia Seed Pudding In A Jar.

Overnight Yoghurt Chia Seed Pudding In A Jar

Move over bircher muesli, chia pudding is my new 5-2 fast diet “thing”.  A no fuss meal that’s very easy to prepare. Almost no effort required. Just measure three simple ingredients – chia seeds, flavoured Greek yoghurt and low fat milk into a mini mason jar. Stir, tightly screw on the lid and shake. Refrigerate. Overnight the ingredients transform into a creamy and delicious pudding, it’s texture reminiscent perhaps of old fashioned sago or tapioca.

From a 5-2 fast day perspective this overnight chia pudding is brilliantly satiating. At just under 200 calories for a full 175ml mason jar serve, its what I try to eat mid morning on those difficult fast days when no amount of distraction seems to keep the hunger pangs at bay. I love the endless possible variations that can be achieved by simply varying the flavour of yoghurt used. In summer my jar is adorned by a fantastic array of fresh sliced seasonal fruit, in the depths of winter I raid my baking supplies for dried fruits and nuts, and sometimes perhaps cacao nibs.

Overnight Yoghurt Chia Seed Pudding

Overnight Yoghurt Chia Seed Pudding In A Jar
Serves 1 (192 calories per serve)

1/3 cup no fat Greek yoghurt (plain or flavored)(I used strawberry) (80 calories)
1/3 cup low fat milk (34 calories)
3 teaspoons chia seeds (60 calories)
1 teaspoon each  dried cranberries and coconut flakes (or fruit and nut mix of choice, fresh or dried) (18 calories)

STIR yoghurt, milk and chia seeds together in a 175ml capacity mason or jam jar.
REPLACE lid and shake well. Refrigerate for 4 hours or overnight.
WHEN ready to serve, scatter over cranberries and coconut flakes or your favourite combination of fresh or dried fruit and nuts.

Posted in Breakfast, What I Love to Cook | Tagged , , , , , , , | 8 Comments

Dressed To Impress. Chocolate Layer Cake With Whipped Cream, Cherry Jam and Ganache.

Chocolate Layer Cake With Whipped Cream, Cherry Jam and Ganache

Everyone has a favourite chocolate cake. At our house it’s a moist, decadently rich and chocolate-y ‘volcano’ cake. A melt and mix recipe with an unusual twist. So named to reflect the alchemy created when bicarbonate of soda added to a heated saucepan of butter, sugar and cocoa, makes the mixture fizz and expand. Eliciting a  frisson of excitement as the  “volcano” forms and a delicious sense of impending danger that a momentary lapse of concentration may cause the saucepan to overflow.

A much loved recipe redolent of my childhood. So entrenched in my psyche that I can make it with my eyes closed. It’s what I make when my household craves a quick chocolate hit and lends itself to all manner of guises – a simple icing sugar dusted slab, iced cupcakes covered with a generous sprinkling of 100’s and 1000’s or a buttercream frosted torte.

Here it is in its latest reincarnation. Dressed to impress as a chocolate layer cake. Baked in two round sandwich tins; as I would another of my afternoon tea time favourites –  the Victoria sponge. Filled with a generous layer of my mother’s home-made sour cherry jam and lashings of freshly whipped chantilly cream. Finished with a rich, thick and shiny ganache topping.

Chocolate Layer Cake With Whipped Cream, Cherry Jam and Ganache
For the Chocolate Cake
1/3 cup cocoa
1 1/2 cups castor sugar
1/2 teaspoon bicarbonate of soda
150 g butter
1 cup water
2 eggs
1 teaspoon vanilla extract
1 1/2 cups self-raising flour

For the Chocolate Ganache Topping
120g dark chocolate; chopped into pieces
50ml cream
1 tablespoon butter

For the Filling
250ml cream
1 tablespoon caster sugar
1/2 teaspoon pure vanilla essence
1/2 cup jam, I used cherry

To Bake the Chocolate Layer Cakes
PREHEAT oven to 180 C. Grease and base line two 20cm round sandwich tins.
COMBINE water, sugar, butter, cocoa and bicarbonate soda in a saucepan and bring to a simmer but do not boil, stirring until the sugar has dissolved and the butter has melted. You will need to watch the pan like a hawk at this point as the bicarbonate of soda will cause the mixture to fizz, keep stirring to stop it  from overflowing.
TRANSFER mixture to a bowl and leave to cool for 30 minutes. Then beat in the eggs and vanilla. Stir in the flour, beating well to combine.
POUR batter into the prepared tins. Be warned, the mixture will seem a little runnier than a regular cake batter.
BAKE in a moderate oven 180°C (not fanforced) for 25 minutes or until a wooden pick or skewer inserted into the centre comes out clean.
COOL for 10 minutes before turning onto a wire rack to cool completely.

To Make the Ganache
BRING cream to a boil in a saucepan over medium-high heat.
POUR  over chocolate in a heatproof bowl. Leave to stand for two minutes to allow chocolate to melt.
ADD butter. Whisk mixture until thick, smooth and shiny.

To Assemble
COMBINE cream, sugar and vanilla extract in a deep mixing bowl. Whip at medium speed until soft peaks form, about 3 minutes.
SPREAD jam evenly over one of the cakes, then cover a thick layer of cream.
PLACE second cake on top. Dollop over ganache, using a palette knife to evenly spread over top to cover. Set aside for 15-20 minutes to set.

Posted in Baked, Chocolate, What I Love to Cook | Tagged , , , , , , , , | 4 Comments

Eat, Fast and Live Longer. A 5-2 Fast Diet Recipe Idea Under 300 Calories. Roasted Brussels Sprout Salad With Crispy Bacon, Apple, Hazelnuts and Farro.

Roasted Brussels Sprout Salad With Crispy Bacon, Apple, Hazelnuts and Farro

I’ve always loved warm winter salads. Especially when they include shards of crispy bacon. Take a closer look, the star of this salad is the humble, much maligned Brussels Sprout. Cleverly deconstructed into leaves and hearts and roasted in a little bacon fat to golden perfection. Tossed with a cast of supporting elements; crispy bacon, roasted slivers of apple, crunchy hazelnuts, and tender grains of farro to produce an incredibly delicious salad. Finished with a final flourish of a good drizzle of syrupy aged balsamic and a shower of coarsely grated parmesan cheese, for further effect.

Bacon fat on a 5-2 fast day you ask? I know it sounds counter intuitive but in this salad, used judiciously it most definitely works.  Of course I used a leaner short cut of bacon in this recipe, on further reflection thin slices of prosciutto would make a stunning substitution. The trick is to use no more than two tablespoons of the rendered fat from the crispy bacon to lightly coat your Brussels Sprouts and add bags of flavour to the final dish. I like to use the same tray I used for my bacon to extract even more goodness from the brown nubbly bits left behind on the baking paper.

There are so many delicious layers of texture in this salad that even the most avid Brussels sprouts naysayer in this house was happy to give it a try. Distracted no doubt by the inviting aroma of those crispy bacon shards. I’ve never truly understood why these gorgeous little emerald nuggets have been so maligned. Perhaps because I’ve never experienced them boiled into  an infamously grey sulphurous sodden state.  I personally like to think of them as tight and bright cute little miniature cabbages. At least that’s how I describe them to my family. Brussels sprouts are in season and in plentiful supply at the markets at the moment, so will be appearing on many of their meal time plates over the next few months.

Brussels Sprouts

Interestingly, I first prepared this salad as part of a non fast day long weekend lunch, ostensibly to prove how wonderful Brussels sprouts could truly be.  It was so popular and deliciously filling that after a little careful calorie counting I decided to recreate it as a 5-2 fast day offering. Try it. I know you won’t be disappointed.

Roasted Brussels Sprout Salad

Roasted Brussels Sprout Salad With Crispy Bacon, Apple, Hazelnuts and Farro
Serves 4 (254 calories per serve)

20 large (500g) Brussels sprouts (215 calories)
1/4 cup dry farro perlato (pearl barley) or substitute quinoa (176 calories)
1 small granny smith apple (55 calories)
6 short cut (lean) rashers bacon, rind removed (276 calories)
1/4 cup hazelnuts, toasted in a hot pan and coarsely chopped (240 calories)
a good drizzle of aged balsamic vinegar (10 calories)
2 tablespoons coarsely grated parmesan (44 calories)
sea salt flakes and freshly ground black pepper

To Cook Farro
COOK the farro (pearl barley) in plenty of salted water according to the instructions on the packet (as a rule of thumb using three times the volume of water to grain), until tender but still firm to the bite. Drain and set aside to cool.

To Roast Apples
PREHEAT oven to 120 C fan-forced. Line a large oven tray with baking paper.
SLICE unpeeled apples very thinly on a mandolin. I like to use a small apple no wider than the mandolin to achieve perfect slices.I used an apple corer to remove the pips before slicing. If you don’t have an apple corer, simply  remove pips from the apples once sliced.
ARRANGE apple slices in a single layer on the prepared oven tray.
BAKE for 20-30 minutes in a slow preheated oven. Flipping the apple slices halfway through baking. The apple slices will cook from the outside in and continue to crisp up once removed from the oven.
REMOVE tray from oven and leave to cool.

To Roast Bacon
INCREASE temperature to 180 C once the apples have been removed from the oven. Line another large oven tray with baking paper.
PLACE the bacon rashers in an even layer on the tray. Bake in hot oven for 15-20 minutes until crisp and golden.
REMOVE the bacon from the tray to a kitchen paper lined plate. Allow to cool before crumbling into shards. Set aside.
DRAIN the bacon fat from the oven tray, reserving 2 tablespoons to roast the Brussels Sprouts. Use this tray for roasting.

To Roast Brussels Sprouts
USING a sharp paring knife, trim the stems off the brussels sprouts and peel away the outer leaves into a large bowl, discarding any that are tough or blemished. Continue trimming the stems and peeling away the leaves, until the leaves no longer separate easily. Place the leaves and hearts of the brussels sprouts into separate bowls.
SLICE the brussels sprouts hearts in half. Toss with a tablespoon of the reserved bacon fat until lightly coated. Arrange in an even layer over 1/3 of the oven tray.
TOSS the separated leaves with the remaining tablespoon of bacon fat until lightly coated. Arrange in an even layer over the remaining 2/3 of the tray.
Sprinkle liberally with sea salt and place in hot oven to roast for 10-15 minutes until the hearts are golden and leaves crispy.
REMOVE from oven and assemble the salad.

To Assemble Salad
TOSS roasted Brussels Sprouts leaves and hearts with cooked farro and three quarters of the roasted apples, crumbled bacon and toasted hazelnuts in a large bowl. Season with sea salt and a good grinding of black pepper.
TRANSFER salad to a large serving platter and scatter over remaining apples, bacon and hazelnuts. Finish with a good drizzle of aged balsamic vinegar and a shower of grated Parmesan. Serve.

Posted in Salad, What I Love to Cook | Tagged , , , , , , , , , | 6 Comments

Improvising With Mini Bundt Tins. Salted Burnt Butter Caramel Glazed Doughnuts.

Salted Burnt Butter Caramel Glazed Doughnuts

I’ve always had a soft spot for doughnuts. Of every variety. Cinnamon sugar dusted, glazed or jam filled. Hot from the oven or fryer. Indeed some of my most poignant childhood memories are of holidays spent my grandparents, the highlight of any outing a visit to a particular doughnut shop.

Hands down, one of my family’s favourite lazy Sunday morning brunches involves a tray of freshly baked jam doughnut muffins.  Soft and fluffy balls of deliciousness concealing a oozy, jammy centre. I love this recipe as it’s quick and easy. No yeast or lengthy complicated proving processes. Just pantry and refrigerator staples, brought together with a bowl, a jug and a wooden spoon in less than fifteen minutes flat.

Anyone who regularly follows this blog will be aware that recently I have developed a penchant for burnt butter and all things caramel. Pair this with my long standing fascination with my mini bundt tray, and a little tweaking of my jam doughnut muffin recipe and you have another quick and easy cheat.  Salted Burnt Butter Caramel Glazed Doughnuts. Delicious and drool worthy. Of course they could just as easily be baked in a regular doughnut tin but as I don’t own one of those, I was more than impressed with my clever substitution.

Salted Burnt Butter Caramel Glazed Doughnuts

1 1/3 cups (200g) self-raising flour
1/2 cup (100g) caster sugar
1/2 cup (125ml)  buttermilk
1/3 cup (85ml) vegetable oil
1 large egg
1 teaspoon pure vanilla extract

For the Burnt Butter Caramel Glaze

85g butter
1 cup (200g) caster sugar
1/3 cup (85ml) pouring cream
sea salt flakes, to sprinkle

PREHEAT oven to 200 C and generously grease a 12 hole mini bundt (or doughnut) tray. Dust lightly with flour.
PLACE flour, salt and caster sugar into a medium bowl. Stir to combine.
IN A JUG  combine the vegetable oil, egg, milk and vanilla extract.
ADD jug of wet ingredients to the bowl of dry ingredients and stir gently to only just combine.
SPOON batter evenly into the bundt tray, filling each indent almost to the top.
BAKE in preheated oven for 10 – 12 minutes, or until toothpick inserted into the centre of each comes out clean.
TRANSFER  to a wire rack to cool a little then using a spoon quickly drizzle over the hot burnt butter caramel glaze (recipe follows).
SPRINKLE over sea salt flakes and allow glaze to set at room temperature.

For the Burnt Butter Caramel Glaze

MELT butter in a small saucepan over medium heat in a heavy saucepan, stirring frequently until the mixture bubbles and foams, and milk solids begin to separate. Continue to cook until nut brown. Remove from heat and set aside to cool.
PLACE a wok or large heavy based non stick pan over medium heat. Add sugar in an even layer.
HEAT without stirring  until the mixture caramelises, swirling the wok every now and then until all the sugar crystals have dissolved and the mixture is a deep golden colour. The mixture will caramelise very quickly in a matter of minutes.
REMOVE wok from heat, then whisk in the brown butter and cream. Take care, the hot caramel mixture will bubble and spatter a little.
RETURN to medium heat and cook for a few more minutes, stirring constantly until the butter and cream are completely incorporated.
TURN OFF heat. The caramel is ready for glazing the doughnuts.

Posted in Baked, What I Love to Cook | Tagged , , , , , , | 6 Comments

Eat, Fast and Live Longer. A 5-2 Fast Diet Recipe Idea Under 200 Calories. Creamy Broccoli Soup With Crispy Oven Roasted Chickpeas.

Creamy Broccoli Soup With  Oven Roasted Chickpeas

It’s the first day of winter, so to mark the occasion I’m posting a soup recipe. The Bureau of Meteorology warns that we are about to welcome the changing of the seasons with a cold snap and some of the coolest temperatures of the year so far. For Sydney that means lows of 3 or 4 C and highs of about 16 or 17 C. Positively balmy for some parts of the world, I know…but, it’s cold for us. A welcome change after a long Indian summer of sweltering humidity.

Enough about the weather, and onto the soup. The stars of this show are really the chickpeas, with the soup providing an all important supporting act to showcase their versatility. On feast days I could eat them by the bucketload. Deep and golden with a satisfying crunch. If the truth be known I rarely bake them just by one tinful. Usually it’s two tins per tray, and two trays into a hot oven simultaneously  for 40 minutes or so. However, this being a 5-2 fast day, I’m scaling down. One tin it is – to avoid any loss of focus and mindless sampling.

Velvety and a bright vibrant green, the broccoli soup is rich and creamy, yet completely dairy free. It’s delicious and fresh, on any other occasion it would be a standout in it’s own right. In this post, however, it provides the  perfect foil for my spicy, crispy oven roasted chickpeas. Here’s where the calorie counting gets interesting. Whilst a generous bowl of soup topped with a mound of chickpeas comes in at just 181 calories per serve, half those calories are accounted for by those moreish, crispy croutons.

Now you understand there’s method in my madness and the very reason why I roasted just one tin. There’s a little over 500 calories alone in one tin’s worth of those crisp and crunchy morsels. Or put in 5-2 terms a whole fast day’s calorie allocation. Looking on the brighter side, to balance everything out  there’s just 50 calories per cup of broccoli soup without any crispy accompaniment. At the end of the day you choose. Both elements are delicious on their own. Together, they pack a powerful flavour punch – something to definitely brighten a cold and miserable winter’s day.

Creamy Broccoli Soup With Crispy Oven Roasted Chickpeas

Creamy Broccoli Soup With Crispy Oven Roasted Chickpeas
Serves 6 (181 calories per generous bowlful)

For the Broccoli Soup
1 tablespoon olive oil (120 calories)
1 medium onion, finely diced (30 calories)
2 cloves garlic, finely diced (8 calories)
3 medium heads broccoli, stalks and florets separated (204 calories)
2 medium desiree potatoes, peeled and diced (300 calories)
2 ribs celery, diced (17 calories)
2 sprigs thyme (1 calorie)
6 cups chicken or vegetable stock (120 calories)
sea salt flakes and freshly ground black pepper

For the Roasted Chickpeas
1 x 400g tin chickpeas, drained weight 240g (394 calories)
1 tablespoon olive oil (120 calories)
1/2 teaspoon ground cumin (4 calories)
1/2 teaspoon chili powder (4 calories)
1/4 teaspoon cayenne pepper (1 calorie)
1/4 teaspoon sea salt

To Prepare the Soup
HEAT oil in a large saucepan over medium heat. Sauté onion and garlic with a good pinch of salt until soft and translucent, about 5 minutes.
SEPARATE broccoli into florets and stalks.
TRIM away any tough or woody outer layers from each stalk, dice tender stalks.set florets aside.
ADD diced broccoli stalks, celery and potatoes to the saucepan. Increase heat to high, and cook, stirring for a further 5 minutes or so, until the potato begins to soften a little.
ADD the stock and thyme. Bring the saucepan to the boil. Reduce heat to medium and simmer, uncovered, for a further 10 minutes until potato is almost cooked through.
ADD broccoli florets, cook until broccoli is tender and bright green, about 10 minutes.
REMOVE from heat. Discard thyme and set aside for a few minutes to  cool a little.
PUREE soup in batches in the jug of a blender or in the pot with a hand-held immersion stick blender.
REHEAT soup just before serving.  Check seasoning, adding a little more sea salt and pepper to taste. Ladle into serving bowls. Serve immediately with a generous garnish of crispy oven roasted chickpeas.

To Roast the Chickpeas
PREHEAT oven to 180 C. Line a large oven tray with baking paper.
DRAIN chickpeas into a large mesh strainer and thoroughly rinse under cold water to remove all traces of the starchy water they were packaged in.
TRANSFER chickpeas to a  paper towel lined bowl. Pat dry, removing any errant loose papery skins.
REMOVE the paper towels. Drizzle with olive oil and sprinkle with spices and sea salt, tossing until well coated.
SPREAD chickpeas in an even layer over the prepared oven tray.
BAKE in hot oven for about 30 – 40 minutes until the chickpeas are a deep golden brown and crunchy. Shake the tray every now and then whilst roasting to redistribute the chickpeas. This helps ensure they roast evenly and do not burn. Remove from oven to cool.

Posted in Soup, Vegetables, Vegetarian, What I Love to Cook | Tagged , , , , , , , , , | 4 Comments

Pretty Baking. Sweet Yet Simple. Apple Rose Tartlets.

Apple Rose Tartlets

Pretty little Apple Rose Tartlets have been populating my Instagram feed. Darling bijoux works of art constructed from little more than layers of thinly sliced apple and butter puff. So impossibly gorgeous, my interest could not help but be piqued. Thanks to Manuela from  Cooking With Manuela the secret is out – the process is not nearly as complicated and intimidating as it might appear. Using thawed sheets of puff pastry from the freezer and apples from the fruit bowl, these gorgeous little beauties can be rolled, baked, dusted with icing sugar and ready to be enjoyed in just under an hour. No fancy pastry chef skills required.

Apple Rose Tartlets - Preparation

With crisp and juicy new season apples in plentiful supply, this is the perfect recipe for Autumn baking. Whilst in her post Manuela used unpeeled red skinned apples to give her tartlets a rosy hue, on the day my baking muse visited I only had green granny smith apples at my disposal. To peel or not to peel? Not wanting green tinged roses, I peeled. Yesterday at the markets I bought a big bag of Pink Ladies, my next batch this weekend will be unpeeled.

The next step is to core the apples and slice them into halves. Each half is then sliced into paper thin slices  and placed into a bowl of acidulated water to avoid discoloration. To ensure the apples are pliable enough to make rolling of the rosettes easier, its a good idea to give them a quick blast in the microwave.  Make sure the apple slices have been drained and are completely dry before assembling your pastries.

Apple Rose Tartlets - Under Construction

Apples done, it’s time to slice the puff pastry sheets into a dozen strips and brush each strip with a little heated apricot jam. Averse as I am to soggy pastry I decided to sprinkle over an extra streusel like layer of almond meal, demerara sugar and cinnamon. Ostensibly to soak up any errant moisture from the apples, but also to add a little more flavour.

Then let the apple layering begin. As shown in the photo, I arranged six to eight apple slices in a pretty overlapping scallop edged pattern over the top edge of each pastry strip, folding up the bottom edge of the pastry to anchor the apple slices for rolling.

Apple Rose Tartlets - Rolled

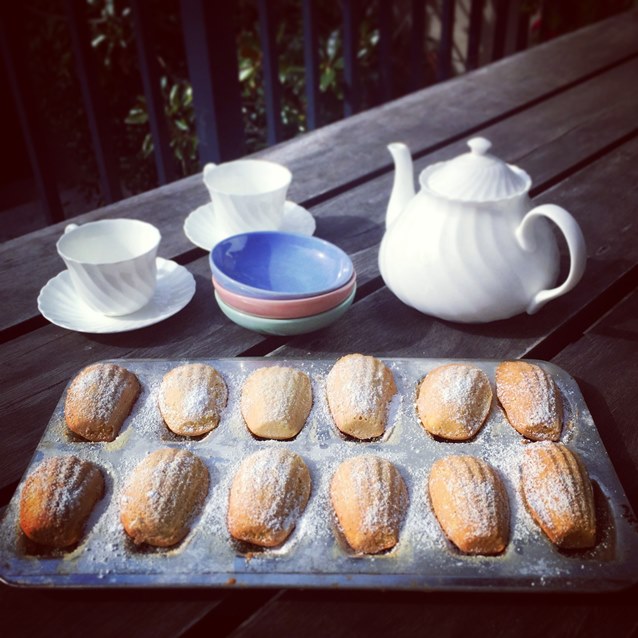
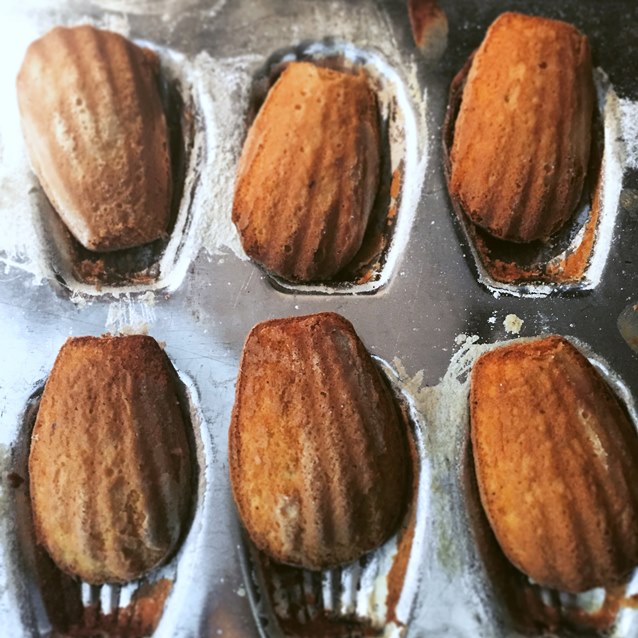
Each apple encased strip is gently but tightly rolled in a coil to form a rosette, before being placed into a muffin tin. Baked in a hot oven until crisp and golden, dusted with icing sugar, they will be ready to be enjoyed within an hour.

Unfussy and straightforward, this truly is pretty baking at its very best. I love how there is room for personal reinterpretation in this recipe. No doubt my next batch will look a little less rustic – particularly when I use my blushing Pink Ladies and leave their skins on. Perhaps next time I might leave a little more of the apple exposed. However rustic or professional they look, what matters most is every crisp, flaky mouthful is utterly delicious. Minimum effort for maximum effect – my kind of recipe.

Apple Rose Tartlets - Baked

Apple Rose Tartlets
Inspired by  Cooking With Manuela
Makes 12.

3 frozen square puff pastry sheets, thawed
3 large granny smith apples
freshly squeezed juice of half a lemon
1/2 cup apricot jam
3 heaped tablespoons almond meal
3 heaped tablespoons demerara or brown sugar
1 teaspoon cinnamon
icing sugar, for dusting

SQUEEZE lemon juice into a medium sized bowl of water.
PEEL and core apples, cut into half, then slice each half into paper thin slices, aim for 12 -16 slices depending on the size of each apple half. Place the sliced apples into the bowl of acidulated water to avoid discolouration.
MICROWAVE the bowl of sliced apples on medium power for about 3 minutes, to slightly soften. The apple slices need to be pliable so that the roses are easier to roll.
STRAIN apple slices. Transfer to a large paper lined plate and pat dry with sheets of paper towel to remove any excess moisture. Set aside to cool.
PREHEAT oven to 200 C. Line the bases of a large 12 hole muffin tray with squares of baking paper.
COMBINE almond meal, sugar and cinnamon in a small bowl.
MICROWAVE apricot jam on medium power for a minute or so to loosen.
UNWRAP puff pastry sheets. Cut each sheet into four 6cm wide strips. You should have 12 strips – one for each apple rose.

FOR EACH APPLE ROSE, take a long strip of pastry, brush with apricot jam and sprinkle over a little of the almond meal,sugar and cinnamon mixture.
ARRANGE 6-8 apple slices in an overlapping layer over the top half of your pastry strip.  The rounded top edges of each apple slice should extend a little over the top of the pastry sheet to give the baked tartlet a pretty scalloped look.
FOLD the bottom edge of the pastry strip up to cover 2/3 to 3/4 of the apple slices to secure them. Carefully but tightly roll up the pastry encased apple strips. Pinch the end to seal and place the apple rose, apple side facing up into a paper lined muffin hole.
REPEAT until all 12 pastry strips have been filled and rolled.

BAKE in a preheated 200 C oven, middle or lower rack position, for 30-35 minutes until pastry is crisp and apples are deeply golden. If apples appear to colour  too quickly, loosely cover with a sheet of tin foil, and continue to bake until pastry is cooked.
REMOVE pastries from oven, transfer to a wire cooling rack and dust with a shower of icing sugar to serve.

Posted in Baked, What I Love to Cook | Tagged , , , , , , , , , | 12 Comments

Eat, Fast and Live Longer. A 5-2 Fast Diet Recipe Idea Under 200 Calories. Roasted Eggplant Salad With Saffron Yoghurt And Pomegranate.

Roasted Eggplant and Pomegranate Salad With Saffron Yoghurt.

For this week’s 5-2 offering I’ve drawn inspiration from the big, bold, genius flavours of Yotam Ottolenghi once more. As usual the offering on my plate has been dictated not by careful recipe planning, but whatever is available in my pantry. On the spur of the moment. Right now.

In my refrigerator? Three beautifully bulbous shiny purple eggplant. On my fruit bowl? A  pendulous pomegranate, it’s blushing scarlet exterior holding the promise of a trove of impossibly sweet, bright ruby red arils. Casting an eye over this bounty I ask myself ‘What would Yotam cook?’  I truly can’t think of a more enjoyable way to throw together a meal.

Fortunately, enamoured as I am by Yotam’s style, I’m the proud owner of an impressive stack of his cookbooks. A ready reference of fresh and fabulous recipe ideas. Whilst I adore his latest offerings Jerusalem and Plenty More, this time I’ve meandered down memory lane to where it all started for me, at least, through the well thumbed, food spattered pages of my much loved copy of his debut tome Ottolenghi The Cookbook.

I love how simple and unfussy this salad is to prepare. Whilst your eggplants are roasting in the oven, all that’s left to do is to raid the herb garden for fresh parsley, split open a pomegranate and whisk up a saffron infused yoghurt dressing.  A gorgeous plate of food, ready in no time at all, for under 200 calories a serve. With it’s gorgeously lush yoghurt dressing, it’s almost a fast day recipe in disguise.

Roasted Eggplant Salad With Saffron Yoghurt And Pomegranate

Serves 4 (193 calories per serve)
Adapted from Ottolenghi The Cookbook by Yotam Ottolenghi and Sami Tamimi (page 29)

3 medium eggplant, cut into 2cm thick slices (270 calories)
2 tablespoons olive oil for brushing (240 calories)
2 tablespoons toasted pine nuts (116 calories)
1/4 cup fresh pomegranate arils (instructions on how to seed a pomegranate here) (36 calories)
1/4 cup fresh parsley leaves (4 calories)
coarse sea salt and black pepper

Saffron Yoghurt
a small pinch of saffron strands (2 calories)
1 1/2 tablespoons hot water
1/2 cup (90g) plain Greek yoghurt (95 calories)
1 small garlic clove, crushed (4 calories)
2 tablespoons lemon juice (6 calories)
a pinch of sea salt

For The Roasted Eggplant

PREHEAT oven to 220 C. Line two large oven trays with baking paper.
ARRANGE eggplant slices in a single layer over the prepared oven trays, brushing each slice lightly with olive oil on both sides. Season with salt and pepper.
ROAST for 20-35 minutes until golden brown. Allow to cool before assembling the salad.

For The Saffron Yoghurt

INFUSE saffron in hot water for five minutes until rich yellow in color.
PLACE yoghurt, garlic, lemon juice and a good pinch of sea salt into a bowl. Pour over saffron infusion. Whisk well together until sauce is smooth and golden.
SEASON to taste, then chill. Sauce will keep in fridge for up to three days.

To Assemble The Salad

ARRANGE roasted eggplant on a large platter in slightly overlapping concentric circles.
DRIZZLE over saffron yoghurt, followed by a scattering of pine nuts and pomegranate seeds. Finish with a shower of picked parsley leaves. Serve at room temperature with extra saffron yoghurt on the side.

Posted in Vegetables, Vegetarian, What I Love to Cook | Tagged , , , , , , , , , | 7 Comments

Let Them Eat Cake. A Little Taste Of France. Madeleines With Browned Butter and Lime.

Madeleines With Browned Butter and Lime

Rummaging through the pantry cupboard, I chanced upon my pretty scallop edged madeleine trays. Relics of a long forgotten past. It must be ten years since I used them last.  I well remember the thrill of the hunt for those prized metal trays. Amidst a sea of modern rubber silicon versions which to my mind, at the time, simply wouldn’t do.

Petites Madeleines. Rich, plump and buttery scallop edged sponge cakes. A little taste of France. Simply concocted from staple pantry ingredients – sugar, butter, eggs and flour.  Flavoured by a deep rich nutty beurre noisette. Scented by citrus zest. Introduced to the  Court of Versailles by Louis XV’s wife Marie. Eponymously named after Madeleine, a young maid from the town of Commercy who baked the cakes for Marie’s father, the Duke of Lorraine. Immortalised by the French writer Proust in his tome Remembrance Of Things Past as a “…little scallop-shell of pastry, so richly sensual under its severe, religious folds”.

Madeleines Browned Butter and Lime

Enamoured as I am by all things French, I do remember I used to bake these little cakes with their distinctive humped backs quite a lot. Almost too much. One of the secrets to a gorgeously soft and fluffy madeleine was to allow is the batter to chill in the refrigerator for at least an hour before baking. Somewhere along the line (most likely by accident) I discovered that overnight was better, so took to making up the batter the night before. Next morning my madeleines could be freshly baked. At a moment’s notice. Without fail these delicate little beauties would rise to the occasion in just eight minutes in my hot oven. A huge bonus when baking for a busy household.

No doubt we overdosed on their deliciousness one time too often. Sadly, to the extent that something that was meant to be special suddenly became commonplace and under appreciated. Not surprisingly my madeleine baking ground to a halt and, over time,  those metal trays were pushed to the darkest depths of the pantry cupboard. A decade later, what’s old is new again. The time has finally come to resurrect those tins with a browned butter and lime rendition of those soon to be loved once more petites madeleines.

Madeleines

Madeleines With Browned Butter and Lime
Makes 2 dozen

180g unsalted butter
5 eggs
3/4 cup caster sugar
finely grated zest from 2 limes
1 1/3 cups plain flour
1 teaspoon baking powder
icing sugar, sifted, to dust

MELT butter in a small saucepan over medium heat in a heavy saucepan, stirring frequently until the mixture bubbles and foams, and milk solids begin to separate. Continue to cook until nut brown. Remove from heat and set aside to cool. If you prefer these cakes are also delicious made with melted butter – so feel free to skip the browning of the butter step.
WHISK eggs and sugar together until pale and fluffy, then stir in the lime zest.
SIFT together flour and baking powder. Fold gently into the batter until just combined.
GRADUALLY stir through cooled browned butter mixture in a thin steady stream, until just combined.
COVER with plastic wrap and allow mixture to rest for at least an hour in the refrigerator, overnight is better.
PREHEAT oven to 180 C. Butter two madeleine trays and dust with flour.
PLACE a tablespoon of batter into each indentation of the buttered and floured madeleine trays. Tap each tray lightly on your bench to make sure the mixture perfectly fills the scalloped ridges of each indentation.
BAKE for 6 – 8 minutes, or until golden and well risen with a classic raised hump on top.
TAP madeleines to release them from the tin. Allow to cool a little on a wire rack before dusting with icing sugar to serve. Best eaten on the day they are baked, suitable to freeze.

Posted in Baked, What I Love to Cook | Tagged , , , , , , , , | 10 Comments

Eat, Fast and Live Longer. A 5-2 Fast Diet Recipe Idea Under 200 Calories. Yellow Split Pea and Vegetable Soup With Crispy Shredded Kale.

Yellow Split Pea and Vegetable Soup With Crispy Shredded Kale

With a definite chill in the air and winter fast approaching, 5-2 fast day Mondays have quickly become soup days. Filling and low in calories, with the added bonus if I’m organised, of no cooking. A godsend on fast days when all I have to do is simply pull a container of soup from the freezer, defrost and reheat.

That’s why when I make soup I fill my pot to the brim and make vast quantities. Seemingly enough to feed a proverbial army but in truth usually only enough to fill the hole in collective stomachs of my hungry family with a few stolen tubs successfully squirreled away in the freezer.  Soup day for the non fasters in my family is also synonymous with loaves of fresh artisan bread and an all important finale – dessert. Usually something as simple as an ice cream sundae they can construct and consume away from the table in the confines of the kitchen. Out of sight, out of mind.

I love making soup with lentils and legumes. They’re substantial and satiating, and very, very good for you. This Yellow Split Pea and Vegetable version is deliciously creamy without the addition of any dairy products at all. I’ve topped it with a shower of crispy oven baked kale for crunch and added interest. Who said fast days had to be boring?

Yellow Split Pea and Vegetable Soup With Crispy Shredded Kale
Makes about 10 cups (156 calories a cup plus 20 calories per 1/4 cup crispy kale )

300g (1 1/2 cups) dried yellow split peas (1008 calories)
1 teaspoon bicarbonate soda
1 tablespoon olive oil (120 calories)
1 large onion, finely sliced (30 calories)
1 leek, finely sliced (27 calories)
4 celery sticks, diced (34 calories)
2 large carrots, diced (50 calories)
2 large parsnips, diced (150 calories)
2 cloves garlic, crushed (8 calories)
bouquet garni of 2 bay leaves, 2 sprigs thyme and 2 sprigs rosemary (6 calories)
6 cups good chicken or vegetable stock (120 calories)
up to an extra cup water, to thin consistency when pureeing, if necessary
1 lemon (12 calories)

2 1/2 cups crispy shredded kale, to serve (recipe below) (196 calories)

SOAK dried split peas in a large bowl of warm water and a teaspoon of bicarbonate of soda (to soften) for half an hour. Strain and set aside.
PLACE oil in a large saucepan over medium heat. Add onion and leeks. Fry, stirring occasionally until soft and translucent, about 10 minutes.
ADD carrots, celery, parsnips and garlic. Sauté lightly until vegetables just begin to soften.
ADD strained split peas and bouquet garni with 6 cups chicken or vegetable stock.
BRING to the boil, turn heat to lowest setting, cover and allow to simmer very gently for 2 to 3 hours.
TURN off heat. Remove  the bouquet garni. Purée the soup in the stockpot with a stick blender to the desired consistency, add a little water to thin the soup if it is too thick.
TO FINISH, stir through finely grated zest and freshly squeezed juice of one lemon. Season to taste with sea salt and freshly ground pepper
LADLE soup into preheated bowls or mugs to serve. Garnish with crispy kale.

Crispy Shredded Kale
Makes about 2 1/2 cups (78 calories per cup)

4 cups fresh Kale, shredded (136 calories)
1/2 tablespoon olive oil (60  calories)
sea salt, for sprinkling

PREHEAT oven to 160 C. Line an oven tray with baking paper.
SHRED the kale by stripping the leaves from their stems.  Stack the leaves on top of one another, roll them up and then cut the roll into thin ribbons.
PLACE shredded leaves in an even layer on the lined oven tray. Toss with a little olive oil and  sea salt.
BAKE until crisp, about 15 minutes turning the leaves halfway through.
SERVE or store in an airtight container until required.

Posted in Soup, Vegetables, What I Love to Cook | Tagged , , , , , , , , , , | 6 Comments

Sweet Fix. Little Greek Semolina Custard Phylo Cigars.

Little Greek Semolina Custard Phylo Cigars

I love these little pastries. Their crisp and flaky exterior hide a sweet, rich and creamy surprise. A lovely lemon scented custard made with basic pantry ingredients semolina, sugar, butter and milk, and counter intuitively – no eggs. Whisked up in minutes in a saucepan over the stove. As long as the semolina is added in a thin, steady stream there’s no lumps. Of course an advantage of an eggless custard is that there’s no dreaded possibility of any curdling.

‘Custard’ made, all you have to do is unroll a package of fresh phylo pastry. Working one sheet at a time, brush each liberally with butter as you fold, fill and form them into fat little cigars. I always find it useful to outsource this step to the nimble fingers of my resident keen nosed helpers. They who seem to have a penchant for sniffing out the merest hint of baking in the kitchen, at just a moment’s notice.

After all many hands do make light work and those who roll also happen to be very enthusiastic scoffers of these little Greek semolina custard phylo cigars. Eating them warm by the trayful, straight out of the oven. Fortunately for them, this gorgeous little sweet fix is a snap to make. Proof that you really don’t need fancy ingredients for an impressive dessert.

Little Greek Semolina Custard Phylo Cigars
Makes about 2 dozen cigars

24 sheets from one package (375g) fresh phylo pastry
750 ml (3 cups) milk
1/2 cup caster sugar
long thinly peeled strips of lemon zest from one lemon
60g butter
3/4 cup fine semolina
1 teaspoon vanilla extract
freshly squeezed juice of one lemon
120g butter, extra, to brush phylo sheets
icing sugar, to dust

PREHEAT oven to 200 C. Line a large oven tray with baking paper.

To Make The Semolina Custard Filling
COMBINE sugar, milk and lemon zest in a saucepan. Place over medium heat and bring to a simmer, stirring to dissolve the sugar. Add butter. When butter has melted remove the strips of lemon zest.
STIRRING continuously, gradually whisk in semolina in a thin steady stream. Cook, stirring for 3 minutes until the mixture thickens and pulls away from the sides of the pan.
ADD vanilla extract and lemon juice. Stir to combine. Allow mixture to cool slightly before assembling the cigars.

To Assemble The Phylo Cigars
UNROLL phylo pastry and place between two clean tea towels on the benchtop.
MELT extra butter in a microwave or saucepan over low heat.

For Each Cigar
TAKE one phylo  sheet, brush with butter, fold in half, butter again and refold in half again until you have a small rectangle.
TAKE a tablespoonful of the filling and place it near the edge of the shortest side. Fold the long edges of the phylo sheet over the filling.
ROLL up the sheet. Brush the edge of the sheet with a little more butter to seal.
PLACE rolled cigar seam side down on the prepared baking tray.

CONTINUE to roll cigars with the remaining phylo sheets until all the filling is used.
PLACE full tray in preheated oven and bake for 20 minutes until golden.
ALLOW to cool for 10 minutes before dusting with icing sugar. Serve warm.

Posted in Baked, What I Love to Cook | Tagged , , , , , , , , , , , | 4 Comments