Eat, Fast and Live Longer. A 5-2 Fast Diet Recipe Idea Under 300 Calories. Rockmelon, Prosciutto And Feta Salad With Mixed Salad Leaves.

Rockmelon, Prosciutto And Feta Salad With Mixed Salad Leaves

A refreshing 5-2 fast day salad. Sweet. Salty. Addictive. Perfect for a hot, languid summer’s day. Best of all it’s entirely fuss free. No cooking required. Easily prepared from ingredients sourced from our local grocer;  rockmelon (cantaloupe), a bag of salad leaves, a tub of feta and a packet of thinly sliced prosciutto. Just whisk up a simple vinaigrette and assemble the ingredients attractively on a plate. Delicious and guilt free. Even better, a generous plate full comes in at a very respectable 252 calories per serve.

Rockmelon, Prosciutto And Feta Salad With Mixed Salad Leaves
Serves 2 generously (252 calories per serve)

200g mixed Italian salad leaves (endive, radicchio and rocket), washed and dried (34 calories)
1/4 medium rockmelon (cantaloupe) seeds and  rind removed, sliced into very thin wedges (92 calories)
6 slices (60g) prosciutto, very thinly sliced (114 calories)
50g feta cheese, crumbled (132 calories)
1 tablespoon balsamic vinegar (12 calories)
1 tablespoon extra virgin olive oil (120 calories)
sea salt and freshly ground pepper

PLACE salad leaves into a large bowl.
WHISK together balsamic vinegar and olive oil in a small jug, and pour half the dressing over the salad leaves. Season with sea salt and freshly ground pepper.
ARRANGE dressed leaves  inan even layer over the base of a large serving platter.
TOP with thinly sliced rockmelon and prosciutto.
CRUMBLE over the feta. Finish with a drizzle of the remaining dressing and A good grinding of black pepper. Serve immediately.

Posted in Salad, What I Love to Cook | Tagged , , , , , , , , , , | Comments Off on Eat, Fast and Live Longer. A 5-2 Fast Diet Recipe Idea Under 300 Calories. Rockmelon, Prosciutto And Feta Salad With Mixed Salad Leaves.

A Cooling Taste Of Christmas. Raspberry Yoghurt Semifreddo With Gingerbread Crumbs

Raspberry Yoghurt Semifreddo With Gingerbread Crumbs

I know its almost Christmas when bags of Pfeffernüsse start appearing in supermarkets and delicatessens. I’ve always had a huge soft spot for these delicious little German “pepper nut” cookies. Full of a heady mix of honey, molasses and ground spices; nutmeg, cardamom, anise, cinnamon, cloves and black pepper they’re heavily redolent of a very sophisticated gingerbread. I can imagine them being enjoyed in colder climes dunked in hot chocolate or mulled wine as a warming festive treat. Not so practical here in Australia whilst we are sweltering in the summer heat.

Ever resourceful, I’ve taken to crossing multicultural boundaries, crushing my precious pfeffernüsse to incorporate them into a cooling raspberry yoghurt semifreddo. Light and airy, meltingly delicious, but not quite an ice cream (semifreddo translates as half cold in Italian) it’s ridiculously easy to prepare. No churning required. Just a little foresight for a prepare ahead dessert that needs about 8 hours in the freezer to set. So much so, I find it easiest to make a few batches at a time, and  pop them in the freezer in readiness for a simple but impressive impromptu dessert.

In this version I whisked egg whites with honey into stiff peaks, then simply  folded them through a tub of lemon infused raspberry yoghurt. For a lusciously thick and creamy semifreddo, strain the yoghurt for at least an hour in the fridge before using. Then it’s just a matter of pouring the mixture parfait style, with layers of crumbled gingerbread  pfeffernüsse  into a cling film lined loaf tin. Cover, freeze and you’re done. A cooling taste of Christmas made from a couple of store bought ingredients – a packet of gingerbread cookies and a tub of raspberry yoghurt with a few frozen raspberries thrown in for a flamboyant finish.

Raspberry Yoghurt Semifreddo With Gingerbread

Raspberry  Yoghurt Semifreddo With Gingerbread Crumbs
Serves 6

4 egg whites
1/3 cup honey
1/4 teaspoon cream of tartar
a generous pinch sea salt
2 cups raspberry yoghurt
juice of half a lemon
200g soft German gingerbread cookies (pfeffernusse)
1 cup frozen raspberries, to garnish

LINE a 20cm long x 10cm wide x 6cm deep  loaf tin with cling film, leaving enough hanging over sides to fold over.
STRAIN yoghurt in the fridge in a muslin lined sieve for at least an hour to thicken.
CRUMBLE gingerbread into a bowl. Set aside.
IN A LARGE HEATPROOF BOWL, combine egg whites, honey, cream of tartar and salt. Place bowl over a pot of simmering water (the bottom should not touch the water) and using an electric beater, whisk on high speed until stiff, glossy peaks form, about 5-8 minutes.
STIR together  thickened yoghurt and lemon juice in a separate bowl. Fold a few large tablespoons of the meringue mixture into the yoghurt to lighten the base, then gently fold the base back into the remaining meringue until well incorporated.
SPOON 1/3 of the yoghurt meringue mixture into the prepared loaf tin, pressing down with a spatula to make sure the mixture is evenly distributed over the base and into the corners of the tin.
WORKING IN LAYERS, sprinkle over 1/3 of the crumbled gingerbread and cover with a further 1/3 of the yoghurt meringue. Repeat once more using another 1/3 of the gingerbread crumbs and all the remaining yoghurt meringue. Set aside the remaining 1/3 of gingerbread crumbs in a covered container  to use as a garnish at serving time.
LIGHTLY tap the filled tin against your work surface to remove any bubbles and smooth the surface of with a spoon. Cover and freeze until firm, about 8 hours or overnight.
REMOVE semifreddo from the freezer and leave to stand at room temperature for 5 to 10 minutes to soften slightly. Turn out onto a serving platter, scatter with frozen raspberries and gingerbread crumbs. Slice thickly and serve.

Posted in Frozen, Fruit, Sweet Treats, What I Love to Cook | Tagged , , , , , , , , | 5 Comments

Summer Staples. Roast Potato Salad With Fresh Mint And A Lemon Dijon Mustard Vinaigrette.

Roast Potato Salad With Fresh Mint And A Lemon Dijon Mustard Vinaigrette

Let’s start this conversation with a deceptively simple yet potentially polarising question. How do you prefer your potato salad?  Dressed with mayonnaise? Or vinaigrette?  On the subject of this summer barbecue and picnic staple, our household is steadfastly, almost irrevocably divided into two very opposing camps.

To keep everyone happy, I now provide a rotation of two very different types of potato salad. The first, a traditional mayonnaise based offering made with boiled potatoes with bacon, spring onion and parsley add-ins. And this, the newer kid on the block. A fresher, lighter vinaigrette dressed roast potato and onion version. Heady with summery flavours of lemon, garlic and mint.

The common denominator in both? A liberal, not too heavy handed, douse of Dijon mustard. I know which one I personally prefer. And to my resident I can’t-do-potato-salad-without-mayo aficionados? Please try this at least once without gracing the table with a superfluous squeeze bottle of mayonnaise.

Roast Potato Salad With Fresh Mint And A Lemon Dijon Mustard Vinaigrette
Serves 6 generously

For The Potato Salad

1 kg Dutch Cream potatoes, well scrubbed
2 medium red onions, peeled and sliced into eighths
8 garlic cloves, unpeeled
finely grated zest of one lemon
4 tablespoons olive oil
1 small bunch mint, leaves removed from stem and shredded

For The Dijon Mustard Vinaigrette

4 tablespoons olive oil
freshly squeezed juice of 1 lemon
1 tablespoon Dijon mustard
sea salt and freshly ground pepper

IN A LARGE saucepan, cover the potatoes with cold water, add a generous pinch of salt  and bring to a rapid boil over high heat.
PAR-BOIL over medium heat until just tender, about 10 minutes. Drain and allow to cool slightly before slicing into quarters. Set aside.
MEANWHILE preheat oven to 180 C. Pour 4 tablespoons olive oil into a roasting tin, large enough to hold the quartered potatoes and onion wedges in a single layer. Place tin into oven for 5-10 minutes to heat up.
REMOVE hot roasting tin from oven. Carefully add quartered par boiled potatoes, red onion wedges and whole, unpeeled garlic cloves; turning gently with a spatula to ensure they are well coated with hot oil. Scatter over finely grated lemon zest.
ROAST in hot oven for 30-40 minutes until potatoes are crisp and golden. Remove from oven and transfer to a large salad bowl.
WHISK together olive oil, lemon juice and mustard in a small bowl until well emulsified. Season with sea salt and pepper.
POUR dressing over the hot potato mixture. Toss well to combine. Set aside for ten or so minutes to cool a little before adding fresh shredded mint. Delicious served warm or cold.

Posted in Marinades, Pastes and Dressings, Salads, Vegetarian, What I Love to Cook | Tagged , , , , , , , , , | 1 Comment

Eat, Fast and Live Longer. A 5-2 Fast Diet Recipe Idea Under 100 Calories. Frozen Grapes And Cherries.


Here in the southern hemisphere, a reliable marker that  Christmas is just around the corner is the appearance of  big, beautiful bunches of grapes and boxes of cherries at the markets. With a searingly hot start to the summer with temperatures already in the 30’s we’ve been keeping grapes and cherries in the freezer for a refreshingly sweet and icy treat. Hugely moreish, these intensely sweet and fruity little sorbet bombs provide a virtually guilt free sugar fix. I can effortlessly nibble through a whole cup for a tiny 95 calories.

There’s no artificial flavourings or colourings. Just nature’s peak season whole fruit at it’s juiciest best. For a slightly more decadent smoothie effect, dip the frozen grapes and cherries in a little plain Greek yoghurt. Leave for a few moments as the icy fruit sets the yoghurt into a crisp shell, adding just 24 more calories to this delicious treat. Truly, this idea is so easy to prepare, it really doesn’t qualify as a recipe at all.

Frozen Grapes And Cherries
95 calories per cup serve (add 24 calories if yoghurt dipped)

1/2 cup (about 16) seedless red or green grapes (55 calories)
1/2 cup (about 10) dark red cherries with pit (40 calories)
2 tablespoons plain Greek yoghurt, for dipping (optional) (24 calories)

WASH grapes and cherries well before freezing.
DRAIN in a colander and/or salad spinner. Blot with paper towel to ensure the fruit is scrupulously dry for a better quality freeze.
ARRANGE fruit on a baking paper lined tray and place into the freezer to quick freeze. After 2-3 hours transfer grapes into ziplock  bags or containers and return to the freezer until ready to eat.
FOR A DELICIOUS VARIATION quickly dip frozen cherries and grapes into plain Greek style yoghurt and place on a sheet of non stick baking paper to set. This should take just minutes. If it’s  a particularly humid day place in the freezer for a few moments. Two tablespoons of yoghurt adds just 24 calories to this treat.

Posted in Frozen, Fruit, Sweet Treats, What I Love to Cook | Tagged , , , , , , , | 4 Comments

Home For The Holidays. Cola Glazed Ham.

Schools out for the summer. Swaddled in a calico ham bag in my fridge? A cola glazed, clove studded baked leg of ham. In readiness for the inevitable plague of teenage locusts standing askance in front of an open fridge, hands on hips, asking the perennial question. Is there anything to eat? I’m starving. 

I chanced upon this brilliant solution last summer. How fortuitous that  our end of school year also happens to coincide with the beginning of the festive season. I need no reminding that Christmas is less than three weeks away now, but happily  the seasonal reappearance of legs of ham at our local butcher beautifully fills a pressing need in our house.  How to feed a steady stream of always hungry modern day fridge foragers.

With a plentiful hoard of bread rolls in the freezer, it’s hunting and gathering 101 made easy. Of course there’s also a complementary supply of lettuce, tomato and cheese, with a wide ranging assortment of sauces and condiments. To enable the construction of  mountainous sandwiches and toasties, and perhaps an occasional ham plate with salad on the side.

Last year a five kilo leg of cola glazed ham lasted just five days. As an adjunct to hearty breakfasts and dinners. Disappearing slice by caveman sized slice (or should that be hunk?) from the bone. Receiving a huge thumbs up and grunts of appreciation all round. Why glaze with cola you may well ask? For no other reason than it’s quick and easy. And as it so happens…the idea peculiarly intriguing and appealing to idiosyncratic teenage palates.

Cola Glazed Ham

1 5kg cooked, bone in, leg of ham
500 ml cola
1/2 cup brown sugar
2 tablespoons Dijon mustard
2 teaspoons dry mustard powder
32-36 whole clove

PREHEAT oven to 160 C. Take the ham out of the fridge up to an hour before baking to bring to room temperature.
AT THE SHANK END of the ham, use a sharp knife to cut a zigzag pattern through the skin. Starting from the other end of the ham, carefully remove the skin with your fingers by peeling it away from it’s fat layer.
SCORE through the fat in a diamond pattern, being careful not to cut through to the meat.
INSERT a whole clove into the centre of each diamond.
PLACE the ham, clove studded side up,  into a large, shallow roasting tin.
STIR together cola, brown sugar, Dijon and  dry mustard powder until smooth. Pour mixture over ham.
BAKE for 2 1/2 hours in a preheated oven, basting with pan juices every 20 minutes. Rotate the tray half way through baking to ensure an even colour.
REMOVE from oven and allow ham to cool for 20 minutes before transferring to a serving platter or ham stand for serving.

Posted in Marinades, Pastes and Dressings, Pork, What I Love to Cook | Tagged , , , , , , | 4 Comments

Gluten Free, Dairy Free and Nut Free. Chocolate Covered Christmas Honeycomb Ring.


Are you up for the challenge? What to make when asked to bring a gluten free, dairy free and nut free sweet treat to an early Christmas get-together? This request almost had me stumped. Sometimes it helps not to over think these things too much. Just put the question out there to the universe, and the answer will reveal itself. A little later that day, browsing through my blog stats, two of my earlier posts that consistently receive hits on a daily basis jumped out at me. The first for Old-Fashioned Homemade Honeycomb
and second for Nigella’s Sweet and Salty Crunch Nut Bars.

Inspired by those two posts, here is my sweet Christmas solution to the gluten free, dairy free and nut free conundrum. A giant chocolate covered honeycomb disc covered in Christmas hued popping candy sprinkles. Set in a well buttered and paper lined bundt tin, it looks like an oversized glazed doughnut. Picture perfect until shattered like a Violet Crumble or Crunchie bar.

Chocolate Covered Christmas Honeycomb Ring

Gluten Free, Dairy Free and Nut Free Chocolate Covered Honeycomb Ring
For a comprehensive trouble shooting guide to making honeycomb refer to my previous post It’s The Shatter That Matters. Old-Fashioned Homemade Honeycomb.

Honeycomb
1 1/2 cups caster sugar
1/3 cup honey
1/3 cup golden syrup
1/3 cup water
2 teaspoons bicarbonate of soda

Chocolate Topping
200g block dark chocolate; chopped into pieces
3 teaspoons vegetable or olive oil
assorted sprinkles, to decorate

GREASE and paper line a large round bundt tin (as shown).
PLACE sugar, honey, golden syrup and water in a heavy based saucepan with high sides.
STIR over low heat, until sugar dissolves, occasionally brushing down side of the saucepan with a pastry brush dipped in water to remove any sugar crystals, about 5 minutes.
INCREASE heat to high, cover with a lid and bring to the boil.
REMOVE lid.  Cook, without stirring, for 10-15 minutes or until the syrup reaches hard crack stage (150C). Remove saucepan from heat and set aside for a moment to allow bubbles to subside a little.
ADD the bicarbonate of soda and quickly stir with a wooden spoon until combined. The mixture will bubble and foam.
POUR into the prepared bundt tin. Set aside for 10 -15 minutes until honeycomb is almost set but still pliable, and run a flat bladed palette knife around inside edges of honeycomb ring to loose. Set aside to cool and harden completely.
CAREFULLY turn out honeycomb ring onto a serving platter. Peel away the baking paper.
PLACE chocolate and olive  oil into a  clean and completely dry jug and  microwave on low for about 90 seconds. Stir every 30 seconds until melted. Pour evenly over honeycomb ring, decorate with sprinkles and refrigerate until chocolate is just set, about 10 minutes.
STORE in an airtight container to prevent the honeycomb from drawing moisture from the air and becoming sticky.

Posted in Chocolate, Confectionery, Sweet Treats, What I Love to Cook | Tagged , , , , , , | Comments Off on Gluten Free, Dairy Free and Nut Free. Chocolate Covered Christmas Honeycomb Ring.

Eat, Fast and Live Longer. A 5-2 Fast Diet Recipe Idea Under 100 Calories. Mini Caprese Cocktail Santas.

Mini Caprese Cocktail Santas

December 1st and the silly season has well and truly started. A time for pre Christmas catch-ups, get togethers and cocktail parties. Full of conviviality, canapés and festive good cheer. Truly the most wonderful time of the year.

In search of a healthier festive treat here is a cheeky  (almost kitsch) Christmas cocktail party take on Caprese salad. Mini roma tomato and bocconcini ball Santas. Speared on cocktail sticks 1970’s style. Almost too cute to eat. Inspired in part by the now ubiquitous Strawberry Santas which filled pinterest boards two years ago but much, much kinder to your hips. After all each mini Caprese cocktail Santa accounts for just 26 calories. Almost too good to be true.

Caprese Tomato Bocconcin and Basil Santas

Mini Caprese Cocktail Santas
Makes 16 (26 calories per cocktail stick)

16 roma cherry tomatoes (48 calories)
18 bambini (5g) bocconcini (mozzarella) balls (360 calories)
32 basil leaves, separated from stem, washed and dried (6 calories)
16 wooden cocktail sticks
sea salt and freshly ground pepper

DRAIN bocconcini balls and pat dry with sheets of kitchen paper towel. Cut two of the bocconcini balls into eight pieces; these will form the pompom on Santa’s hat. Leave the remaining bocconcini balls whole. Set aside.
THOROUGHLY rinse tomatoes. Remove from stem if using vine ripened tomatoes. With a sharp paring knife cut around the pointy end of each tomato, about 1/3 of the way down. The top will form Santa’s hat, and the bottom 2/3 of the tomato his body.
USE the sharp point of your knife to gently remove seeds from both the top and bottom of each tomato and place on a kitchen paper lined plate upside down to absorb any moisture. Set aside.
FOR each mini caprese cocktail Santa, carefully thread a basil leaf onto a cocktail stick, followed by a larger tomato bottom, another basil leaf, a whole bocconcini ball, a smaller tomato “hat” and a bocconcini “pompom.
REPEAT until all cocktail sticks, tomatoes, bocconcini balls and basil leaves have been used.
SPRINKLE with sea salt and pepper  and place in a tall glass or vase to serve. Dipping sauce of extra virgin oil and aged balsamic vinegar poured into a shot glass optional. Remember each tablespoon of olive oil accounts for 120 calories and balsamic vinegar 20 calories a serve.

Posted in Salad, Small Bites, To Serve with Drinks, Vegetarian | Tagged , , , , , , , , | 3 Comments

A Labour Of Love. Four Layer Chocolate And Caramel Ombré Piñata Birthday Cake.


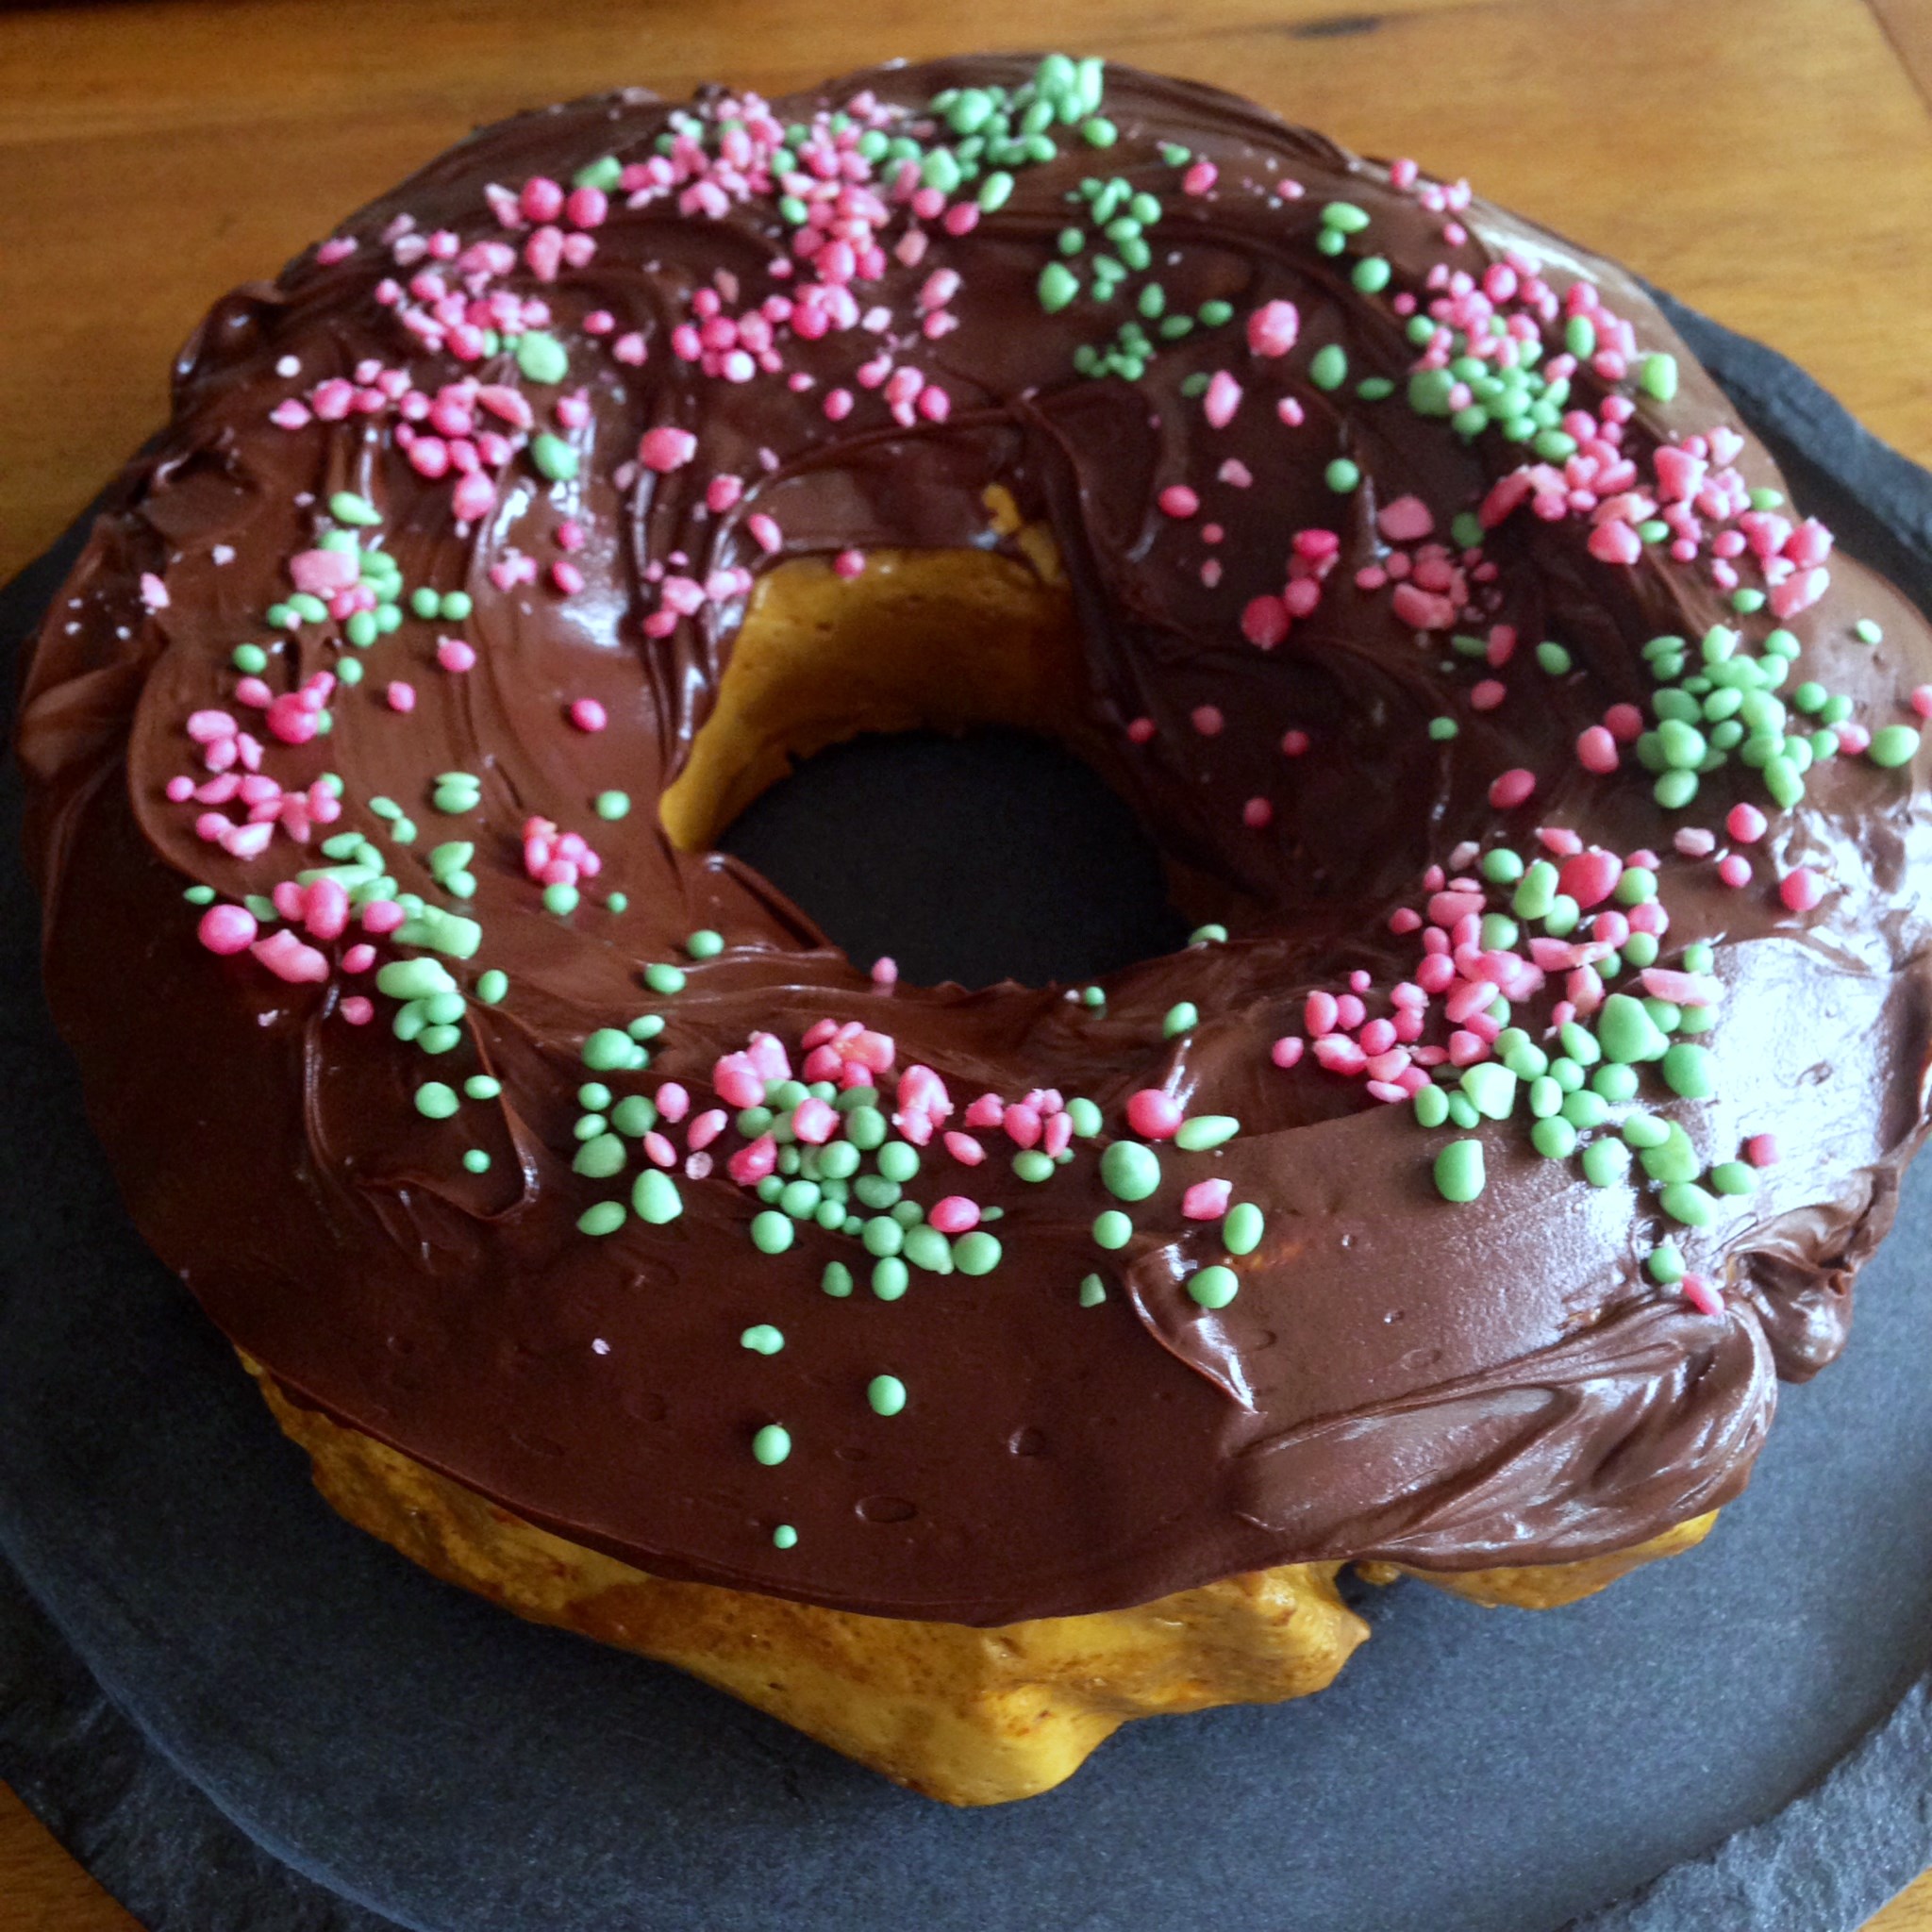
Birthdays are always celebrated in our house with a home-made cake of the lucky birthday boy or girl’s choosing. Last weekend we celebrated our daughters’ fifteenth birthday. This time last year I made elegant Mini Strawberry Cloud Cakes With Chocolate Bottoms and Fresh Raspberries. This year their joint request was a little more retro and challenging. A decadent teenage balayage inspired sugar high; a chocolate and caramel ombré piñata cake.

Picture this. Four layers of vanilla, caramel, chocolate-caramel and  dark chocolate sponge. Sandwiched with dulche de leche. Smothered in chocolate ganache. Filled with mini m&m’s and jelly tots. The original inspiration coming from a BBC Food recipe for a much simpler Chocolate and Caramel Ombré Cake  which I eventually adapted with some fiddling about into a piñata extravaganza.

Happily it took just a little over three hours to bake and put together. Fortunately I had tins of dulche de leche squirreled away in the pantry cupboard from a rather large batch prepared earlier. On the day I only had to bake the cakes and whip up the ganache, for what turned out to be a rather straight forward assembly.

What can I say? This cake truly is a party  show stopper.  The pure, unadulterated joy on the girls’ faces and squeals of excitement as they blew out the candles was priceless.  The tumble of lollies as they cut through the first slice captured by a flurry of instagrams and snap chats. Fingers crossed they won’t raise the bar any higher next year.


Ombre Pinata Birthday Cake

Four Layer Chocolate And Caramel Ombré Piñata Birthday Cake.
Serves 12 -16

4 layer cakes – vanilla, caramel, chocolate-caramel and chocolate (recipe follows)
1 tin Dulche de Leche, at room temperature (recipe follows)
1 large bowl chocolate ganache frosting, at room temperature (recipe follows)
2 large 180g bags mini m&m’s
1 large 140g bag jelly tots

TAKE the caramel and chocolate-caramel layer cakes and using a 10cm round food presentation ring or scone cutter, stamp out the centres of the cakes. Set aside. The rings will be used as the middle layers for the ombré piñata cake. I like to make a mini cake from the centres using leftover dulche de leche, ganache and lollies.
PLACE the vanilla layer cake on a wire rack and spread a quarter to a third of the tin of dulche de leche in a ring over the top of the cake, leaving a 10cm circle bare in the centre.
PLACE the caramel sponge ring on top of the dulche de leche covered vanilla cake. Spread another quarter to a third of the tin of dulche de leche over the top of the cake.
PLACE the chocolate-caramel sponge ring on top of the dulche de leche covered caramel ring.
FILL the centre with one packet mini m&m’s and one packet jelly tots. Reserve the remaining packet of m&m’s for decoration.
SPREAD the remaining quarter to a third of the tin of dulche de leche over the top of the chocolate-caramel ring cake. Reserve just a little to sandwich the centre cut sponge circles if making a mini cake.
PLACE chocolate layer cake over the dulche de leche covered chocolate-caramel ring cake.
USING a palate knife spread the chocolate ganache frosting over the entire cake, starting with the sides and finishing with the top. Quantities provided for the ganache are generous, use leftovers to frost the mini cake (if making) or use as a decadent milkshake or hot cocoa flavouring.
DECORATE with remaining packet of m&m’s. Cake will keep moist stored in an airtight container in a cool place for up to three days, but of course is at its best eaten on the day. The lollies will tumble out of the cake pinata style when sliced.

Ombre Pinata Cake Layers

For The Vanilla And Chocolate Sponge Layers
Adapted From BBC Good Food Chocolate and Caramel Ombré Cake

225g very soft butter, plus extra for greasing the cake tins
225g (1 cup) caster sugar
1 teaspoon vanilla extract
3 eggs
175g (1 1/4 cups) self raising flour
85g (2/3 cup) ground almonds
1 teaspoon baking powder
150ml natural yoghurt
5 tablespoons cocoa powder, sifted
2 1/2 tablespoons boiling water

PREHEAT oven to 160 C fan-forced. Grease, flour and base line 2 x 20cm round sandwich tins
BEAT butter and caster sugar until pale and creamy. Add eggs and vanilla, beating until just incorporated.
SIFT together self raising flour, almond meal and baking powder. Fold into butter/sugar/egg mixture with yoghurt in two batches.  When smooth divide mixture into two portions.
DISSOLVE cocoa powder in boiling water and stir into one portion of the cake batter.
POUR vanilla and chocolate batters into prepared tins and smooth tops with a spatula.
BAKE for 25 – 30 minutes until a skewer inserted into the centre of each cake comes out clean. Set aside for 15 minutes before inverting the cakes onto a wire rack to cool.

Ombre Pinata Naked C ake

For The Caramel And Chocolate-Caramel Sponge Layers
Adapted from BBC Good Food Chocolate and Caramel Ombré Cake

225g very soft butter, plus extra for greasing the cake tins
175g (3/4 cup) light muscovado (brown) sugar
55g (1/4 cup) dark muscovado (dark brown) sugar
1 teaspoon vanilla extract
3 eggs
175g (1 1/4 cups) self raising flour
85g (2/3 cup) ground almonds
1 teaspoon baking powder
150ml natural yoghurt
1 tablespoon cocoa powder, sifted
1/2 tablespoon boiling water

PREHEAT oven to 160 C fan-forced. Grease, flour and base line 2 x 20cm round sandwich tins
BEAT butter and sugars together until pale and creamy. Add eggs and vanilla, beating until just incorporated.
SIFT together self raising flour, almond meal and baking powder. Fold into butter/sugar/egg mixture with yoghurt in two batches.  When smooth divide mixture into two portions.
DISSOLVE cocoa powder in boiling water and stir into one portion of the cake batter.
POUR caramel and chocolate-caramel batters into prepared tins and smooth tops with a spatula.
BAKE for 25 – 30 minutes until a skewer inserted into the centre of each cake comes out clean. Set aside for 15 minutes before inverting the cakes onto a wire rack to cool.

Ombre Pinata Cake Fixings

For The Chocolate Ganache Frosting

220g block dark chocolate, chopped
220g block milk chocolate, chopped
300ml thickened cream

WHILE cakes are cooling, combine chocolate and cream in a heatproof bowl over a saucepan of simmering water. Stir until smooth. Remove from heat.
SET aside at room temperature to cool, stirring occasionally until ganache is thick and spreadable. If it is a hot and humid day, place the melted chocolate and cream mixture into the fridge for about 10 minutes to speed up the cooling process.

Ombre Pinata Cake Dulche De Leche

For The Dulche De Leche Filling

1 tin sweetened condensed milk.

PREPARE the Dulche de Leche at least a day ahead using this recipe from my previous blog post Easy Slow Cooker Dulche De Leche. Alternatively you can use a commercially sourced product, if available.
Once made unopened tins of Dulche De Leche can be stored in the pantry indefinitely.

Posted in Baked, Chocolate, What I Love to Cook | Tagged , , , , , , , , , , | 5 Comments

Simple Cheese Making At Home. Thick, Luscious And Creamy Mascarpone.


Mascarpone. Word associations. Triple Creme. Luxurious. Expensive. Italy’s answer to creme fraiche. Thick, luscious and creamy. Slightly sour with a wonderful palate cleansing tang. Celebrations. Cannoli and tiramisu. Lazy holiday brunch. Peaches and cream. Sweet summer berry tarts. Savoury mushroom pastries. A rich finishing note folded through risottos, polenta and pasta sauces.

Here is a little known secret. Despite it’s lusciousness and hefty price tag, mascarpone is incredibly easy and inexpensive to make at home. Waistline aside, there is no reason to only use it for special occasion treats. All that’s required?  Two ingredients; cream and lemon juice. A little patience and a good deal of time. Eight to twelve hours to be precise. All important for the cooked acidulated cream to weave its magic in a cloth lined sieve in the fridge. My solution? Sleep on it and allow this all important transformation to take place overnight. Entirely removing the temptation to take incessant sneak peaks and unnecessarily poke or prod your little bundle of curds and whey.

For years I had no idea that those ridiculously expensive little tubs of mascarpone could be made so effortlessly at home. Eighteen months ago I was blown away by the discovery of how easy it is to make fresh ricotta for breakfast . From full cream milk and a little acid, in only 20 minutes from go to whoa.  To me this latest revelation is just as breath-taking, although, in truth, the processes are very similar. Best of all I’m sharing it with you to add to your repertoire just in time for the onset of the festive season; a time for friends, extended family get togethers and celebratory food.

Fresh Home Made Mascarpone Cheese

Fresh Home Made Mascarpone
Makes approx 1 1/2 cups 

500 ml (2 cups) thickened cream
1 tablespoon lemon juice

LINE a large mesh sieve with a few layers of cheesecloth (or brand new chux super-wipes). Suspend over a bowl.
BRING a large saucepan half filled with water to a strong simmer over medium high heat.
MEANWHILE place cream into a large glass jug and microwave on medium for 2 minutes. I like to do this to speed up the initial heating process.
POUR heated cream into a heavy glass bowl. Place bowl over the now simmering pot of water and continue to heat, stirring occasionally with a wooden spoon, until cream is near boiling point (85 – 90 C reading on a candy thermometer). If not using a thermometer, the cream is ready when it begins to froth and steam with tiny bubbles just beginning to break on its surface.
REDUCE heat to low and add lemon juice.
STIR continuously until cream becomes very thick and coats the back of a spoon, about 5-10 minutes. Remove from heat and allow to cool for 20 minutes.
POUR thickened cream into lined sieve. Allow to cool completely, before covering with glad wrap and tying up the ends of the cloth to form a bundle. Transfer the sieve  and bowl to the refrigerator.
REFRIGERATE for 8-12 hours to drain and thicken. The longer the cheese is left to drain the firmer the texture. Unlike ricotta, mascarpone should not release too much whey whilst draining; as a rough guide usually only  2-3 tablespoons
SPOON drained mascarpone into a glass jar or air tight container. It will keep, stored in the fridge, for up to 5 days.


Posted in Cheese, Sweet Treats, What I Love to Cook | Tagged , , , , , , , , | 5 Comments

Eat, Fast and Live Longer. A 5-2 Fast Diet Recipe Idea Under 200 Calories. Cooling Mango Buttermilk Lassi.

If today’s sweltering 45 degrees celsius is anything to go by, it looks like we’re in for  a long, hot summer. After a day spent languishing in the heat, this post is short, to the point and sweet. The ideal way to beat a searingly hot day? A refreshing and cooling mango buttermilk lassi. A popular, well loved beverage of the Indian sub continent.

Thick, tangy and delicious, this version uses buttermilk in place of yoghurt keeping the calorie count down without any sacrifice in flavour. At just 106 calories per serve, this exotic smoothie is sure to become a firm summer fast day favourite.

Mango Buttermilk Lassi

Cooling Mango Buttermilk Lassi
Serves 2 (106 calories per serve)

1 mango, peeled, pitted and chopped (135 calories)
1/2 cup cultured buttermilk (50 calories)
1 teaspoon honey (20 calories)
1 teaspoon lemon juice (1 calorie)
a pinch of finely grated lemon zest (1 calorie)
a pinch of freshly grated nutmeg (2 calories)
a pinch of ground cumin (2 calories )
1/3 cup crushed ice

PLACE all ingredients into a high powered blender and process until completely smooth and creamy. Serve.

Posted in Breakfast, Fruit, What I Love to Cook, What I Love to Drink | Tagged , , , , , , , , , | 3 Comments