Fun Facts About Hokkaido. Including Three Favourite Regional Specialities. From the Delicious to the Bizarre.

As we say goodbye to 2012 and welcome a New Year I thought it would be fun to have what I can only describe as a trivial look at Hokkaido. Probably not what you would find in a guide-book. Just some quirky observations I have made over the years. And no I haven’t been drinking too much sake. Travel to a different culture often involves taking yourself outside of your comfort zone and experiencing something new and different. Providing a new perspective on how we see things.

I absolutely adore Japan. I first visited for work in the mid eighties and travelled extensively through the main island Honshu. Fast forward to the mid noughties. My husband, an avid skier discovered the powder snow in Niseko. Vast plumes and drifts of powder dumped on the island of Hokkaido by strong Siberian winds.

On a clear day, high upon the ridge of Mount Annapuri you can actually see across to Vladivostok, Russia. Strange but true Niseko is closer to Vladivostok than Tokyo. I know. I have had countless discussions about this. In summer there is a 6 1/2 hour ferry from  Otaru in Hokkaido (about an hours train ride away from Niseko) to Korsakov in Russia (just outside Vladivostok). My husband and I have had many whimsical conversations about perhaps spending a summer in Niseko and taking that ferry ride to Vladivostok. From there we would board the Trans-Siberian Express  which would take us to Moscow. Then another two-day train ride to Paris via Berlin. A pipe dream perhaps? Definitely something to add to our bucket list.

But I digress. Perhaps because there is so much to tell you about this fascinating part of Japan. Despite the island being practically submerged by snow for at least six months of the year, Hokkaido’s primary industries involve agriculture and fishing. And this brings us back full circle to my current favourite regional specialities.

Regional Speciality No 1. Choux Pastry Puffs filled with Custard Cream.

cream puff japanese

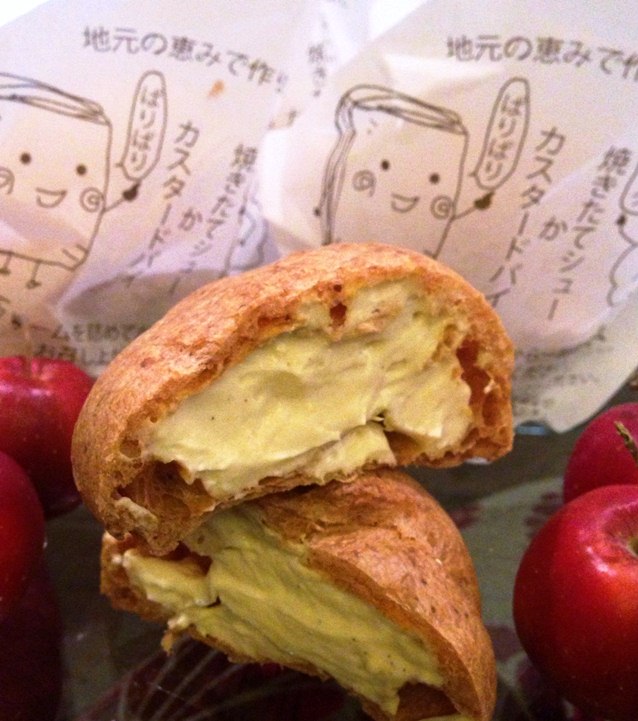
These are large and substantial. Filled with a lush custard cream only once you order them. With strict instructions that they are best consumed immediately or within the hour. At the very most two. I love the cute tissue paper packaging. Little sleeves adorned with cream puff men imploring you to eat them.

Hokkaido is well-known for its dairy products. Ice cream  yoghurt, milk and cheese. The whole of Japan has the most amazing cake shops filled with jaw dropping gateaux and tortes. So naturally these choux pastry puffs are top of my list.

These particular beauties were purchased from the Fuji Cake Shop in Kutchan town. Just around the corner from my favourite Japanese supermarket. The Coop. Opposite Kutchan train station and the all important taxi rank for lugging home the groceries. I have on occasion also purchased them from the farm-gate so to speak at Milk Kobe en route to the Hilton at Niseko Village. Well worth a visit but perhaps not as easy to access without a car.

Regional Speciality No 2. King Crab. Any Which Way.

KingCrab

Hokkaido is well known for its seafood. King crabs are a local delicacy and in season in winter. At the height of the ski season. These are delicious whichever way you care to consume them. Available fresh or frozen. From the supermarket, souvenir shop or specialist seafood providore. Do not leave Niseko without trying them. Chilli Crab Ramen. A favourite, local dish. Available on piste at Hanazono 308. I have truly lost count of the number of times I have specifically skied to Hanazono for a lunch time fix.

Regional Speciality No 3. Chocolate Coated Potato Chips.

ChocolatePotatoChips

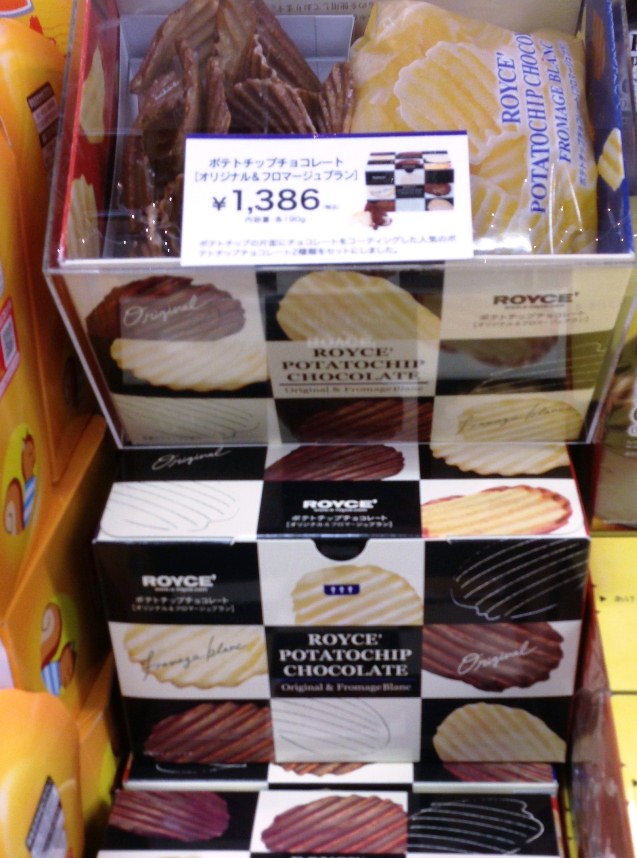
Hokkaido is famous for its potatoes. A local delicacy. Every time we visit Hokkaido we are confronted by these chocolate covered potato chips. As much as I adore Hokkaido potatoes I have never been able to bring myself to eat these. To my western palate they seem bizarre. I have included these solely for their quirkiness. It must be a Japanese umami sweet- salty flavour combination thing. All I know is that Japanese tourists buy these to fulfill their omiyage gift giving traditions in droves. I have witnessed it with my own eyes. My children have tried them though with mixed reactions. Two think they are amazingly good. The other is not quite sure. I think I’ll stick with eating my delicious Hokkaido potatoes au natural. Or transformed into gnocchi. As we intend to do tonight with Motoko’s home-grown potatoes.

The regular potato chips sans chocolate are delicious. There is even a Calbee potato store at New Chitose Airport that freshly fries your chips to order. Crinkle or thinly cut. With preferred seasoning.

And there you have it. A fun, if trivial, look at Hokkaido. Here’s hoping you have a wonderful start to the New Year and that 2013 brings you much success and happiness.

Posted in Musings & Inspiration | Tagged , , , , , , , | 6 Comments

The Ultimate Japanese Convenience Food. Gyoza.

gyoza cookedWe love gyoza. Plump little Japanese dumplings filled with meat and vegetables. Their bottoms fried to a golden hue and tops softly steamed to silky perfection. They are available everywhere in Niseko. On and off piste. Always on the menu at the local izakaya to have with a drink and the ramen and noodle houses as an appetiser before the main course.

With three hungry teenagers in tow I paid a visit to the local Japanese supermarket in Kutchan town to stock up on supplies. I now have a refrigerator full of Japanese convenience food to satisfy the hungriest and greediest of them all. Gyoza, ramen, soba, pork or chicken buns, edamame and even tempura prawns are all available in handy convenience packs. With a minimum of fuss an authentic Japanese meal can be on the table in minutes.

Here’s how its done. Buy a packet of prepared gyoza from the Japanese supermarket. Any brand will do (it has to really as I neither speak Japanese or read kanji or hiragana).  Be guided by the pictures.

gyoza packet

Heat a pan on medium with a little olive oil. Sear the bottoms of the gyoza until they are golden brown. Add 1/2 a cup of water and the contents of the seasoning sachets. Steam until the liquid has evaporated and serve.

So easy that even my teenagers can prepare these for themselves. With unrestricted access to the refrigerator they will probably eat a whole packet each. The ski lifts here open at 8.30 am and operate until 9 pm at night. Often my little darlings ski home at around 5 pm. Raid the fridge and can be back out there under lights until the last run.

I myself prefer to pay a relaxing visit to the soothing mineral waters of the onsen and then visit one of the many izakaya and restaurants for a bite to eat.  Tonight my husband and I are off to ABuCha for sukiyaki. Whilst I adore these gyoza too, when I’m on holiday my children can fend for themselves. Fortunately these gyoza are also available in Japanese supermarkets back at home. So you don’t have to wait for a trip to Japan to enjoy them.

Posted in Small Bites, To Serve with Drinks, What I Love to Cook | Tagged , , , , , , | Comments Off on The Ultimate Japanese Convenience Food. Gyoza.

Rainy Day Ramen. Hirafu Village.

Niseko Ramen

Its raining in the village today. It’s quite warm at zero degrees celsius  This is the first time in six years we have experienced rain. Usually its a snow storm or “brizzard” that puts the lifts on hold and gives us the opportunity to do something other than ski.

No worries. Time to reacquaint ourselves with the village. Discover the new. Revisit old haunts. The Japanese certainly have a quirky sense of humour. Walking around the village this sign caught my eye. We are definitely eating here. For many years we religiously ate spicy ramen for lunch at a barely off piste restaurant called Hirafu Fleur. Big steaming bowls of ramen served with a chilli rating of 0 for the timid to a searing 7 for the firebrands. A rating of 3 was more than enough for most patrons.

Last year with all the redevelopment in the village our lunch time haunt disappeared. We are hoping that Niseko Ramen turns out to be our old friends from Hirafu Fleur.

NisekoRamenRestaurant

Posted in Musings & Inspiration, Where I Love to Eat | Tagged , , , , , | Comments Off on Rainy Day Ramen. Hirafu Village.

Ohayo Gozaimasu. The Paddington Foodie in Japan.

japan air

Ohayo Gozaimasu. That’s Good Morning in Japanese. It’s 6:30 in the morning and we have just landed at Narita Airport in Tokyo. In transit. Waiting for our connecting flight to Sapporo in Hokkaido.  The northern most island of Japan. Then onwards to our final destination.  Niseko. My family is excited about the powder skiing. We will be hitting the slopes sometime this afternoon.

I love Hokkaido for its produce. Fresh, beautiful seafood.  Sashimi.  Sushi.  Coincidentally, it’s king crab season at the moment.  An added bonus. We especially adore the King Crab Chilli Ramen at Hanazono. There’s also soba. Miso.  Onigiri. Katsu-don.  Teriyaki.  Teppanyaki.  Okonomiyaki. The list goes on.

A little known fact. Hokkaido is famous for potatoes.  And a myriad of other fruits and vegetables. In summer, I like to think of it as the food bowl of Japan. My friend Motoko had an especially good crop this summer and we will be making gnocchi from her home-grown potatoes for dinner on Year’s Eve. Sad but true, I packed a potato ricer of all things! We will also be having our annual fondue night. A great tradition we look forward to each year.

There are a lot of great foodie surprises in store. The food in Japan is superb. A food lover’s paradise. We will be so spoilt for choice! And yes we will be stopping in Tokyo on our way home. All I have to do now is work out how to fit in both skiing and blogging.

Posted in Musings & Inspiration | Tagged , , , , | 2 Comments

From the Vietnamese Imperial Court. Spring Rolls With Pork, Crab and Prawns.

SpringRollServed

Something substantial to serve with drinks.  From the Vietnamese Imperial Court. Spring Rolls with  pork, prawn and crab no less. Fit for an emperor. Crisp, crunchy and delicious. And so easy to prepare.

SpringRollFilling

All the work is in the preparation of the filling. Slice and dice.  Sauté in a smoking wok.  Cool.  Now you’re ready to roll. The fun begins. Truly.

SpringRollWrapper

Take a wrapper. Position a heaped tablespoonful of filling on the diagonal. A tight wrap and roll. Away from you. Tuck in the sides as you go.

SpringRollsWrapped

Soon you will have a plate full of these swaddled beauties. A quick dip into very hot oil for a crisp and crunchy finale.

SpringRollFrying

Ready to be devoured with a sweet chilli dipping sauce. Deliciously naughty. But nice.

SpringRollsPlatter

Imperial Spring Rolls With Pork, Crab and Prawns.

Makes 30 large spring rolls

2 packets large spring roll wrappers, available in the freezer section of any good Asian supermarket

500 grams​ minced pork
15​ uncooked king prawns, peel, de-vein and cut prawn meat into roughly 1.5 cm dice
2​ carrots, peeled, finely sliced carrots and cut into a fine julienne
1 cup​ finely sliced fresh black cloud ear fungus
1 small can​ crab meat
200 grams​ bean vermicelli
1 red onions, finely chopped
5​ cloves garlic, finely chopped
thumb sized piece ginger, finely chopped
1 long red chilli, finely chopped
1 /4 chinese cabbage, shredded
6 long green spring onions, finely chopped
1 teaspoon sea salt
1 teaspoon pepper
1 teaspoon white sugar
2 tablespoons oyster sauce
30​ spring roll wrappers
vegetable oil for deep-frying
sweet chilli sauce for dipping

PLACE vermicelli in medium heatproof bowl. Cover with boiling water; stand until just tender. Drain. Chop into 5 cm lengths.
HEAT  2 tablespoons oil in wok on high heat. Sauté onions until soft and translucent.
ADD garlic, ginger and chilli. Stir for about 2 minutes.
ADD pork and sauté until golden brown.
ADD carrots, green spring onions and cabbage. Sauté  for another 1-2 minutes.
ADD prawn, crab, cloud ear fungus and lastly vermicelli. Mix all of the ingredients well and season with salt, pepper, sugar and oyster sauce.
SET aside to cool.
PLACE a rounded tablespoon of the mixture across the edge of a wrapper. Roll to enclose filling, folding in ends. Place on tray, seam-side down. Repeat with remaining mixture and wrappers. Place on tray in single layer.
HEAT oil in wok to a depth of 3 cm.  Shallow fry spring rolls in batches until browned lightly and cooked through. Drain on absorbent paper.
SERVE with sweet chilli dipping sauce.

Posted in Pork, Seafood, To Serve with Drinks, What I Love to Cook | Tagged , , , , , , , , , , | 3 Comments

The Perfect Post Christmas Panacea. Turkish Apple Tea with Raspberries, Hibiscus, Lemon and Mint.

appletea

Feeling a little fragile this morning. After a full day of festive feasting. We had a wet, dreary, rainy Christmas Day but hardly noticed. Our theme courtesy of the gorgeous Cate. White and bright. Joyous and uplifting.

christmastable2012

Today we woke to a picture perfect blue sky day right on cue for the start of the annual Boxing Day Sydney to Hobart Yacht Race.

The perfect panacea for those of us who have overindulged? Apple Tea with Raspberries, Hibiscus and Mint. Brewed from scratch. The Turkish way. Apple Tea not only soothes and cleanses but speeds up the metabolism. Increase the anti oxidant and Vitamin C hit with raspberries, hibiscus, lemon and mint.

In summer I like my tea iced. The quintessential thirst quencher.  Apple tea is delicious hot or cold. On its own with a little honey, lemon and mint. Or mixed with fruit. Ripe summer berries are abundant at this time of year and  take this tea to an extra level of deliciousness. I like to add them frozen in place of ice cubes. Come to think of it a shot of vodka wouldn’t go astray. Perhaps another time. Certainly not today. I seriously need to detox.

appleteabrew

Turkish Apple Tea with Raspberries, Hibiscus, Lemon and Mint.

Makes 6 -8 cups

3 granny smith apples, unpeeled and uncored, cut into quarters
1 whole orange,  unpeeled, cut into quarters
1 cinnamon quill
2 whole cloves
4 cups water
1 strong cup of hibiscus tea, or your favourite fruit tea
1 1/2 cups frozen raspberries
3 – 4 sprigs of mint, rinsed
1 lemon, sliced
honey or sugar to taste

PLACE apples, oranges, cinnamon, cloves and water in a saucepan. Bring to  boil on high heat.
TURN  heat down and simmer until the fruit is tender.
REMOVE cinnamon quill and cloves.
STRAIN mixture through a fine sieve into a large jug pushing gently with the back of a spoon to remove as much liquid from the fruit pulp as you can.
MEANWHILE brew a strong cup of hibiscus tea. Add to the jug with the apple tea.
PLACE jug in the refrigerator to cool.
WHEN ready to serve add frozen raspberries, fresh mint and lemon slices to the jug. Sweeten with a little honey or sugar to taste.

Posted in What I Love to Drink | Tagged , , , , , , , , , , | Comments Off on The Perfect Post Christmas Panacea. Turkish Apple Tea with Raspberries, Hibiscus, Lemon and Mint.

From Our Family Table. Christmas Turkey. Brined, Roasted and Stuffed.

turkeyroasted

Success! There is really only one way to describe our brined, roasted and stuffed turkey. Moist, flavoursome and delicious. Appreciated by our guests. And most importantly completely demolished. Always a good sign. A most fitting finale for my Christmas recipe posts.

There is absolutely no doubt about it. Brining works. A very well-kept secret. It’s far less daunting than it sounds. All the work is in the preparation. Roasting the turkey is a snap. Here’s how I did it. The photos show the process. The recipes as always are towards the bottom of the post.

First thing in the morning I removed the turkey from the brine and sat it in a sink full of cold water for 15 minutes to flush out any excess salt. Then drained it well and patted it inside and out with paper towels. To help achieve a crispy skin when roasted.

turkeystuffingingredients

Next step? Preparing the stuffing. I used caramelised onions, apples, sage, chicken stock  and toasted, crumbled bread.

turkeystuffing

Remember to preheat the oven to 180 C. Best to do this while stuffing and trussing the turkey.

turkeybedvegetables

Set the turkey on a bed of vegetables to roast with a cup or so of stock. These vegetables will form the basis of a great gravy.

turkeytrussed

Brush the turkey liberally with butter.Cover with tin foil and roast for about 2 – 2 1/2 hours, basting every 30 minutes or so. Remove the tin foil for the final 30 minutes to crisp the skin.

The result? Tender moist turkey. With a crispy skin. Not salty at all. And neither were the stuffing or the gravy. This method for roasting a turkey is definitely a keeper in our house.

From our family table to yours, we wish you all a wonderful and delicious Christmas.

turkeyplated

HOW TO ROAST AND STUFF A TURKEY

This method works equally well for either a brined or non brined turkey. For brining instructions refer to my previous post. To maximise flavour I like to roast my turkey on a bed of vegetables. This also provides a great base for a fantastic gravy.

Roasting time: about 2 hours ( 1 1/2 hours under a tin foil tent, 1/2 hour uncovered)
Resting time before carving : at least 30 minutes

1 free range turkey, weighing  approx 4 – 5 kg
1 quantity of your favourite stuffing, I used Caramelised Onion, Apple and Sage, recipe follows below.
1/2 cup butter
1 cup chicken stock

For the Bed of Vegetables

2 onions, peeled and thickly sliced
1 leek, trimmed and sliced lengthwise
2  carrots, sliced lengthwise
2 sticks of celery, chopped
6 cloves of garlic, bruised
small handful of herbs; I used parsley, sage and thyme
drizzle of olive oil

For the Gravy

1 heaped tablespoon plain flour
1 cup red or white wine
4 cups hot chicken stock
pan juices and vegetables

Roasting and Stuffing the Turkey

TAKE turkey out of the fridge at least 1/2 hour before roasting. Pat inside and out with paper towels.
PREHEAT oven to 180 C and arrange a rack in the lower third of the oven.
PREPARE the stuffing. Loosely fill the small neck cavity with stuffing. Fold neck skin under body and fasten with a skewer. Loosely fill large body cavity with stuffing. Using your fingers gently loosen and prise open skin over the breast of the turkey. Fill with a thin layer of stuffing to protect the breast while roasting.
TUCK wing tips back and underneath breast. Tie drumsticks together with kitchen twine.
PILE all the vegetables and herbs into the centre of a roasting pan. Drizzle with a little olive oil. Arrange into an even layer. This is the vegetable bed upon which the turkey will roast.
TRANSFER turkey, breast side up, to the roasting pan. Place on the vegetable bed.
RUB turkey all over with softened butter and season. If the turkey has been brined season with pepper only, no sea salt.
POUR chicken stock into the pan. Cover turkey breast with a sheet of baking paper and then cover the whole roasting tin with a tent of tin foil.
ROAST turkey for 30 minutes. Baste with pan juices, lifting foil and baking paper. Continue roasting and basting every 30 minutes thereafter until juices run clear when a skewer is inserted into the thigh. About 2 hours for a 4 – 5 kg turkey. Remove tin foil for the last 30 minutes of roasting to achieve a brown and crisp skin.
IF pan juices evaporate to a glaze while roasting, add a little more chicken stock to the pan.
REMOVE the turkey from the oven. Transfer to a platter,  cover with tin foil and let it rest for at least 30 minutes before carving.
MEANWHILE make the gravy.

Making the Gravy

USING a spoon remove most of the fat from the roasting pan.
PLACE the pan on the stove over medium heat. Add flour to the pan. Stir with a wooden spoon to incorporate with the pan juices and vegetables. Break the soft vegetables up as you go.
DEGLAZE the pan with the wine. When the alcohol has cooked away add the hot chicken stock.
BRING the pan to the boil, scraping up any bits that are catching on the bottom. Reduce heat and simmer until the gravy thickens to a good pouring consistency. About 10 minutes.
STRAIN the gravy through a sieve into a clean bowl. Discard any vegetables and herbs left behind.
SEASON to taste and pour into a gravy boat.

Caramelised Onion, Apple and Sage Stuffing

1/4 cup butter
2 tablespoons olive oil
3 cups onion, chopped
6 cups stale bread, baked in oven until golden and crumbled
1 egg
3 green apples, peeled, quartered and finely sliced
3 tablespoons fresh sage, chopped
3 sprigs fresh thyme , leaves stripped
1 tablespoon brown sugar
1/4 cup parsley, chopped
3/4 cup chicken stock or more to moisten
sea salt and freshly ground black pepper

MELT butter and olive oil in a small fry pan on low heat.
SAUTÉ onion with brown sugar, thyme and a generous pinch of salt for 10 minutes or until softened and caramelised.
IN A SEPARATE bowl, combine caramelised onion with crumbled bread, apple, and herbs.
ADD egg and enough chicken stock to moisten. Season well with salt and pepper.

Posted in Poultry, What I Love to Cook | Tagged , , , , , , , , , | 3 Comments

Talking Turkey. With Apple Cider and Spice. Brining Tonight. Roasting Tomorrow.

turkeybrinesolution
Tonight I’m brining a turkey. For lunch tomorrow. OK.  I’ll admit that I have never ever brined a turkey before and to the best of my knowledge have never even eaten a brined turkey. I do recall a neighbour brining a turkey last Christmas Eve and remember thinking what a novel idea. Apparently it’s a popular American technique. Soak a turkey in a brining solution prior to roasting. A sure fire way to add moisture and flavour, and keep the breast from drying out during baking. I’m up for it and hope my guests are too.

brine ingredients

Fortunately it’s a laid back gathering – turkey, salads and fresh baguettes. I’m praying that the turkey doesn’t end up a salty, sodden mess. I’m filling the brined turkey with an apple, sage and caramelised onion stuffing so have decided to use an apple cider and spice brining solution.

turkey in brine

Apple Cider and Spice Brine

6 – 7 kg turkey
6 cups (1.5 litres) apple cider
2 large onions, roughly chopped
2 large apples, roughly chopped
4 stalks celery, roughly chopped
4 carrots, roughly chopped
1 tablespoon peppercorns
6-8 star anise
2-3 cinnamon quills
3 bay leaves
6-8 sprigs thyme
1 cup sea salt
1/2 cup sugar
4 cups (1 litre) water

COMBINE all ingredients in a large pot. Stir until salt and sugar dissolve. Bring to a boil. Turn off heat and cover. Allow to cool completely. Pour into a large brining bag or pot.

PLACE uncooked turkey breast side down in brining solution. Refrigerate overnight, for about 10 – 16 hours. If the brine doesn’t cover the turkey completely, turn the bird half way through the soaking period.

WHEN ready to roast turkey. Remove from brine and submerge in a pot or sink of fresh, cold water. Allow to sit in clean water for 15 minutes to remove excess salt. Remove from water. Pat dry with paper towels.

PREPARE according to your normal roasting method.

Posted in Poultry, What I Love to Cook | Tagged , , , , , , | 2 Comments

Cool as a Christmas Cucumber Canapé. Viviane’s Tzatziki Rolls.

tzatziki canape

It’s the countdown to Christmas. Lots of last-minute get togethers. Here’s a very easy canapé idea. A de-constructed tzatziki. I stumbled upon this fabulous canapé idea on Viviane’s gorgeous blog @ Down Under. Viviane is French and hails from New Zealand. Just across the ditch. But we won’t hold that against her. There is a very friendly rivalry between the Aussies and Kiwis.

I love the food scene in New Zealand. Its fresh and innovative. I love Viviane’s blog. For its simplicity and deliciousness. I’m so glad I found her. These little Tzatziki Rolls are perfect for summer entertaining. As Viviane puts it they’re fresh, creamy and crunchy all in one bite. And so very easy to assemble.

I was a little apprehensive at first about how thick the yoghurt needed to be to hold together in the canapé. My solution? Drain Greek yoghurt in a muslin lined sieve in the fridge overnight. Perfect!  Next day I made the filling adding a little grated lemon zest to the mix. I assembled these pretty rolls just before serving. Looking at the photos I’m imagining how pretty they would look for Christmas topped with a little salmon roe.  Bravo Viviane!

tzatziki canape ingredients

Viviane’s Tzatziki Rolls 

http://atdownunder.com/2012/12/13/roll-up/

Makes a dozen
2 small Lebanese cucumbers, ends cut off and then finely sliced (2-3 mm) lengthwise.
330 g yoghurt, drained
1 small bunch of mint, rinsed and leaves finely chopped + extra leaves kept for garnish
1 garlic clove mashed or 1 big garlic spear head finely chopped
Salt and pepper

Lightly sprinkle salt over each side of cucumber slices and let them rest for 20 minutes. In a bowl mix together drained yoghurt  chopped mint, garlic / garlic spear, salt and pepper. Rinse cucumber slices under running water and pat them dry. Lay cucumber stripe flat, scoop a teaspoon of yoghurt  place it at the extremity of the stripe and roll. Fasten the roll with a toothpick and a mint leave. Keep on with the rest of cucumber slices and yoghurt filling.

Posted in To Serve with Drinks, Vegetarian, What I Love to Cook | Tagged , , , , , , | 2 Comments

The Accidental Gift. Of BBQs, Pizza Ovens and Clay Paving Bricks.

pizza and pavers

Christmas gifts. They say it’s the thought that counts. A well-chosen gift speaks volumes. Here is an accidental gift. Quirky and inexpensive. A definite conversation piece.

At home with my parents we decided to make pizza for lunch. My parents have only very recently discovered the Internet. Bookmarked on their computer? My blog. Consummate foodies at heart they love to read about what we’re eating.  My father is especially tickled pink when I publish posts about his garden, particularly when I photograph his beloved produce.

There was another post that piqued their imagination. A few months ago I travelled to Daylesford to visit one of my oldest friends. Jane.  In her garden there is a rather impressive wood fired pizza oven. Sadly, the weather transpired against us and we didn’t get the opportunity  to fire up that oven. Jane’s husband, the rather resourceful Russell converted  his hooded BBQ under cover of the verandah into a pizza oven using garden pavers.

Pizza for lunch. A light bulb moment. I’d convert my Dad’s hooded BBQ into a pizza oven. All I had to do was visit the local Bunnings Warehouse. How difficult could that be? A quick search on the website.  Stone pavers in stock. Tick. I’d be there and back in half an hour. Make the pizza dough. Leave it to prove. Jump in the car.  Armed with my holy grail. Three rules for pizza stone sourcing.

  1. To avoid exploding pizza stones.  Do not use any sort of imitation or reconstituted stone.
  2. Absolutely no cement. It can be highly combustible and harbours cement dust and other nasties.
  3. Unglazed is best. I certainly didn’t want to be baking any unidentified chemicals used in the sealants into my pizza.

What can I say  forewarned is forearmed. It seems every single brick, tile and paver carried by Bunnings, our largest hardware chain, is made of reconstituted cement. It might look like sandstone, bluestone, limestone or any other stone you can think of but it certainly wasn’t natural. It soon became apparent that what I really needed was a simple, unglazed, red clay quarry tile, brick or paver.

My options? Put in a special order. Unlikely to be filled until late January. Everything closes for the summer. Or… at my mother’s suggestion take another short drive. This time to the local quarry and landscape supplier. With a large, thriving garden my parents certainly had the inside running of who could help me on a Sunday morning.

I can reliably tell you that the gentlemen at the quarry were amused. Very amused. But… they had exactly what I was looking for.  At a bargain basement price of 25 c per brick. At that price I bought a car boot full. To distribute as perfect “man” gifts over the Christmas season. After all what Aussie bloke doesn’t love his BBQ? The parting shot from my new found quarry friends? Be careful they don’t throw them back at you love.

paverpizza

CONVERTING YOUR BBQ INTO A PIZZA OVEN

Place your “stones” onto a cold BBQ hot plate. Lower the lid and preheat your BBQ to 200 – 250 C for at least 20 minutes, but up to an hour. Build your pizza on an oven tray sprinkled with semolina flour. Slide your pizza from the tray onto the stone, or even easier place the tray directly onto the stone. Bake for 8 – 10 minutes. Be careful not to burn the base! This pizza cooks very fast.

We were so busy admiring our handiwork and eating pizza I forgot to take photos. Apart from this one photo. Of our maiden pizza. About 5 minutes into the baking. You will have to take my word for it. The pizzas were delicious. With a thin, crisp, slightly charred crust.

For those of you who are interested in converting your BBQ into a pizza oven I can highly recommend it. Here is the link to the original blog Russell’s Little Secret. Stone Pizza complete with recipes and detailed pizza making tips.

Posted in Musings & Inspiration, Pizza, What I Love to Cook | Tagged , , , , , | 1 Comment