Lately I have been delving deep into my kitchen drawer and resurrecting recipes for old fashioned treats. The sort your grandma might have made. Some crawled on scraps of paper, others ripped from the pages of newspapers and magazines. Earmarked as keepers and haphazardly tossed into an overflowing plastic folder. Crumpled but not entirely forgotten. In amongst the baking of Vanilla Magic Custard Squares and Passionfruit and Coconut Impossible Pie, I discovered a wad of annotated recipes for old fashioned fudge. Made the traditional way with a saucepan and a sturdy wooden spoon with all natural ingredients. Fresh pouring cream, sugar, butter, vanilla and chocolate. No cheating allowed with cans of condensed milk, corn syrup, icing sugar or a favourite of our American counterparts, marshmallow fluff.
Those recipes transported me back to a family ski holiday to New Zealand when my children were younger. One of the highlights of that trip was stumbling upon the fabulous Remarkables Sweet Shop in picturesque and quaint Arrowtown. Home to a stunning array of old-fashioned home-made fudge. Rich, creamy and meltingly delicious, hands down the most delectable fudge we have ever tasted. Needless to say we developed an insatiable addiction, and once safely ensconced back hone I was eventually coerced by my children’s endless pleading to try my hand at fudge making. New Zealand style. The old fashioned way with fresh cream.
What can I say? The road to perfect fudge, whilst lusciously achievable, is also fraught with peril and danger. It took a number of attempts and many hours to recreate a fudge on par with The Remarkables Sweet Shop offerings. I discovered by first-hand experience that there’s a fine line between smooth, creamy and delectable, and a grainy, unholy mess. So much so that last Christmas I resorted to a quick and easy fool-proof recipe on the back of a condensed milk tin to create Chocolate Fudge Christmas Trees.
Browsing through that annotated wad of old-fashioned fudge recipes brought back many happy memories of that half forgotten holiday. My girls were so excited when I told them fudge making was back on the agenda. Making good use of all the annotated intelligence in those crumpled pages my latest batch worked like a dream.
Summarised below is a step by step trouble shooting guide to making perfectly smooth and creamy fudge the old fashioned way, just like a Kiwi grandma might have made. The secret to what is essentially a very simple recipe is in understanding the process and avoiding the many potential pitfalls. I know I think I’ve fallen prey to most of them in the past. Don’t be daunted by the length of the recipe. At face value, once you understand the secrets it could read something like this:
Combine cream and sugar in a saucepan over medium heat. Stop stirring when the mixture reaches boiling point, but continue cooking undisturbed until it reaches soft ball stage. Remove from heat, add butter and vanilla. Do not stir or agitate the pan. Once butter has melted pour the mixture over a bowl of chocolate chunks. Beat with a wooden spoon until the fudge thickens and loses its gloss. Pour into a greased pan to set.
Obviously making gorgeously luscious, melt in your mouth fudge is a little like riding a bike. Once you know how, you never forget. This recipe is for you girls. The next batch is on you.

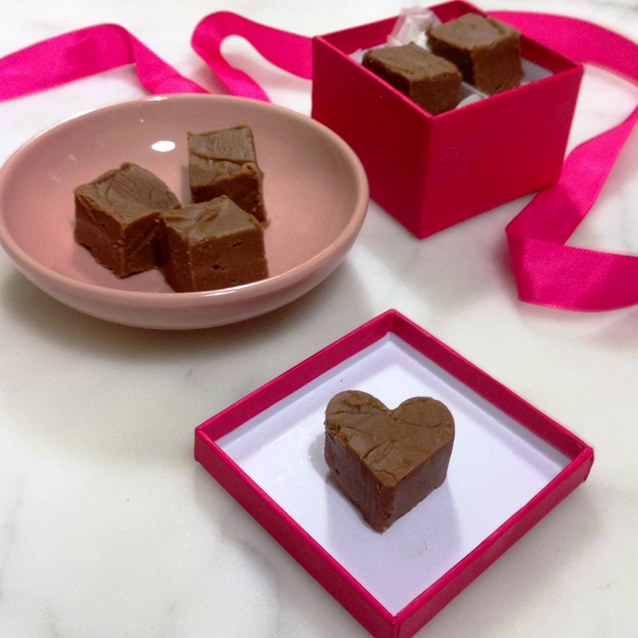
Perfectly Smooth And Creamy Fudge
4 cups caster sugar
2 cups pouring cream
250g (1 block) butter, diced into small cubes
1 tablespoon pure vanilla essence
200g block dark chocolate
LINE the base and long sides of a 18cm x 30cm rectangular slice tin or 20cm x 20 cm square baking tin with non stick paper, extending paper over sides. This makes removal of the fudge from the tin easy when set.
USING a little of the butter grease the sides of a heavy based, minimum 12 cup (3 litre) saucepan. The saucepan needs to hold twice the volume of the sugar and cream to avoid boiling over as the mixture is heated to soft ball stage, and a heavy base to avoid scorching. Buttering the sides helps stop any residual undissolved sugar crystals from clinging to the sides of the saucepan.
PLACE sugar and cream into the buttered saucepan and stir well to combine. Cook over medium- high heat stirring constantly until the mixture just begins to boil. At this point all the sugar should be dissolved. Place a tight fitting lid over the saucepan and boil the mixture for just one minute. The steam will help dissolve any residual sugar crystals that may have been thrown onto the sides of the pan while stirring. Remove the lid.
CONTINUE cooking with no further stirring at a steady simmer until the mixture reaches soft ball stage ( temperatures in the 112-115°C range on a candy thermometer). I like to reduce the heat to medium-low and place a simmer mat under the saucepan to prevent the mixture from sticking to the bottom. This step usually takes about 20 -30 minutes at medium-low heat and will entirely depend upon the size and shape of your saucepan, cooking temperature of your stove and humidity of the day. To avoid any crystallisation of the mixture and a grainy fudge, resist the urge to stir.

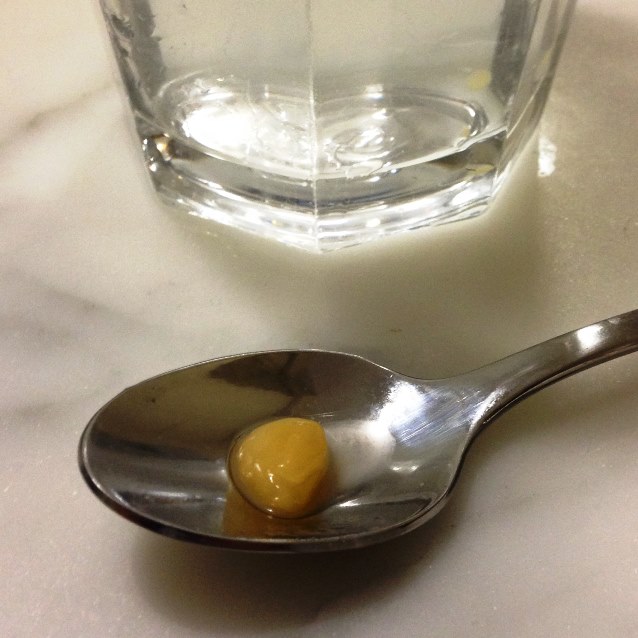
USE a candy thermometer to gauge when temperatures reach soft ball stage but remember that thermometers are not always accurate. After cooking the mixture for about 15 minutes I like to begin testing my fudge to see how close it is to soft ball stage. The old-fashioned way by dropping a small teaspoon of the mixture into a glass of cold water. The mixture should hold its shape after cooling down a little. If it flattens as it cools, it needs to be cooked for a little longer. If the mixture forms a hard ball the fudge has been taken too far and will seize as it is beaten and cools. It may be possible to rescue the fudge by taking a quarter of cup of the hot fudge mixture, diluting with an equal quantity of chilled pouring cream, then very carefully stirring the mixture back into the fudge without scraping the sides or bottom of the saucepan. Continue to cook until temperature reaches soft ball stage.
IMMEDIATELY remove the saucepan from the heat when the mixture reaches soft ball stage (115 C).
GENTLY add the diced butter and vanilla to the saucepan. Do not stir the mixture or agitate the pan. Allow to sit for five minutes as the residual heat begins to melt the butter.
MEANWHILE break up the chocolate into small chunks and place into a large mixing bowl.
CAREFULLY pour the fudge mixture into the mixing bowl containing the chocolate, without scraping the sides or bottom of the saucepan. This is important as you do not want to introduce any errant undissolved sugar crystals into the fudge mixture.
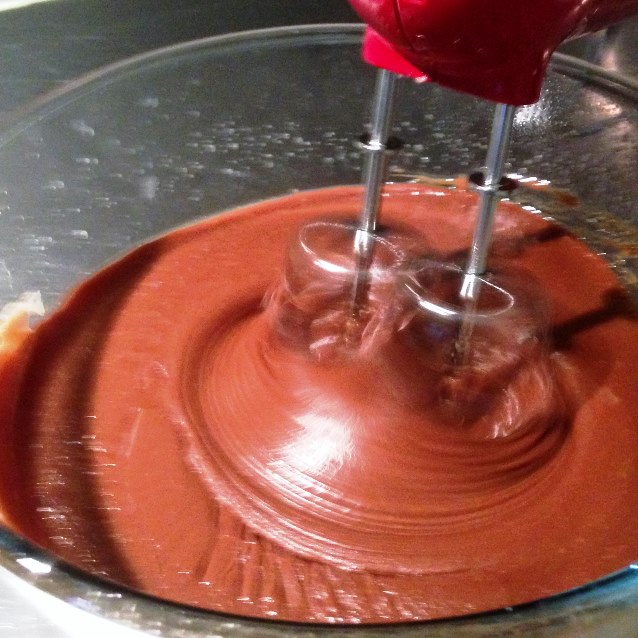
BEAT with a wooden spoon or on low speed with an electric mixer until smooth and thick. The glossy fudge mixture will lose its shine as you beat and become matte as it thickens and comes together.
POUR mixture into the prepared tin and allow to cool before turning out and scoring into small squares.

A great step by step recipe that’s got lots of useful advice. Makes me want to try it for myself! 🙂 thanks for sharing…
Once you know the pitfalls making fudge the old fashioned way is a breeze. Just as simple as the cheats way but the results are so much better. It was quite cathartic taking all those bits of paper and amalgamating all the little comments into one user friendly recipe,
Mmmmm….they look so scrumptious! And you really demystified the process of making them too! 🙂
Now I’m hoping my girls will read etween the lines and make it for themselves.
lol…how old are they? Mine are 8 and 11
14 and their brother, a true eating machine, is 16.
Oh well then, I should say you’re right! They can definitely roll up their sleeves and make a batch!
Lovely! I have never made fudge before in my life and I know my son has been missing out. This is very inspiring. I have a true eating machine too. 16 year old son… 🙂
The hand made old fashioned fudge in New Zealand was a revelation, so delicious and unbelievably smooth. And so very different from the crumbly store bought stuff that passes for fudge over here. My girls and their friends are convinced I’ve nailed it with this recipe. High praise indeed. They’ve demolished the whole tray. My son will be so disappointed he has been at school all week and there is none left for the weekend.
Ahhh, the good feeling from finally getting around to putting together all those scraps of paper. Mine are still sitting in a plastic envelope, waiting for a rainy day.
This looks delicious. Emma xx
Thanks😊
This is totally delicious but wondering if it would be a problem if I reduced the amount of sugar, I found it very sweet.
The optimum ratio for creamy fudge without the use of stabilizers (corn syrup, cream of tartar, marshmallow fluff) is 2 cups sugar to every cup of cream/milk. You could try to reduce the sugar, the fudge will take longer to reach soft ball stage but I’m not sure whether that will affect the texture of the finished product. I always use a dark 70% cacao chocolate to combat the sweetness and sometimes stir in a teaspoon or so of strong espresso coffee when I’m beating the fudge. Hope this helps.
Thanks, will try that next time, meanwhile a little bit goes a long way 🙂
Reblogged this on bevsfoodhaven and commented:
Looks lovely
Pingback: Rich And Decadent. Salted Vanilla Fudge Shortbread Squares. | The Paddington Foodie